Accessories / Mounts & Stands
Iiyama MD 052B2010 Universal Wall Mount Installation Guide
Quick installation guide for the Iiyama MD 052B2010 universal wall mount. Includes mounting steps for various wall types, screen attachment, and security locking instructions.
Table of contents
Quick Installation Guide
This document provides the necessary steps to install the Iiyama MD 052B2010 universal wall mount. Before beginning, ensure you have identified the correct mounting surface and have the appropriate hardware from the included kit.
Wall Plate Installation
The wall plate can be mounted on various surfaces. Follow the specific diagram corresponding to your wall type:
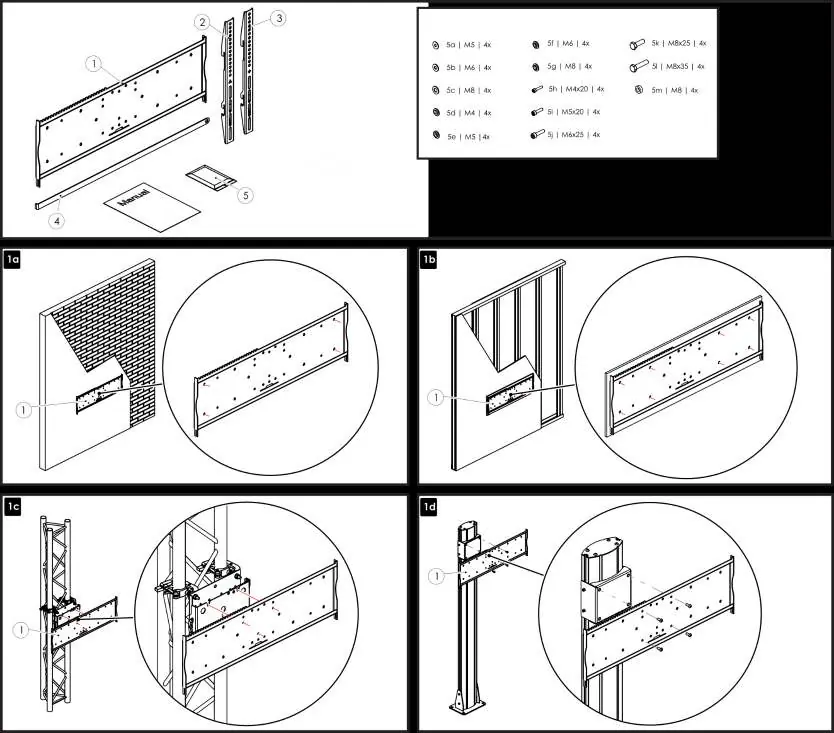
- Brick/Concrete: Secure the plate using appropriate anchors and screws.
- Stud Wall: Ensure the plate is aligned with the studs.
- Truss/Pole: Use the provided mounting hardware to attach the plate to the structure.
Ensure the wall plate is level before fully tightening the fasteners.
Display Mounting
Attach the mounting brackets to the back of your display using the provided screw kit. The kit includes various sizes (M4, M5, M6, M8) to accommodate different VESA patterns. Ensure the brackets are centered and securely fastened to the display.
Security and Final Steps
Once the brackets are attached to the display, hook them onto the wall plate. Ensure the safety mechanism engages correctly. For added security, an optional padlock can be used to lock the display to the wall mount, preventing unauthorized removal.
Manufacturer information
iiyama
Practical help
Common problems
Display is not level after mounting
Adjust the position of the brackets on the display or check the alignment of the wall plate on the mounting surface.
Screws do not fit the display
The kit includes multiple screw sizes (M4, M5, M6, M8). Verify the correct size required by your display's VESA mounting holes.
Before use
- Verify the wall structure (brick, stud, truss, or pole) is capable of supporting the display weight.
- Identify the correct screw size (M4, M5, M6, or M8) for your display.
- Ensure all mounting hardware listed in the parts list is present.
- Use a level to ensure the wall plate is perfectly horizontal.
Images and diagrams
- Steps 1a-1d: Illustrate mounting the wall plate to different surfaces (brick, stud, truss, pole).
- Steps 2a-2b: Show the attachment of brackets to the display.
- Step 3: Demonstrates hanging the display onto the wall plate.
- Step 6: Shows the optional padlock installation for security.
Model compatibility
- Compatible with various wall types including brick, stud, truss, and pole structures.

Manual page author
Michael Turner
Technical manual editor
Reviews PDF manuals for structure, safety notes, and practical product details so readers can find the right information quickly.