Electronics / Networking
User Manual for InLine 63622I 2-Port DisplayPort USB KVM Switch
Quick installation and operation guide for the InLine 63622I 2-Port DisplayPort USB KVM Switch. Learn how to connect your devices, use hotkeys, and configure the Smart Touch button for efficient switching between two computers.
Quick answers from the manual
Quick answer
- The InLine 63622I is a 2-port DisplayPort USB KVM switch. You can switch between two computers using the front-panel Smart Touch button or by using keyboard hotkeys (default: Scroll Lock + Scroll Lock + command). p. 1, 3
Key actions
- Switch PC Port p. 2, 4
- Start Autoscan p. 2, 4
First start
- Power off all devices, connect console peripherals, power on monitor, power on KVM, connect PC cables, power on PCs. p. 1, 3
Problems and fixes
Hotkey sequence not recognized
Ensure each keystroke is pressed within 2 seconds.
p. 2, 4Technical specifications
| Parameter | Value | Meaning | Pages |
|---|---|---|---|
| Max Resolution | 2560 x 1600 | Maximum digital video resolution supported. | p. 1, 3 |
Where to find it in the PDF
- Installation p. 1, 3
- Quick Reference / Hotkeys p. 2, 4
Table of contents
Manual images
Click an image to enlargeQuick Guide from the Manual
The InLine 63622I is a 2-port DisplayPort USB KVM switch designed to control two computers using a single keyboard, mouse, and monitor. It features a Smart Touch button for manual switching and supports keyboard hotkeys for advanced control. Ensure all devices are powered off before installation.
Installation
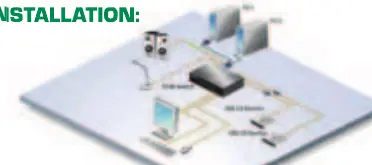
- Power Off: Turn off your KVM switch, monitor, and all computers.
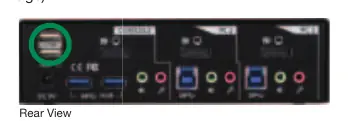
- Connect Console: Connect your shared USB keyboard, USB mouse, DisplayPort monitor, speakers/headphones, and microphone to the console section of the KVM switch. Note: The top-left two USB ports are reserved for the keyboard and mouse.
- Power On Monitor: Turn on your monitor.
- Power On KVM: Connect the external power adapter to the KVM switch.
- Connect PCs: Connect each PC to the KVM using DisplayPort cables, USB (Type A to Type B) cables, and audio/mic combo cables.
- Power On Computers: Turn on your computers.
- Connect USB Devices: Connect your USB peripherals to the USB hub ports (the two blue ports on the back).
Operation
You can control the KVM switch using two methods:
- Front-Panel Smart Touch Button: Press the button on the front panel to switch directly to the respective PC port.
- Keyboard Hotkeys: Use keyboard sequences to switch ports, manage audio, or control the USB hub. The default hotkey sequence starts with Scroll Lock + Scroll Lock.
Important Hotkey Commands
- Select PC Port: ScrLk + ScrLk + (1-2)
- Autoscan: ScrLk + ScrLk + S
- Toggle Beeper: ScrLk + ScrLk + B
- Bind/Unbind PC and Hub: ScrLk + ScrLk + Z (Bind) / X (Unbind)
Note: Each keystroke within a hotkey sequence must be pressed within 2 seconds for the command to be recognized.
Technical Specifications
- Video Interface: DisplayPort
- Resolution: Up to 2560 x 1600 (digital)
- USB Support: USB 3.0 (10x faster than USB 2.0)
- Emulation: TTU (True Transparent USB) for keyboard and mouse compatibility
Manufacturer information
InLine
Practical help
Common problems
Hotkey sequence not recognized
Ensure each keystroke in the sequence is pressed within 2 seconds.
USB devices not working
Ensure they are connected to the dedicated USB hub ports (the two blue ports on the back).
Before use
- Power off all devices before connecting cables.
- Ensure you have DisplayPort cables, USB A-to-B cables, and audio cables ready.
- Connect keyboard and mouse to the top-left USB ports on the console section.
- Verify the monitor is powered on before powering on the KVM switch.
Images and diagrams
- Rear View: Identifies the console ports (keyboard, mouse, monitor, audio) and the PC connection ports.
- Installation Diagram: Illustrates the connection flow between the KVM, monitor, and computers.
Model compatibility
- Designed for DisplayPort and USB 3.0 enabled computers.
- Supports high-profile users including video gamers and multi-platform programmers.

Manual page author
Emily Carter
User documentation editor
Prepares concise manual descriptions and highlights the most useful setup, operation, and maintenance information for readers.