Power / Uninterruptible Power Supplies
User Manual for Vertiv SC 920 Series Secure KVM Switch
Quick guide for the Vertiv SC 920, SC 920D, and SC 920H Secure KVM Switches. Includes installation steps, troubleshooting, and safety precautions for secure dual-head setups.
Quick answers from the manual
Quick answer
- The Vertiv SC 920 series is a secure 2-port dual-head KVM switch. Installation requires connecting all peripherals and computers before powering on the unit. Do not open the enclosure, as it triggers an anti-tampering system. p. 1, 16
Key actions
- Connect peripherals p. 16
- Connect computers p. 16
- Power up p. 16
First start
- Connect all devices and computers while the KVM is powered off. Power up displays and computers, then the KVM. p. 16
Problems and fixes
All LEDs flashing
Tamper detected. Remove from service.
p. 19
No video
Check cable connections and resolution settings.
p. 21Maintenance and reset
- Restore-to-Factory-Default (RFD) function is available via a physical control button on rear panel. p. 6
Technical specifications
| Parameter | Value | Meaning | Pages |
|---|---|---|---|
| Power | 12V DC / 1.5A | Maximum power requirement | p. 14 |
| Resolution | 3840 x 2160 | Maximum supported resolution | p. 14 |
Where to find it in the PDF
- Front Panel Features p. 12
- Rear Panel Features p. 13
Table of contents
Manual images
Click an image to enlargeQuick Guide
The Vertiv SC 920 series is a secure 2-port dual-head KVM switch designed for high-security environments. It features an always-on active anti-tampering system. Important: Do not attempt to open the product enclosure, as this will trigger the anti-tamper mechanism, rendering the unit inoperable and voiding the warranty.
Package Contents
- Vertiv Secure Product
- DC Power Supply
- User Guidance Documentation
Installation
Follow these steps to set up your KVM switch:
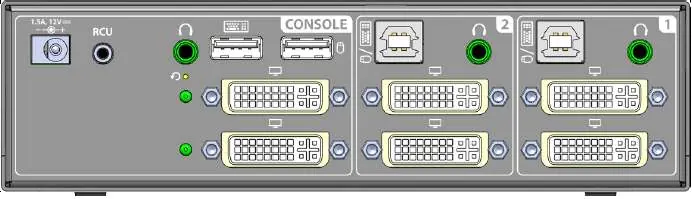
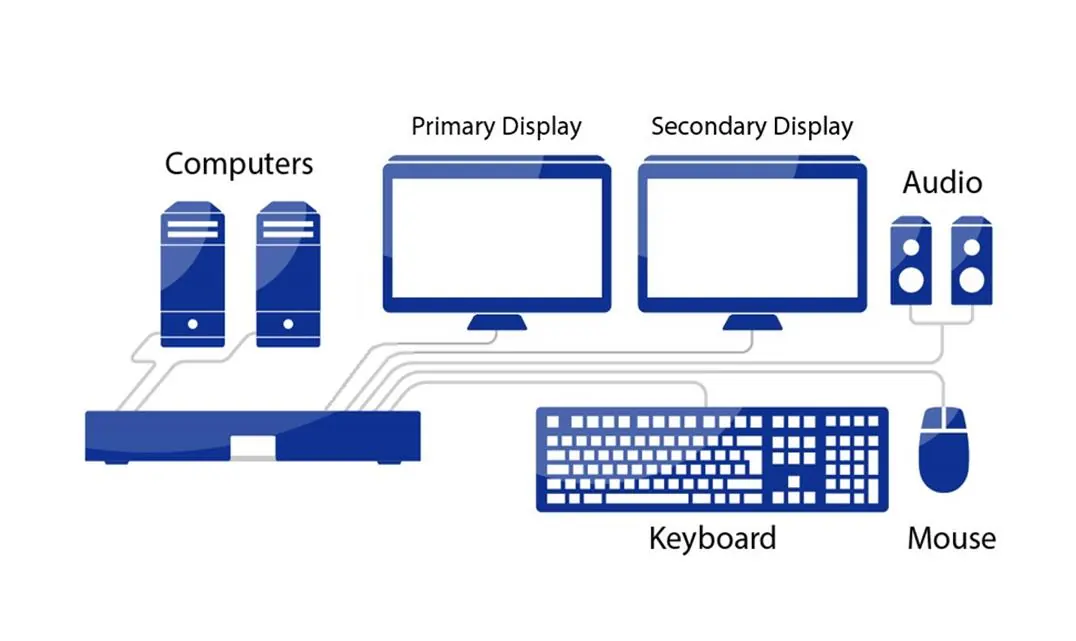
- Connecting Devices: Connect your displays, keyboard, and mouse to the console ports on the rear panel.
- Connecting Computers: Connect each computer to the corresponding interface ports using USB and video cables.
- Power Up: Connect the DC power supply to the KVM. Power up your displays and computers, then power up the KVM switch.
Note: Ensure all devices are connected before powering on the unit. Use only standard USB keyboards and mice; wireless peripherals and microphones are not supported for security reasons.
Operation
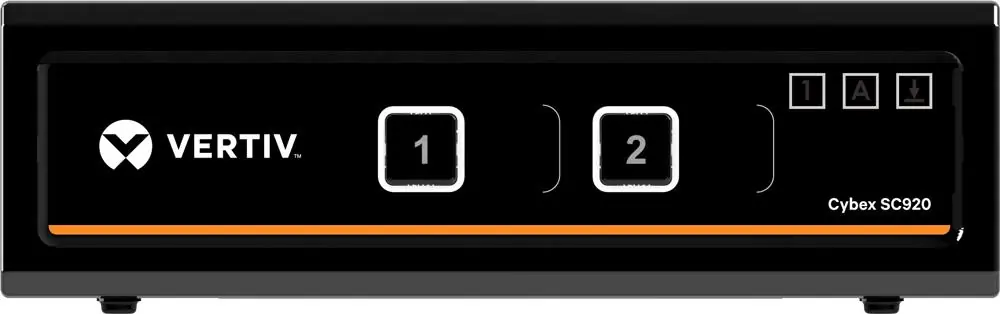
The KVM switch defaults to channel #1 upon power-up. Use the front panel push-buttons to switch between connected computers. The active channel is indicated by the illuminated push-button. Keyboard status (CAPS, NUM, SCROLL Lock) is displayed via dedicated LEDs on the front panel.
Troubleshooting
- All LEDs flashing: Indicates a potential tamper event. Remove the unit from service immediately.
- No video: Check cable connections at both ends. Ensure the display is powered and the correct input is selected. Verify that the computer resolution matches the display capabilities.
- Keyboard/Mouse not working: Ensure you are using standard USB devices. Do not use wireless devices or USB hubs. Check that cables are not crossed between channels.
Security Features
The product includes advanced isolation between computers and shared peripherals, unidirectional data flow (USB, audio, and video), and an active anti-tampering system. Holographic tamper-evident labels are applied to the enclosure; if these are missing or disrupted, do not use the product.

Technical Specifications
- Power Requirements: 12V DC / 1.5A maximum
- Resolution Support: Up to 4K-2K Ultra HD (3840 x 2160 pixels)
- Operating Temperature: 32°F to 104°F (0°C to 40°C)
- Storage Temperature: -4°F to 140°F (-20°C to 60°C)
- Humidity: 0-80% RH, non-condensing
Practical help
Common problems
All channel-select LEDs flash continuously
The product may have been tampered with. Remove from service immediately and contact technical support.
No video image
Check cable connections, ensure the display is powered, and verify that the computer resolution matches the display capabilities.
Keyboard or mouse not working
Ensure you are using standard USB devices. Wireless peripherals and devices with integrated USB hubs are not supported.
Before use
- Inspect tamper-evident labels for damage.
- Ensure all displays, devices, and computers are connected before power-up.
- Use only standard USB keyboards and mice (no wireless).
- Do not connect microphones or headsets.
- Verify cables are not crossed between channels.
Specs in practice
- Power Requirements
- 12V DC / 1.5A maximum.
- Operating Temp
- 32°F to 104°F (0°C to 40°C).
- Resolution Support
- Up to 4K-2K Ultra HD (3840 x 2160 pixels).
Images and diagrams
- Front Panel: Shows channel selection buttons (1, 2) and status LEDs (NUM, CAPS, SCROLL).
- Rear Panel: Shows console ports (keyboard, mouse, audio, video) and computer interface ports.
Model compatibility
- SC 920: DVI-I displays.
- SC 920D: DisplayPort 1.1 & 1.2 displays.
- SC 920H: HDMI displays.
- Not compatible with wireless keyboards/mice or microphones.

Manual page author
Michael Turner
Technical manual editor
Reviews PDF manuals for structure, safety notes, and practical product details so readers can find the right information quickly.