Electronics / Televisions
Quick Setup Guide for Insignia 32" and 42" LED-LCD Connected TV
Quick setup guide for Insignia 32-inch and 42-inch LED-LCD Connected TVs. Includes instructions for stand installation, wall mounting, device connections, network setup, and remote control programming.
Table of contents
Manual images
Click an image to enlargeQuick Setup Guide
This guide provides essential steps to set up your Insignia LED-LCD Connected TV. Before beginning, ensure you have installed the batteries in your remote control.
Installing the Stand
To install the stand, follow these steps:
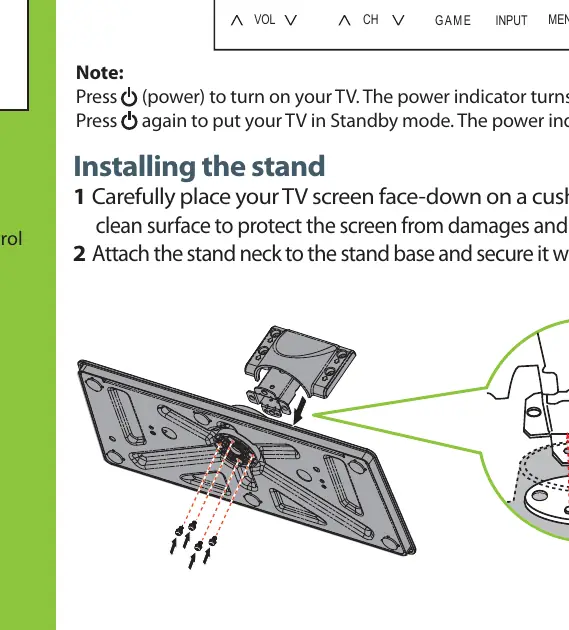
- Carefully place your TV screen face-down on a cushioned, clean surface to protect the screen from damage.
- Attach the stand neck to the stand base and secure it with four screws.
- Align the stand on the TV, insert the metal tabs into the designated slots on the TV base, and secure it with four screws.
Installing a Wall-Mount Bracket
If you prefer to wall-mount your TV:
- Place the TV screen face-down on a cushioned surface.
- Secure the wall-mount bracket to the back of the TV using the screws provided with the bracket.
Connecting Devices
You can connect various devices to your TV using the following methods:
- HDMI (Best): Recommended for the best picture quality.
- Component (Better): Use for devices with component outputs.
- Composite (Good): Use for standard video connections.
- Antenna/Cable: Connect a coaxial cable to the ANT/CABLE IN jack.
Network Setup
Connecting your TV to the internet allows for online features:
- Wired Network: Connect an Ethernet cable from your router to the ETHERNET jack on the back of the TV. Connection is usually automatic.
- Wireless Network: Press the TiVo button, navigate to the Home screen, select Connect to the Internet, and follow the on-screen instructions to set up your wireless network. You can choose to use WPS or manual security settings (WPA2).
First-Time Setup
Upon turning on the TV, the Welcome screen will appear. Follow the guided setup to:
- Select your TV signal type (Antenna or Cable).
- Perform a channel scan (if not using a cable/satellite box).
- Set the date and time.
- Install software updates if prompted.
Programming the Remote
You can program the mode buttons (DVD, STB, AUX) on your Insignia remote to control other devices:
- Press TiVo to open the Home screen.
- Navigate to Settings, then Devices.
- Select Remote control Setup.
- Choose the button you wish to program and follow the on-screen instructions.
Note: The remote must be in RF mode to use the remote setup feature.
Connected Services
Your TV provides access to various online services, including CinemaNow, Netflix, Pandora, Napster, and apps from chumby industries. Use your remote to navigate these services once the network is connected.
Practical help
Common problems
TV does not turn on
Ensure the power cable is connected and press the power button. The power indicator should turn blue.
No network connection
If using a wired connection, ensure the Ethernet cable is securely plugged in. For wireless, verify your router settings and Wi-Fi password.
Remote control not working
Ensure batteries are installed correctly. If programming the remote, ensure it is in RF mode.
No channels found during scan
If using a cable or satellite box, you do not need to scan for channels; select the correct Video Input Source instead.
Before use
- Install batteries in the remote control.
- Place the TV face-down on a cushioned surface for stand installation.
- Have your Wi-Fi network name and password ready.
- Ensure you have the necessary cables (HDMI, Ethernet, etc.) for your devices.
Images and diagrams
- The guide illustrates how to attach the stand neck and base using the provided screws.
- Connection diagrams show the location of HDMI, Component, Composite, and Ethernet ports on the back of the TV.
Model compatibility
- Supports both wired Ethernet and wireless network connections.
- Compatible with standard VESA wall mounts (200x100mm for 32" model, 200x200mm for 42" model).

Manual page author
Michael Turner
Technical manual editor
Reviews PDF manuals for structure, safety notes, and practical product details so readers can find the right information quickly.