Computers / KVM Switches
Iogear 2/4-Port 4K HDMI Splitter User Guide
Quick start guide for the Iogear 2/4-Port 4K HDMI Splitter. Includes hardware overview, installation steps, connection diagrams, and technical specifications.
Quick answers from the manual
Quick answer
- To install the splitter, connect your HDMI source to the input port, connect your displays to the output ports, and plug in the power adapter. p. 2, 3
Key actions
- Connect HDMI source to input p. 2
- Connect displays to output p. 2
- Connect power adapter p. 3
Problems and fixes
Resolution needs to be changed
Adjust the settings from the HDMI source device from its configuration menu.
p. 3Technical specifications
| Parameter | Value | Meaning | Pages |
|---|---|---|---|
| Max Distance (Source) | 6 ft | Maximum cable length from source to splitter | p. 3 |
| Max Distance (Display) | 50 ft | Maximum cable length from splitter to display | p. 3 |
| HDCP Compliance | 1.4 | High-bandwidth Digital Content Protection version | p. 3 |
Where to find it in the PDF
- Package Contents and Introduction p. 1
- Overview and Installation p. 2
- Installation and FAQ p. 3
- Compliance and Warranty p. 4
Table of contents
Manual images
Click an image to enlargeQuick guide from the manual
This document provides instructions for setting up the Iogear 2/4-Port 4K HDMI Splitter. The device allows you to send one digital high-definition video source to two displays simultaneously. It is HDCP 1.4 compliant and supports HDMI 2.0.
Overview
Front View:
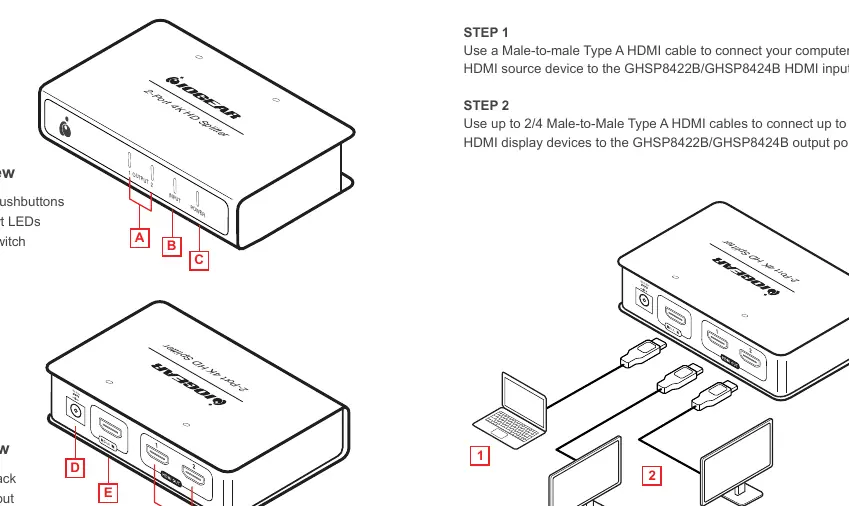
- A: Output Pushbuttons
- B: Input Port LEDs
- C: Power switch
Rear View:
- D: Power Jack
- E: HDMI Input
- F: HDMI Outputs
Hardware Installation
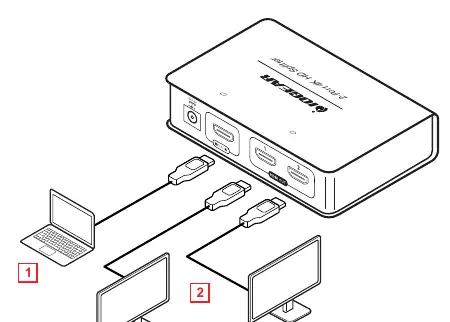
- Step 1: Use a Male-to-male Type A HDMI cable to connect your computer or HDMI source device to the HDMI input port.
- Step 2: Use up to 2/4 Male-to-Male Type A HDMI cables to connect your HDMI display devices to the output ports.
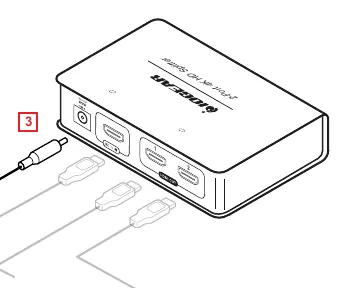
- Step 3: Plug the included power adapter into an AC power source and connect the cable to the splitter's power jack.
Note: The splitter automatically detects the resolution of the monitor connected to port 1. If you need to change the resolution, adjust the settings from your HDMI source device's configuration menu.
Technical FAQ
- Maximum Distance: Source to splitter is 6 ft; splitter to display is 50 ft.
- Cascading: Supports 1080P cascading up to 3 levels (not supported at 4K).
- EDID: Passes EDID from port 1. If port 1 is not connected, it uses a default mode.
- 3D Resolution: Supports 1080P @ 120Hz.
Practical help
Common problems
Resolution issues
Adjust the settings from the HDMI source device's configuration menu.
Cascading limitations
Cascading is supported up to 3 levels, but only at 1080P resolution, not 4K.
EDID detection
The device passes EDID from port 1. Ensure a display is connected to port 1 for optimal detection.
Before use
- Verify package contents: Splitter, HDMI cable, Power adapter, Quick Installation Guide, Warranty Card.
- Ensure HDMI source device is available.
- Ensure HDMI display devices are available.
- Check that the power outlet is accessible.
Specs in practice
- Max Distance (Source)
- 6 ft
- Max Distance (Display)
- 50 ft
- HDCP Version
- 1.4 compliant
- HDMI Support
- HDMI 2.0
Images and diagrams
- Front view identifies output pushbuttons, input LEDs, and power switch.
- Rear view identifies power jack, HDMI input, and HDMI outputs.
- Installation diagram shows source device connected to input and displays connected to outputs.
Model compatibility
- Supports all HDMI-enabled equipment (DVD players, satellite set-top boxes, etc.).
- Supports 1080P cascading up to 3 levels.

Manual page author
Emily Carter
User documentation editor
Prepares concise manual descriptions and highlights the most useful setup, operation, and maintenance information for readers.