Automotive / Car Audio
User Manual for JBL BassPro SL2 Powered Subwoofer
Quick guide for the JBL BassPro SL2 powered subwoofer. Includes installation instructions, wiring diagrams, tuning procedures, and technical specifications.
Table of contents
Manual images
Click an image to enlargeQuick guide from the manual
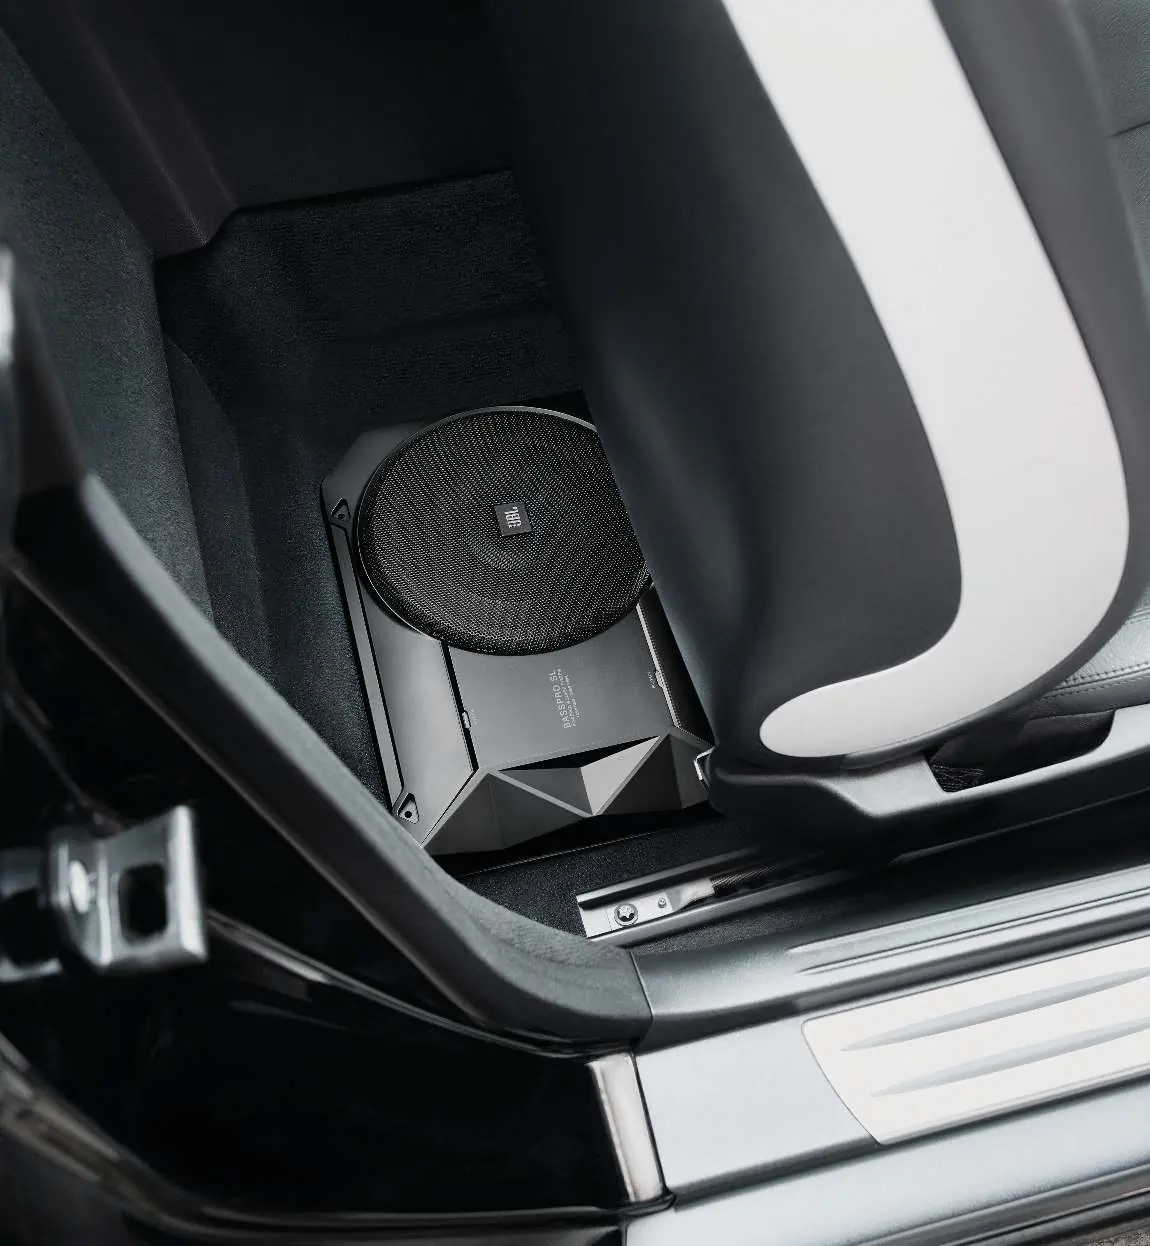
The JBL BassPro SL2 is a compact, powered subwoofer designed to fit under the front seat of most vehicles. This guide covers the essential installation, wiring, and tuning steps required to integrate the subwoofer into your car audio system. Always disconnect the vehicle's negative battery terminal before starting any installation work.
Installation
Choosing a mounting location: Select a location that does not interfere with cargo loading, rear seat folding, or trunk lid operation. The front or rear corner of the trunk or luggage compartment is recommended for "corner loading" against vehicle walls, which provides the best sonic reproduction in the 60Hz - 100Hz range.
Mounting: Ensure the mounting surface is clear of wiring harnesses, brake lines, fuel lines, or the fuel tank before drilling or screwing. Secure the unit firmly to prevent movement or vibration.
Connections
Power Connections: Connect the +BAT terminal to the battery (use #12AWG wire), the GND terminal to a bare metal chassis point (use #12AWG wire), and the REM terminal to the head unit's remote turn-on output (use #18AWG wire).
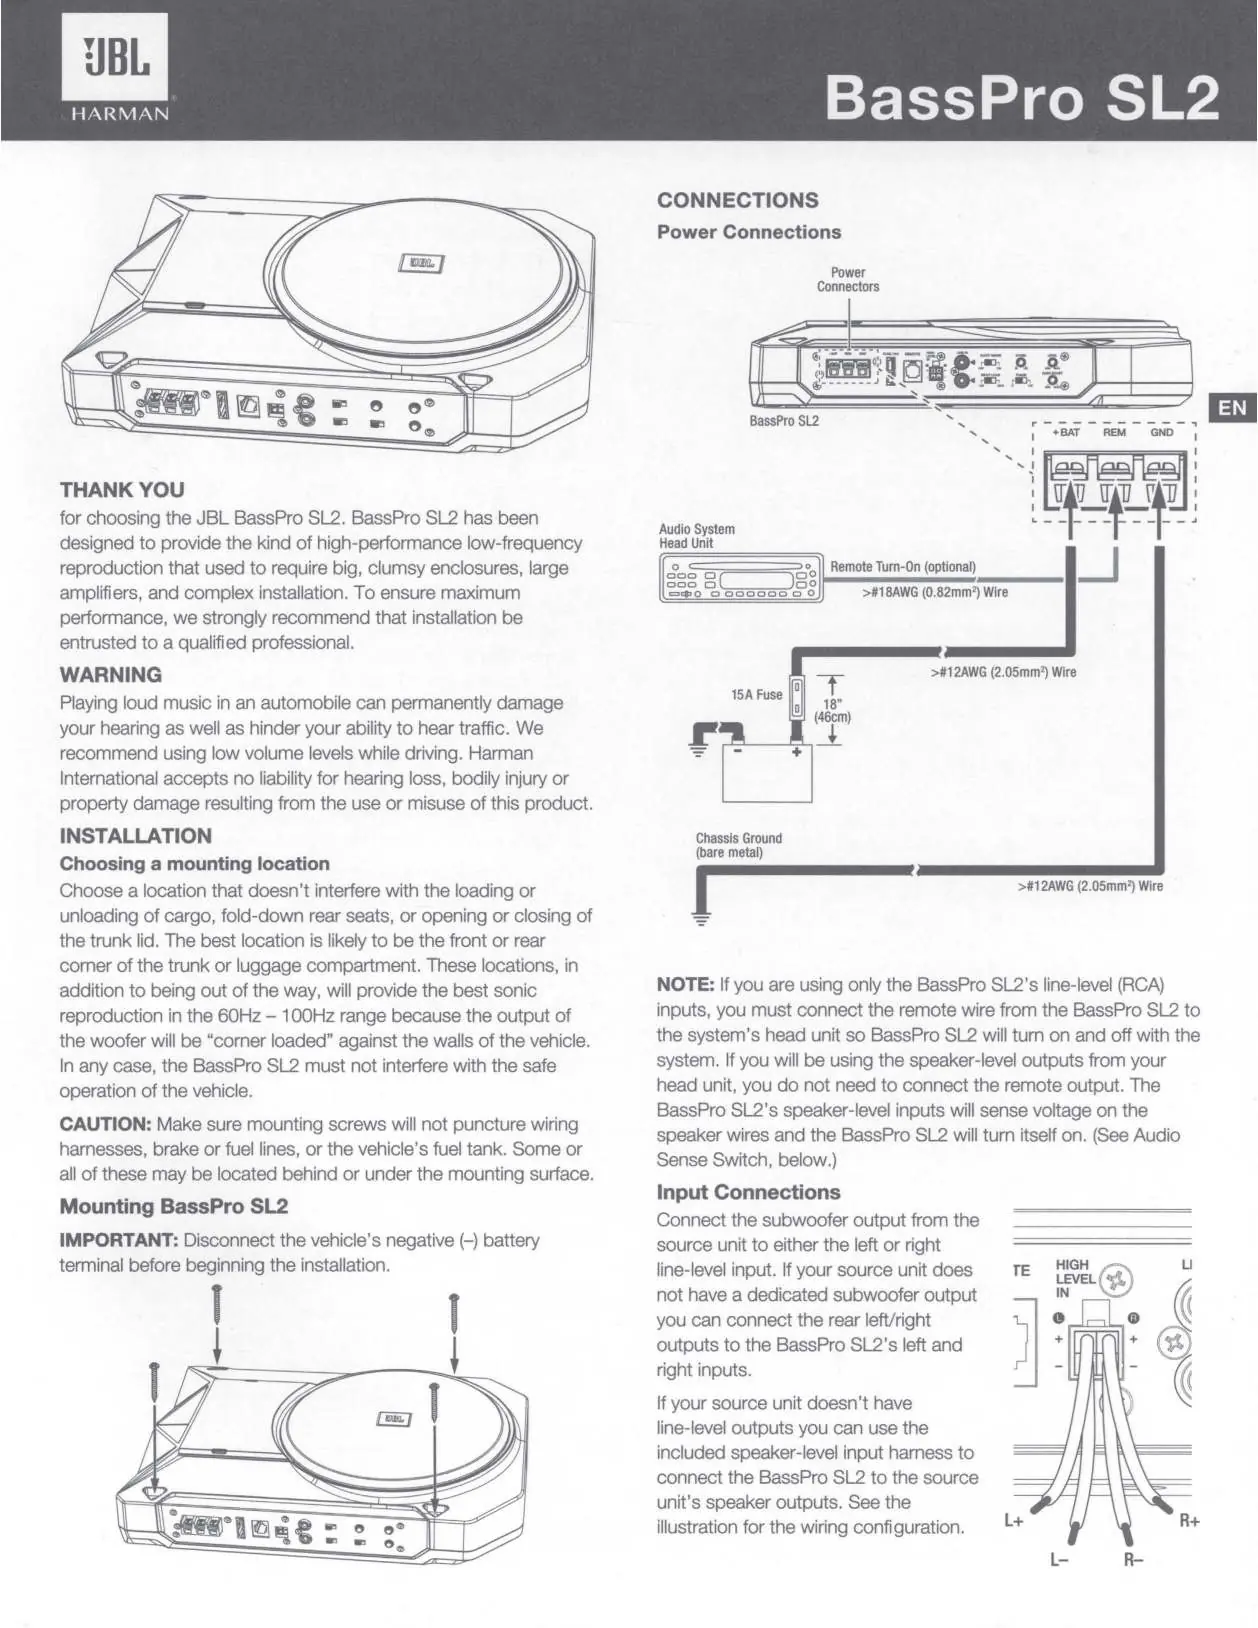
Input Connections: If using line-level (RCA) inputs, connect the subwoofer output from your head unit. If your head unit lacks line-level outputs, use the included speaker-level input harness to connect to the speaker outputs.
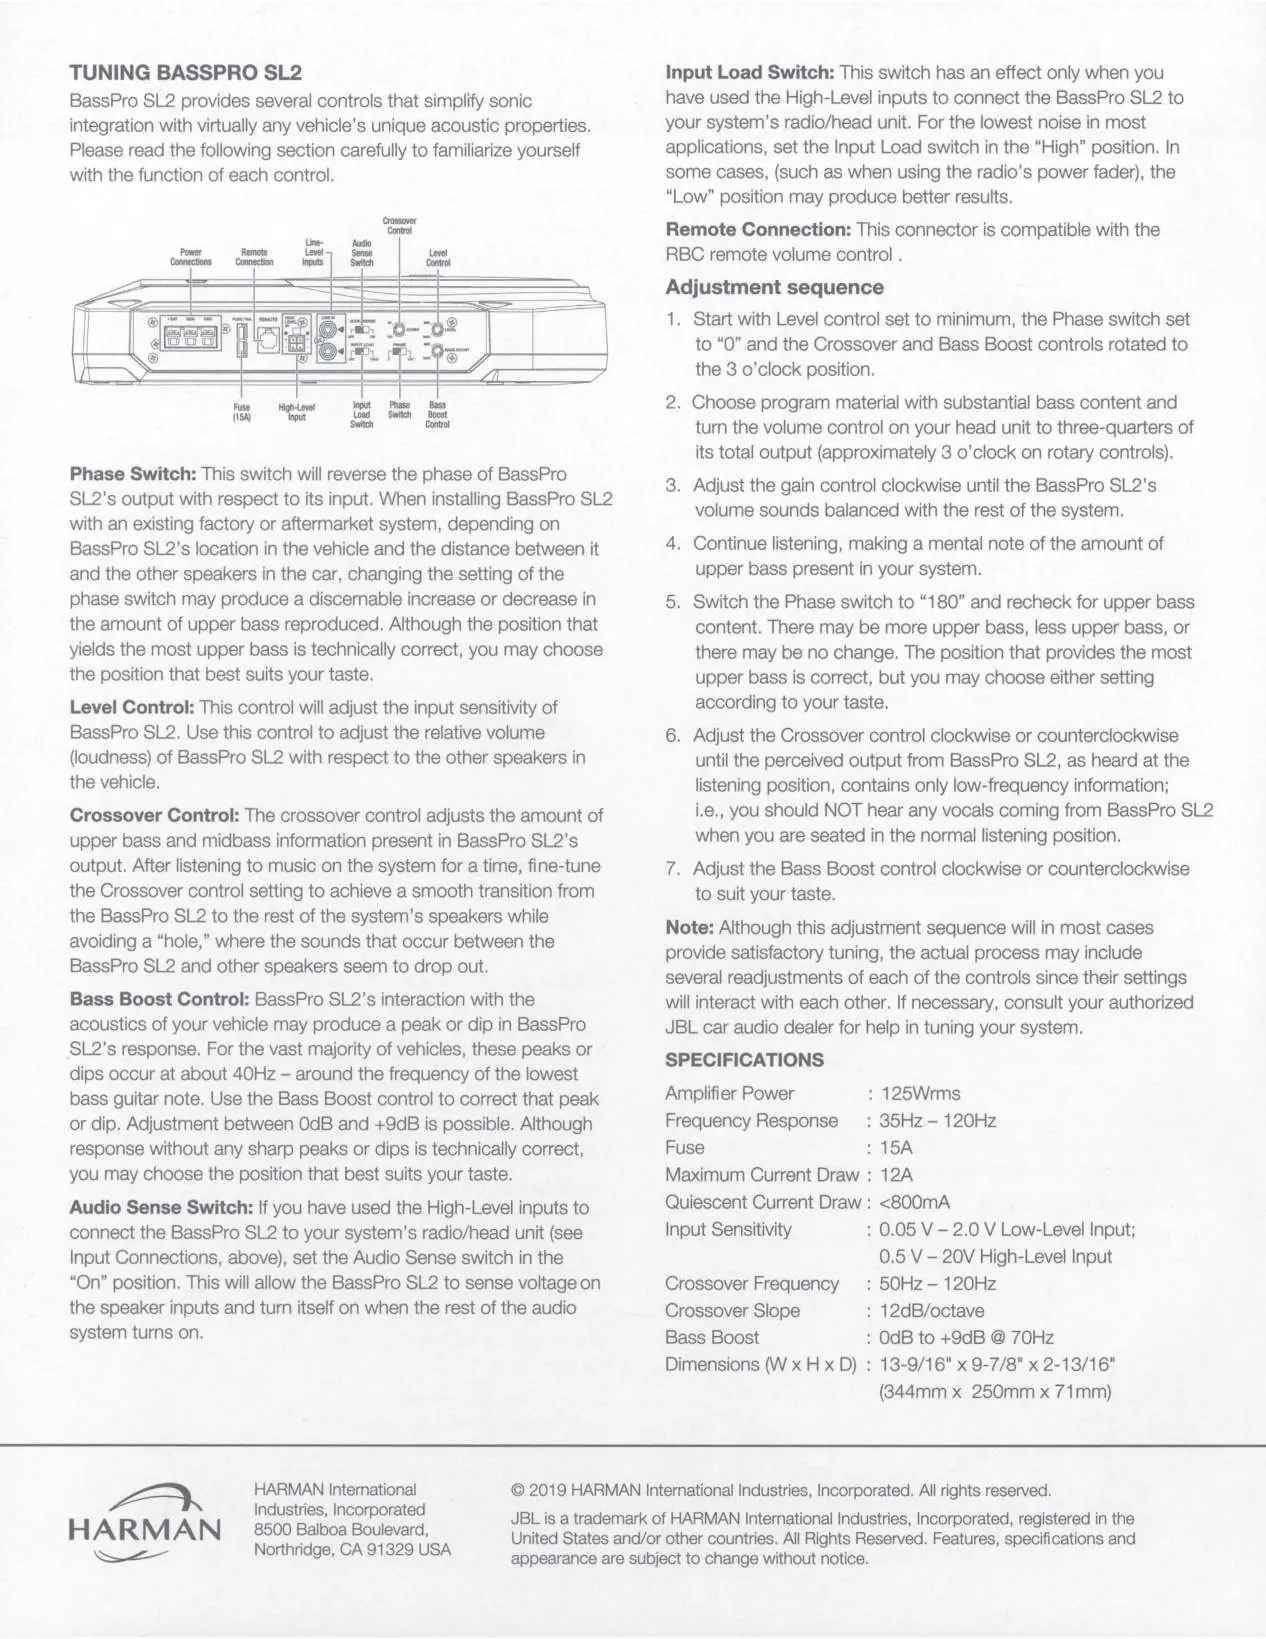
Tuning the BassPro SL2
The BassPro SL2 features several controls to optimize sound:
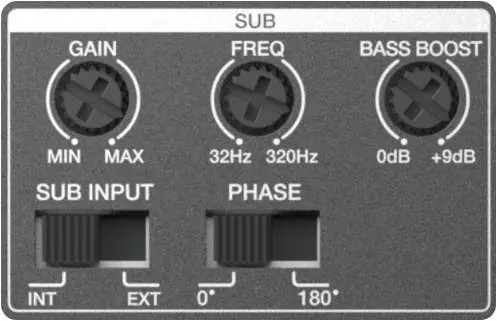
- Level Control: Adjusts the input sensitivity to balance the subwoofer volume with other speakers.
- Crossover Control: Adjusts the frequency (50Hz - 120Hz) to filter out mid-range sounds.
- Bass Boost Control: Corrects peaks or dips in response (0dB to +9dB at 70Hz).
- Phase Switch: Reverses the output phase (0 or 180 degrees) to improve bass response based on speaker distance.
- Audio Sense Switch: When using High-Level inputs, set to "On" to allow the unit to turn on automatically when it senses voltage.
- Input Load Switch: Set to "High" for lowest noise in most applications; use "Low" if using a radio with a power fader.
Adjustment Sequence
- Set Level to minimum, Phase to 0, and Crossover/Bass Boost to the 3 o'clock position.
- Play music with substantial bass and set head unit volume to 3/4.
- Adjust gain clockwise until the subwoofer volume is balanced.
- Switch Phase to 180 and check for better bass response; choose the setting that sounds best.
- Adjust Crossover until only low-frequency information is heard from the subwoofer.
- Adjust Bass Boost to suit your preference.
Car Audio Installation Tips
Batteries: When connecting multiple batteries in parallel, ensure they are of the same age, make, and model. Clean all terminals before installation and use high-quality connectors.


Fuses: A fuse must be installed on the power cable to protect the circuit. The fuse rating should match or slightly exceed the amplifier's fuse rating. Never substitute a fuse with a higher capacity than specified.
Specifications
- Amplifier Power: 125Wrms
- Frequency Response: 35Hz - 120Hz
- Fuse: 15A
- Maximum Current Draw: 12A
- Input Sensitivity: 0.05V - 2.0V (Low-Level); 0.5V - 20V (High-Level)
- Dimensions: 13-9/16" x 9-7/8" x 2-13/16" (344mm x 250mm x 71mm)
Manufacturer information
JBL
Practical help
Common problems
No sound from subwoofer
Check power connections, ensure the remote turn-on wire is connected, or verify the Audio Sense switch is set to 'On' if using High-Level inputs.
Distorted sound
Reduce the input sensitivity (gain) on the amplifier or lower the volume on the head unit.
Vocals heard from subwoofer
Adjust the Crossover control to a lower frequency to filter out mid-range sounds.
Before use
- Disconnect the vehicle's negative (-) battery terminal.
- Verify mounting screws will not puncture wiring, brake lines, fuel lines, or the fuel tank.
- Use #12AWG wire for power and ground connections.
- Use #18AWG wire for the remote turn-on connection.
- Ensure batteries used in parallel are of the same age, make, and model.
Specs in practice
- Amplifier Power: 125Wrms
- The continuous power output capability of the amplifier.
- Frequency Response: 35Hz - 120Hz
- The range of bass frequencies the subwoofer is designed to reproduce.
- Input Sensitivity
- Matches the amplifier to the voltage output of your head unit (0.05V-2.0V for RCA, 0.5V-20V for speaker level).
Images and diagrams
- Power Connections: Illustrates the +BAT, REM, and GND terminal wiring.
- Input Connections: Shows how to wire the High-Level input harness.
- Control Panel: Displays the location and function of Gain, Freq, Bass Boost, Sub Input, and Phase controls.
Model compatibility
- Compatible with RBC remote volume control (sold separately).
- Works with both factory and aftermarket head units.
- Supports both line-level (RCA) and high-level (speaker) inputs.

Manual page author
Michael Turner
Technical manual editor
Reviews PDF manuals for structure, safety notes, and practical product details so readers can find the right information quickly.