Lighting / Outdoor Landscape
Kichler 16261CBR27 LED Path Light User Manual
Quick guide for the Kichler 16261CBR27 LED Path Light. Includes installation steps, safety warnings, maintenance tips, and adjustment instructions for the 16263 model.
Table of contents
Manual images
Click an image to enlargeQuick Guide from the Manual
This document provides installation and safety instructions for the Kichler LED Path Light series, including models 16260, 16261, 16262, 16263, 16264, and 16265. Always disconnect power at the main circuit breaker before starting any installation or maintenance work.
Safety Warnings
- Risk of Shock: Do not install this fixture within 10 feet (3m) of a pool, spa, or fountain.
- Transformer Requirements: Use only with a low voltage transformer rated for a maximum of 300W (25 AMPS) at 15 volts.
- Burial Requirements: Direct burial wire must be buried at a minimum depth of 6 inches (152 mm) below the surface of the ground.
- Cleaning: Ensure the electric current is turned off before cleaning. Use only a soft damp cloth; harsh cleaning products may damage the finish.
Installation Instructions
- Power Off: Turn off power at the main circuit breaker panel or main fusebox.
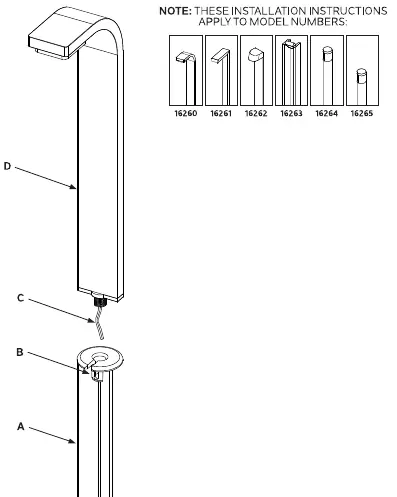
- Stake Installation: Determine the desired location. Drive the stake (A) into the ground. If the ground is hard, use a rubber mallet or place a board on top of the stake to prevent damage.
- Wiring: Route the fixture cable (C) through the wire opening and screw the stem (D) into the stake. Ensure the cable is not twisted.
- Connections: Make wire connections to the main low voltage supply using gel-filled wire nuts (supplied).
Adjusting the Light (Model 16263 Only)
Model 16263 features an adjustable light head:
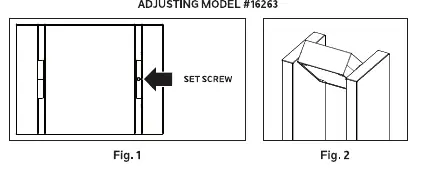
- Locate the set screw on the top of the fixture.
- Use a hex key (supplied) to loosen the set screw (turn counter-clockwise).
- Adjust the light direction as needed (up to 45 degrees from the factory setting).
- Retighten the set screw (turn clockwise) to secure the position.
Maintenance
Keep the fixture clear of potentially combustible materials such as pine needles, grass clippings, mulch, or any debris that has accumulated on the light bulb, lens, or body of the fixture.
Manufacturer information
Kichler Lighting
Practical help
Common problems
Fixture is loose in the ground
Ensure the stake is driven firmly into the ground. If the ground is hard, use a rubber mallet or a board to protect the stake while hammering.
Light not working
Check the main circuit breaker, verify the transformer is powered, and ensure all wire connections are secure and properly made with gel-filled wire nuts.
Before use
- Turn off power at the main circuit breaker.
- Verify the transformer is rated for a maximum of 300W (25 AMPS) at 15 volts.
- Ensure the installation site is not within 10 feet of a pool, spa, or fountain.
- Confirm you have the correct wire (10 GA or 12 GA direct burial wire).
- Clear the area of combustible materials like mulch or grass clippings.
Specs in practice
- Direct Burial Wire
- Must be buried at least 6 inches (152 mm) below the surface.
- Transformer Rating
- Maximum 300W (25 AMPS) at 15 volts.
Images and diagrams
- Fixture Diagram: Illustrates the assembly of the stake (A), wire routing (B), fixture body (C), and light head (D).
- Adjusting Model 16263: Shows the location of the set screw used to adjust the light angle up to 45 degrees.
Model compatibility
- These instructions apply to models: 16260, 16261, 16262, 16263, 16264, 16265.

Manual page author
David Miller
Documentation analyst
Organizes user manual content into clear summaries, with attention to model details, product context, and everyday usability.