Toys / Games
Kidzone 060-ROT-02V2 24V Ride-On SUV Instruction Manual
Quick guide for the Kidzone 060-ROT-02V2 24V Ride-On SUV. Includes assembly steps, battery charging instructions, remote control pairing, and troubleshooting tips.
Table of contents
Manual images
Jump to the sectionQuick guide from the manual
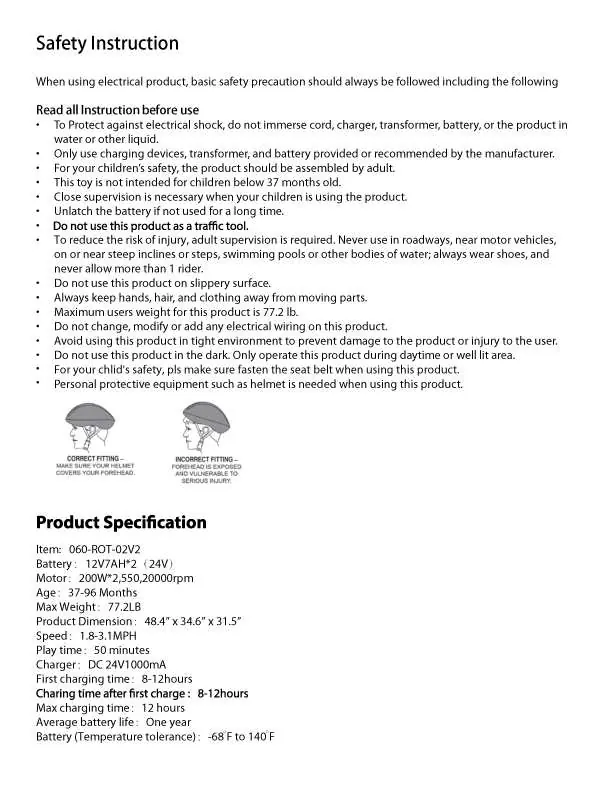
This document provides essential assembly and operation instructions for the Kidzone 060-ROT-02V2 24V Ride-On SUV. Key requirements include adult assembly, connecting the battery before first use, and ensuring the child wears a helmet. The vehicle is intended for children aged 37-96 months with a maximum weight capacity of 77.2 lbs.
Safety Information
- Adult supervision is required at all times.
- Do not use on public roads, near motor vehicles, steep inclines, or bodies of water.
- Always fasten the seat belt.
- Do not modify electrical wiring.
- Use only the provided or manufacturer-recommended charger and battery.
Assembly Instructions
The vehicle requires assembly by an adult. Key steps include:
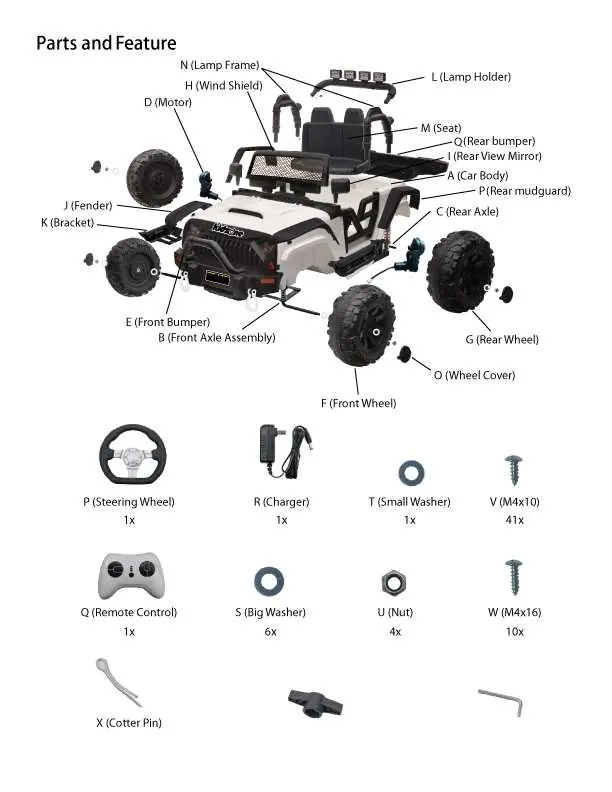
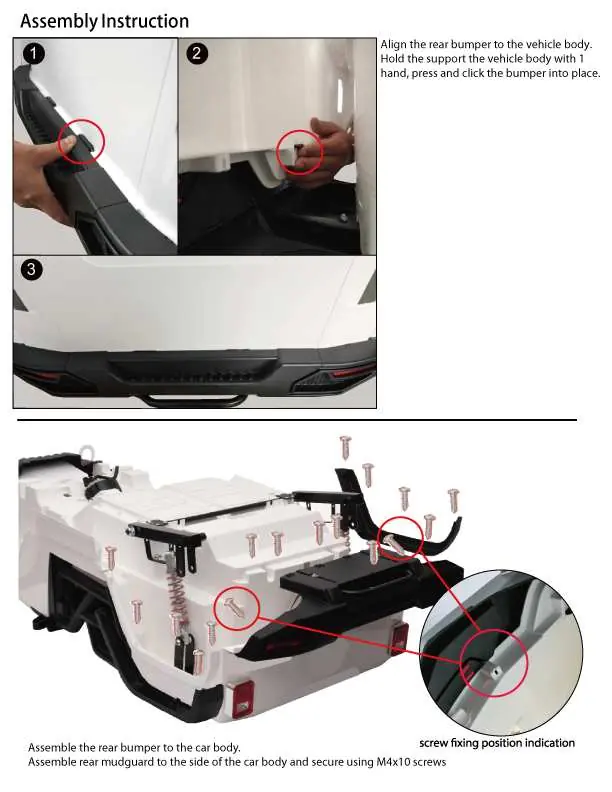

- Rear Bumper and Mudguards: Align the rear bumper to the body and secure with M4x10 screws.
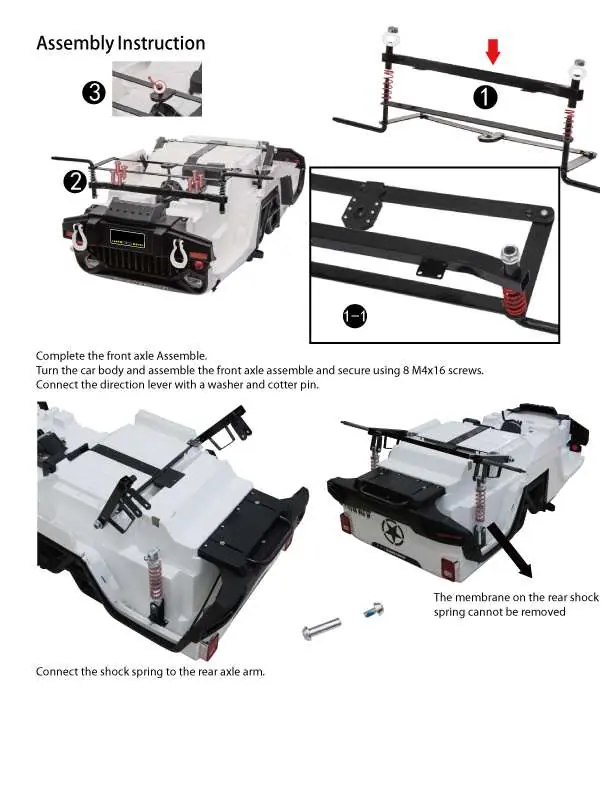
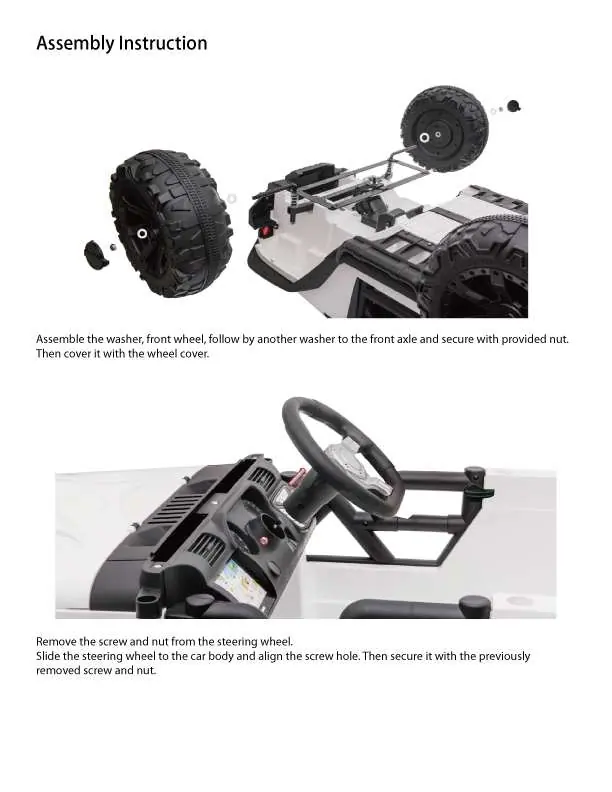
- Front Axle: Assemble the front axle and secure with M4x16 screws. Connect the direction lever with a washer and cotter pin.
- Wheels and Motors: Assemble motors and rear wheels to the rear axle, securing with nuts and wheel covers. Ensure motors are on the correct side.
- Steering Wheel: Remove the pre-installed screw and nut, slide the steering wheel onto the body, and re-secure.
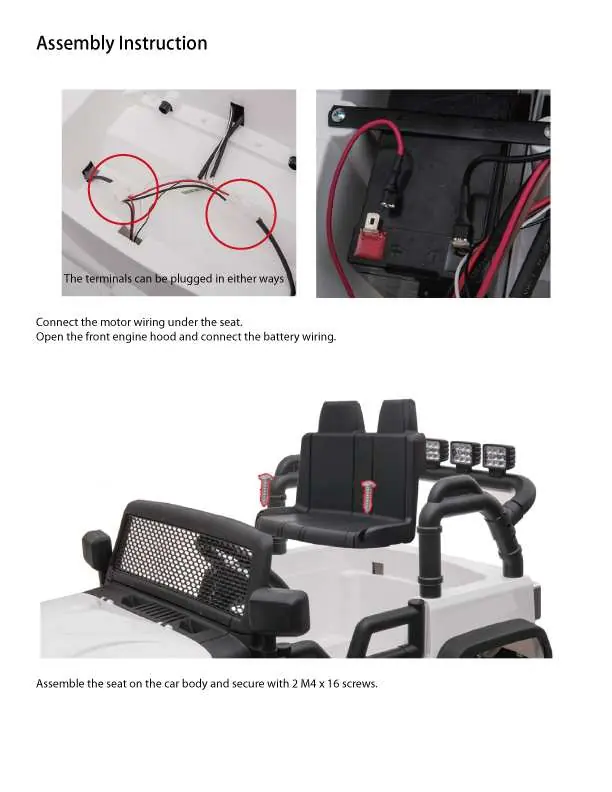
- Electrical Connections: Connect motor wiring under the seat and battery wiring under the front hood.
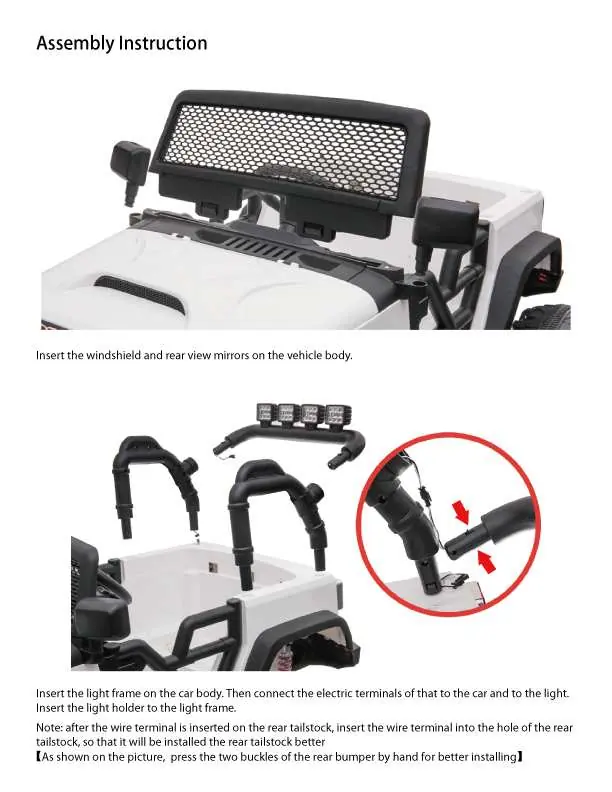
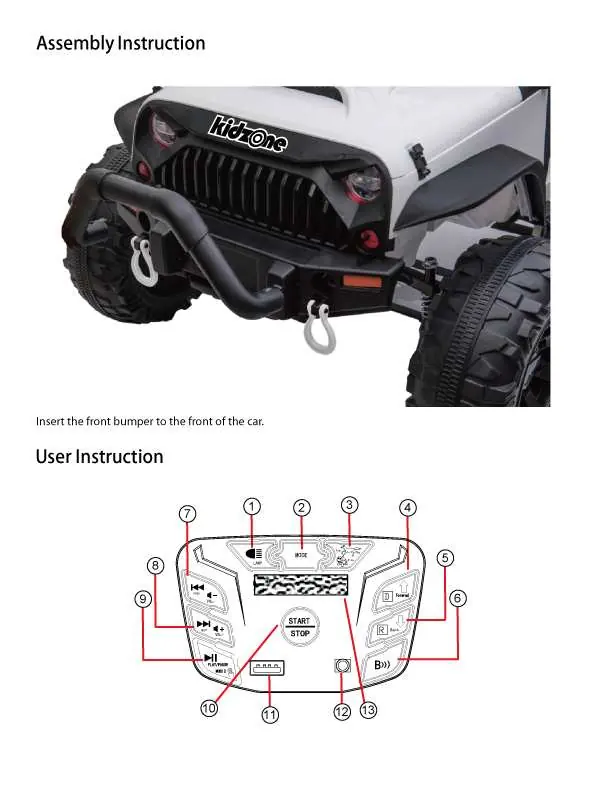
- Final Touches: Install the windshield, mirrors, light frame, seat, and front bumper.
Operation
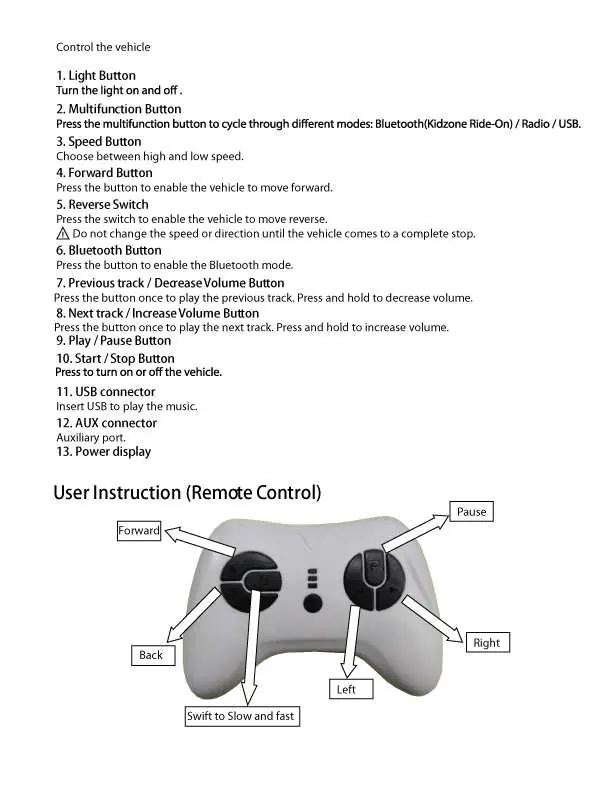
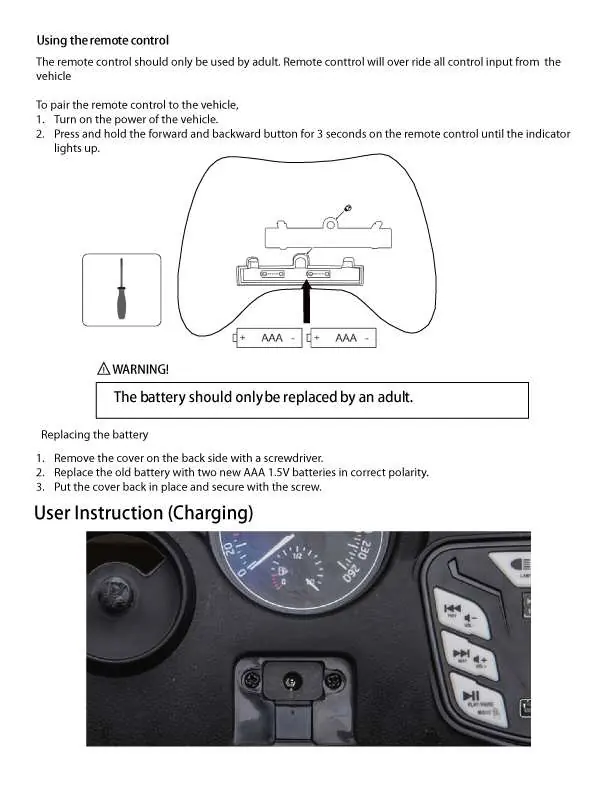
The vehicle features a control panel for lights, speed selection (high/low), forward/reverse, and media modes (Bluetooth, Radio, USB). The remote control must be paired by an adult: turn on the vehicle, then press and hold the forward and backward buttons on the remote for 3 seconds until the indicator lights up.
Charging and Maintenance
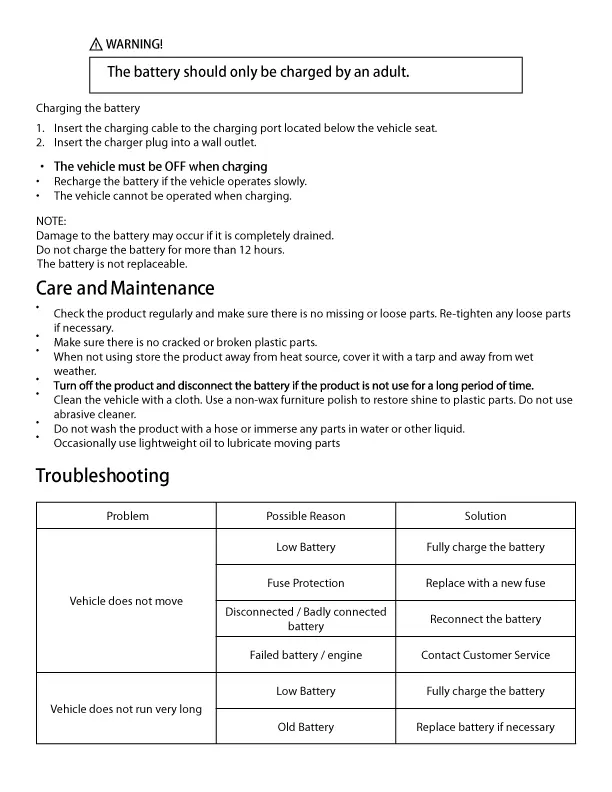
The battery must be charged by an adult. Connect the charger to the port under the seat and plug it into a wall outlet. The vehicle must be turned off during charging. Do not charge for more than 12 hours. Regularly check for loose parts, keep the vehicle away from water and heat sources, and store in a dry place.
Troubleshooting
If the vehicle does not move, check for low battery, a blown fuse, or disconnected battery terminals. If the vehicle runs slowly, ensure the user weight is within limits and the battery is fully charged. For grinding noises or persistent charging issues, contact customer service.
Manufacturer information
Kidzone Toys
Practical help
Common problems
Vehicle does not move
Check for low battery, blown fuse, or disconnected battery terminals.
Vehicle runs very slow
Ensure the user weight is under 77.2 lbs and the battery is fully charged.
Battery does not charge
Ensure the charger is firmly plugged into the power source and the charging port.
Loud grinding or clicking sound
Motor or gearbox may be damaged; contact customer service.
Before use
- Remove all packaging foam.
- Connect the battery terminals.
- Ensure all parts are assembled and screws tightened.
- Charge the battery for 8-12 hours before the first use.
- Ensure the child is wearing a helmet and seat belt.
Specs in practice
- Charging Time
- 8-12 hours (Max 12 hours).
Images and diagrams
- The control panel includes buttons for lights, mode selection, speed, forward/reverse, and media playback.
- The remote control features forward, back, left, right, pause, and speed selection buttons.
- Battery compartment for the remote control requires two AAA 1.5V batteries.
Model compatibility
- Not intended for children under 37 months.
- Only for residential use; not for commercial or rental use.

Manual page author
David Miller
Documentation analyst
Organizes user manual content into clear summaries, with attention to model details, product context, and everyday usability.