Power / Car Chargers
User Manual for Klip Xtreme PowerCar Wireless KCW-505 Magnetic Car Charger
Quick guide for the Klip Xtreme PowerCar Wireless (KCW-505) magnetic car charger. Learn how to install the mount, attach the magnetic ring for non-magnetic phones, and optimize charging performance.
Table of contents
Manual images
Click an image to enlargeQuick guide from the manual
The Klip Xtreme PowerCar Wireless (KCW-505) is a magnetic wireless car charger designed for dashboard mounting. To ensure a secure installation, you must clean the dashboard surface thoroughly with the provided alcohol wipe and allow it to dry completely before applying the adhesive base. Crucially, you must wait 24 hours after sticking the base to the dashboard before attaching the phone holder or placing any weight on it.
Package contents
- Magnetic wireless car charger
- Stick-on magnetic ring
- Wet & dry cleaning wipes
- USB-A to USB-C charging cable
- Positioning template tool
- Protective film
- Extra adhesive tape
- Quick Installation Guide
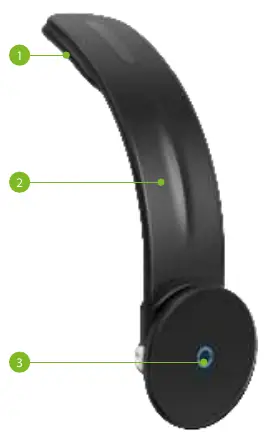
Overview
The device consists of an adhesive tape base, a flexible arm holder, and the magnetic wireless charging pad. The flexible arm allows you to adjust the viewing angle of your smartphone while it charges.
Installation instructions
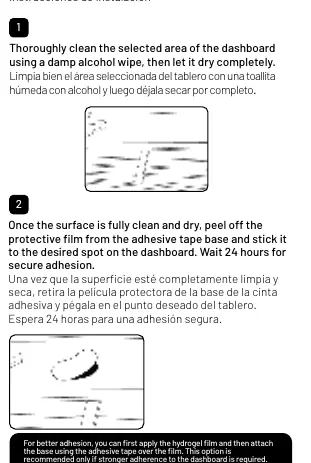
- Clean the surface: Thoroughly clean the selected area of the dashboard using the provided damp alcohol wipe and let it dry completely.
- Attach the base: Peel off the protective film from the adhesive tape base and stick it to the desired spot. Wait 24 hours for secure adhesion.
- Optional hydrogel film: For better adhesion, you can apply the hydrogel film first and then attach the base using the adhesive tape over the film. This is recommended only if stronger adherence is required.
- Adjust and connect: Adjust the holder's arm to your preferred viewing angle. Connect the USB-C plug of the charging cable to the pad's port and the USB-A end into your car's USB-A port or charger.
How to charge non-magnetic wireless smartphones
If your phone does not support magnetic wireless charging natively, you can use the included magnetic ring:
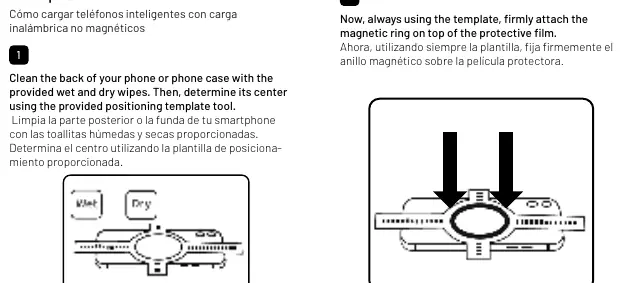
- Clean the back of your phone or phone case with the provided wipes.
- Determine the center of your phone using the provided positioning template tool.
- Stick the protective film using the template as a guide. Important: You must attach the protective film BEFORE attaching the stick-on magnetic ring.
- Firmly attach the magnetic ring on top of the protective film using the template.
Safety and usage tips
- Charging the smartphone with a thick phone case might affect the magnetic attraction.
- To guarantee a strong hold, always ensure surfaces are clean and dry before sticking adhesive tapes or protective films.
- The phone holder arm can withstand up to 300 bends. Avoid bending the arm too many times in a short period.
Specifications
- Input Power: 5V-3A, 9V-3A
- Output Power: 5W / 7.5W / 10W / 15W
- Output for iPhone: 7.5W fast wireless charging
- Operating Temperature: 32–104°F (0–40°C)
- Connector: USB-C
- Charging Cable: 3.28 ft USB-A to USB-C
Practical help
Common problems
Weak magnetic hold or mount falling off
Ensure the dashboard surface was cleaned with alcohol and allowed to dry completely. Wait 24 hours after installation before using the mount.
Phone not charging
Check if the phone case is too thick or contains metal, which may interfere with magnetic attraction and wireless charging.
Before use
- Clean the dashboard surface with the provided alcohol wipe.
- Allow the surface to dry completely.
- Wait 24 hours after sticking the base before attaching the phone.
- Ensure your phone supports wireless charging.
- Use the positioning template for non-magnetic phones.
Specs in practice
- Output Power
- Supports up to 15W; iPhone fast charging is limited to 7.5W.
- Charging Distance
- The charger works within a range of 0.08–0.24 inches (2–6 mm).
Images and diagrams
- The flexible arm allows for viewing angle adjustment.
- The magnetic ring must be applied using the positioning template for non-magnetic phones.
Model compatibility
- Compatible with devices supporting magnetic wireless charging.
- Non-magnetic phones require the included stick-on magnetic ring.

Manual page author
Michael Turner
Technical manual editor
Reviews PDF manuals for structure, safety notes, and practical product details so readers can find the right information quickly.