Power / Wireless Chargers
User Manual for Scosche StuckUp Wireless Charging Mount
Quick guide for the Scosche StuckUp wireless charging mount. Learn how to install the dash or vent mount, adjust the device, and understand charging specifications and LED indicators.
Table of contents
Manual images
Click an image to enlargeQuick guide from the manual
This document provides instructions for the Scosche StuckUp wireless charging mount. It covers two installation methods: dash mount and vent mount. The device features adjustable side supports and a bottom support to secure your phone, along with LED indicators to show charging status and foreign object detection.
Included elements
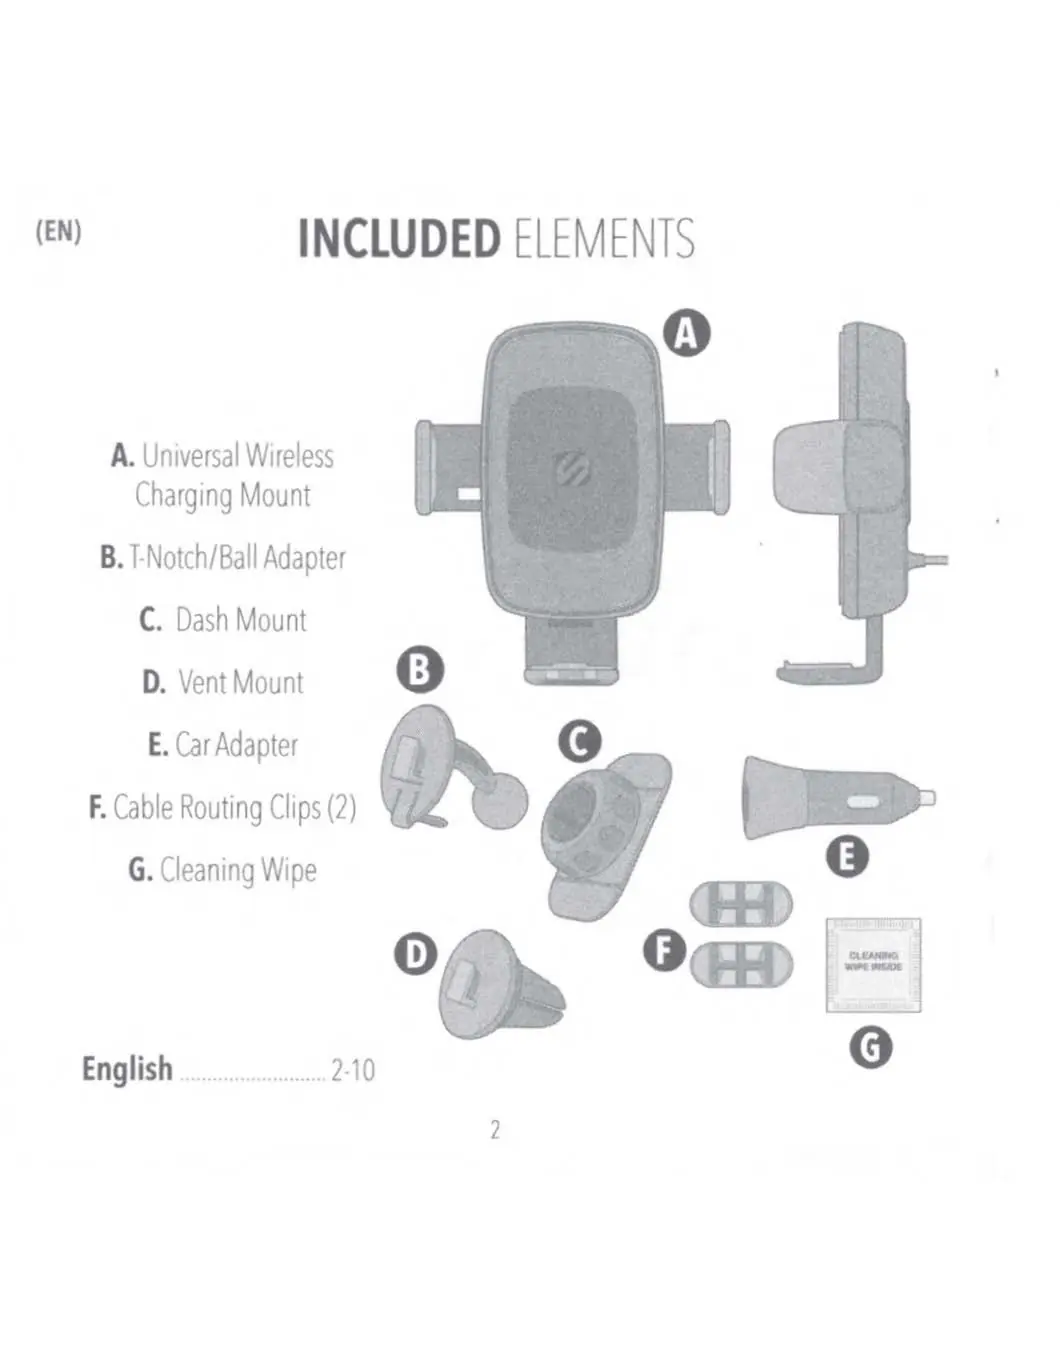
- Universal Wireless Charging Mount
- T-Notch/Ball Adapter
- Dash Mount
- Vent Mount
- Car Adapter
- Cable Routing Clips (2)
- Cleaning Wipe
Dash mount installation
Assembly:
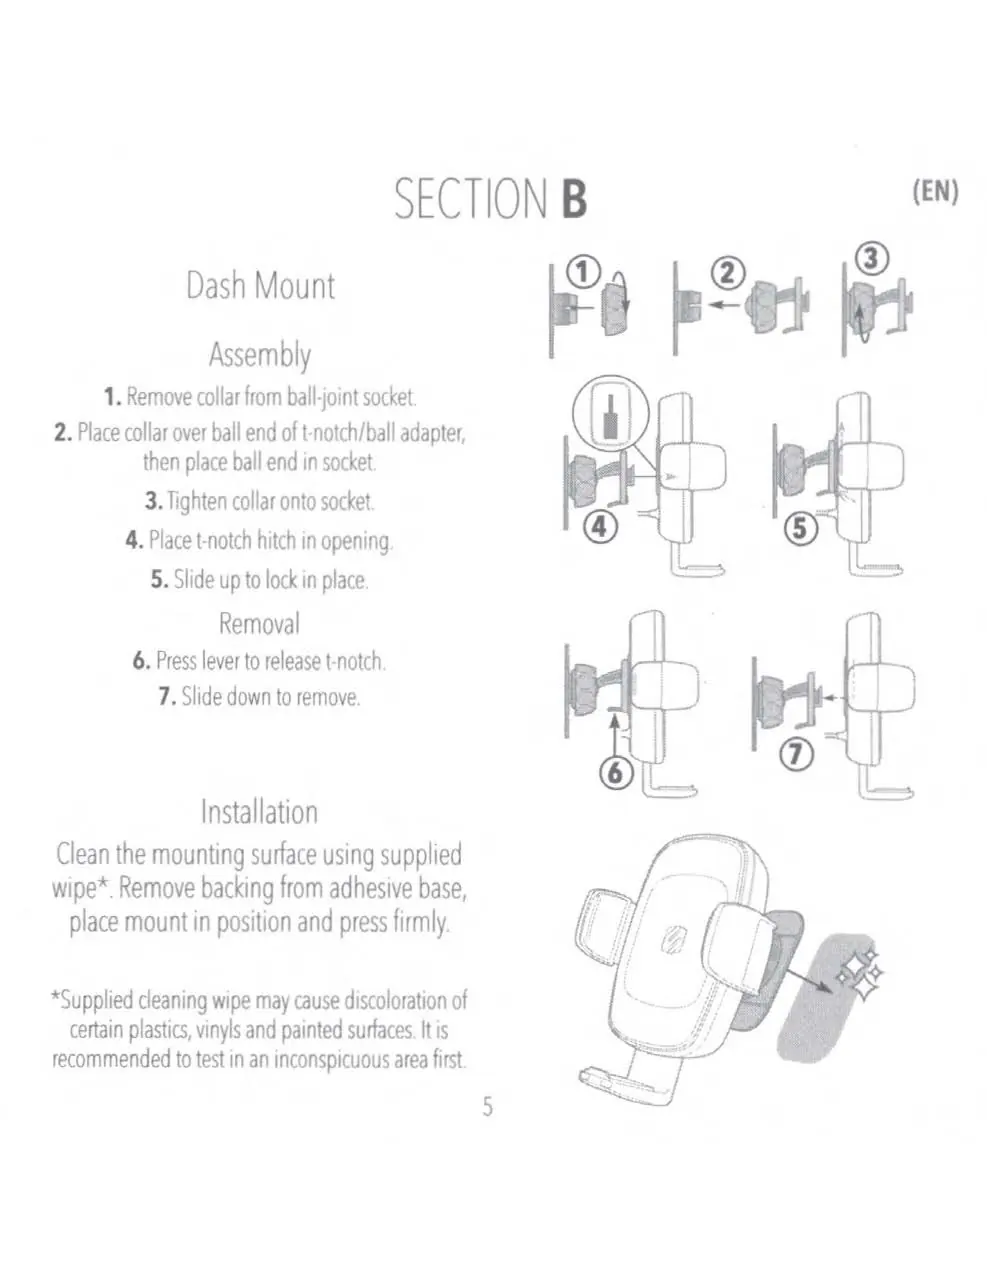
- Remove the collar from the ball-joint socket.
- Place the collar over the ball end of the T-Notch/Ball adapter, then insert the ball end into the socket.
- Tighten the collar onto the socket.
- Place the T-Notch hitch into the opening on the back of the mount head and slide up to lock in place.
Installation:
- Clean the mounting surface using the supplied wipe. Note: The wipe may cause discoloration on certain plastics or painted surfaces; test in an inconspicuous area first.
- Remove the backing from the adhesive base.
- Place the mount in the desired position and press firmly.
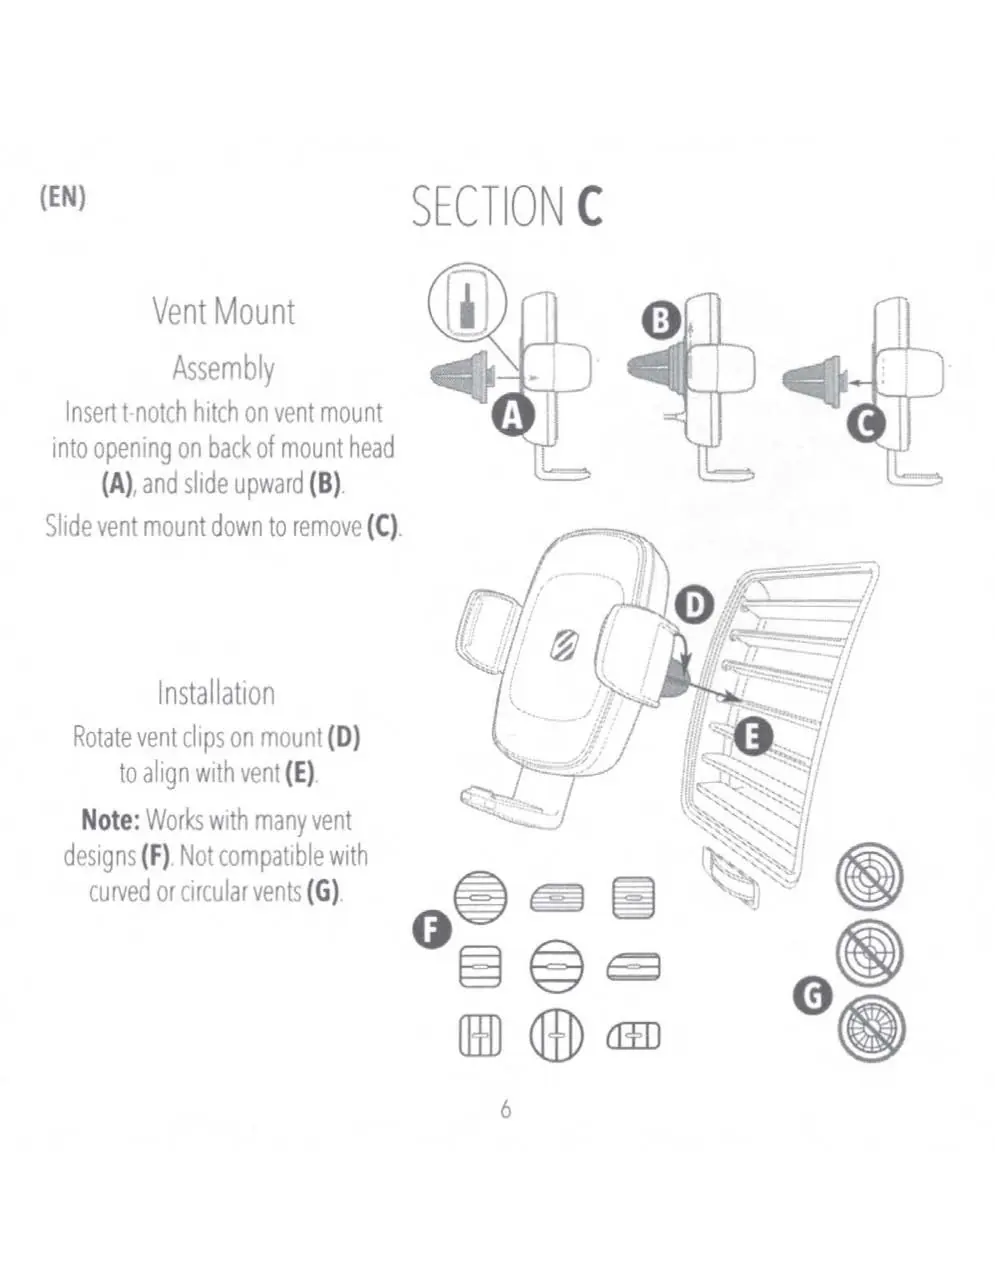
Vent mount installation
- Insert the T-Notch hitch on the vent mount into the opening on the back of the mount head and slide upward.
- Rotate the vent clips on the mount to align with your vehicle's vent slats.
- Slide the mount onto the vent.
Note: This mount works with many vent designs but is not compatible with curved or circular vents.
Device operation and adjustment
Securing the device:
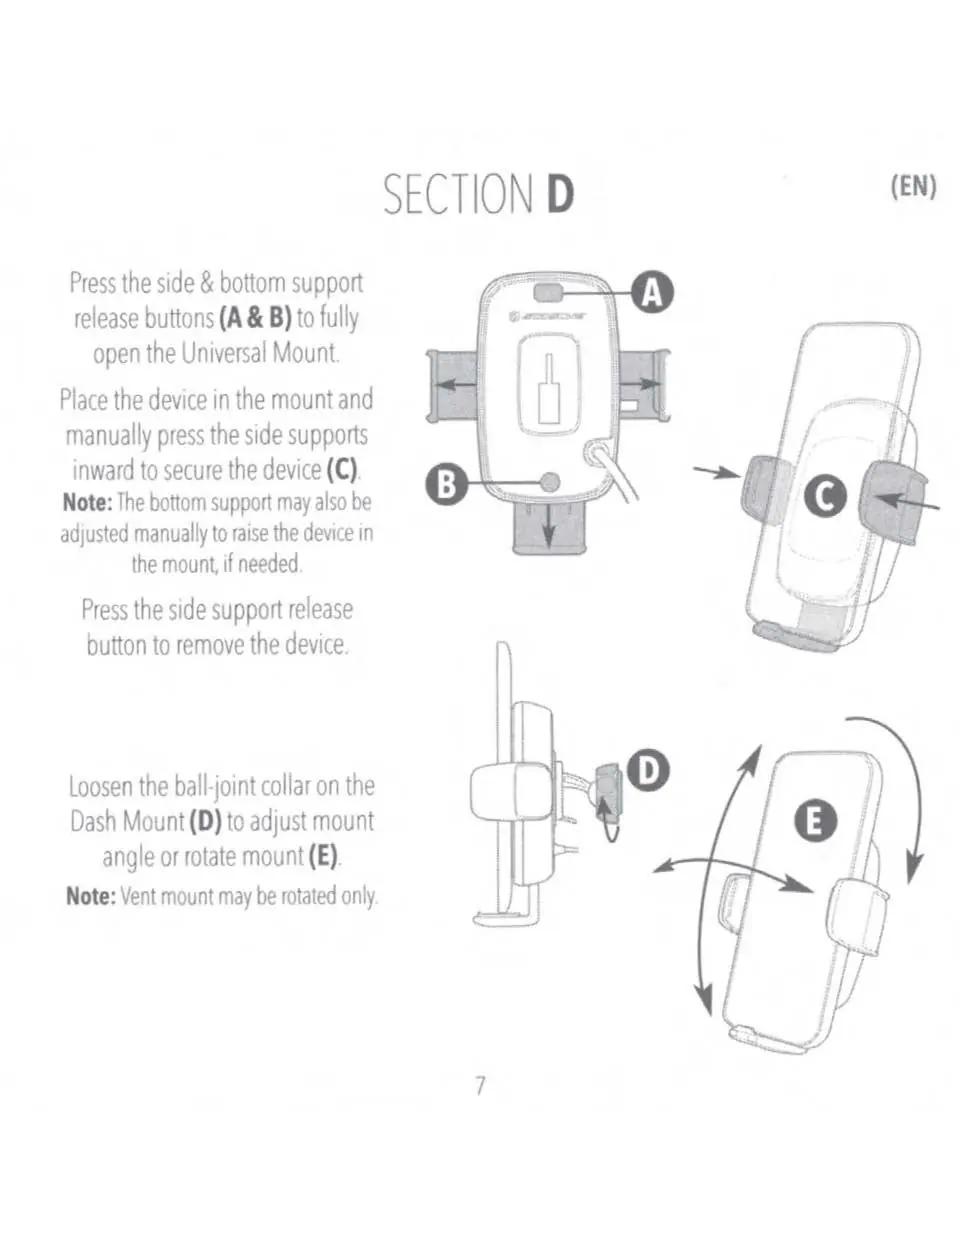
- Press the side and bottom support release buttons to fully open the mount.
- Place your device in the mount.
- Manually press the side supports inward to secure the device.
- The bottom support can be adjusted manually to raise the device if needed.
Adjustment:
- Dash Mount: Loosen the ball-joint collar to adjust the mount angle or rotate the mount.
- Vent Mount: The vent mount may be rotated only.
Charging and LED indicators
Connect the mount to the included car adapter using the provided cable. Use the cable routing clips to manage the wire.
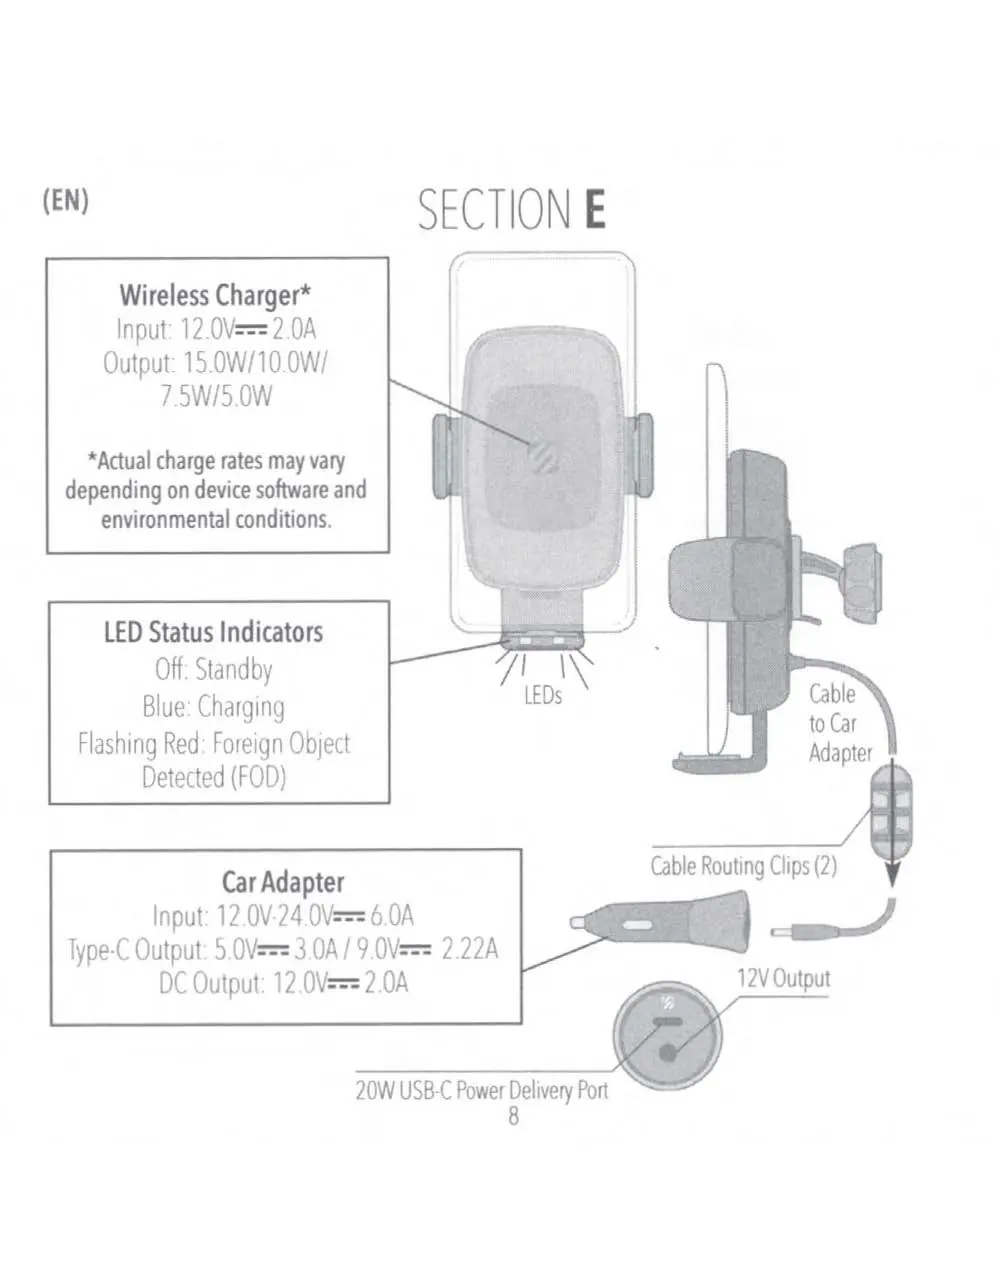
LED Status Indicators:
- Off: Standby
- Blue: Charging
- Flashing Red: Foreign Object Detected (FOD)
Technical specifications
Wireless Charger:
- Input: 12.0V - 2.0A
- Output: 15.0W / 10.0W / 7.5W / 5.0W (Actual rates vary by device)
Car Adapter:
- Input: 12.0V - 24.0V - 6.0A
- Type-C Output: 5.0V - 3.0A / 9.0V - 2.22A
- DC Output: 12.0V - 2.0A
Manufacturer information
Scosche Industries, Inc.
Practical help
Common problems
Flashing Red LED
Foreign Object Detected (FOD). Ensure no metal or foreign objects are between the phone and the charger.
Mount not sticking to dash
Ensure the surface is cleaned with the provided wipe. Test the wipe on an inconspicuous area first to avoid discoloration.
Vent mount does not fit
The vent mount is not compatible with curved or circular vents.
Before use
- Verify your vehicle vent type (not compatible with circular/curved vents).
- Clean the dash mounting surface thoroughly.
- Ensure the car adapter is plugged into a 12V power source.
- Test the cleaning wipe on a hidden area of the dashboard.
Specs in practice
- Wireless Output
- Supports up to 15W charging, depending on device software and environmental conditions.
- Car Adapter Input
- Compatible with standard 12V-24V vehicle power outlets.
- Type-C Output
- Provides fast charging capabilities (up to 20W Power Delivery).
Images and diagrams
- Dash Mount Assembly: Illustrates the collar and ball-joint connection process.
- Vent Mount Assembly: Shows the T-Notch insertion and vent clip alignment.
- Device Operation: Demonstrates how to use the release buttons and secure the phone.
Model compatibility
- Not compatible with curved or circular air vents.

Manual page author
Emily Carter
User documentation editor
Prepares concise manual descriptions and highlights the most useful setup, operation, and maintenance information for readers.