Computers / Laptops
Owner's Manual for LG 14ZB90R Series Notebook
Quick guide for the LG 14ZB90R Series notebook. Learn about setup, power connection, troubleshooting, safety precautions, and battery maintenance.
Table of contents
Manual images
Click an image to enlargeQuick guide from the manual
This manual provides essential information for the safe and convenient use of your LG 14ZB90R Series notebook. Before using the product, ensure you charge the battery completely. Always back up critical data to an external storage device, as SSD malfunctions can lead to data loss. Note that screen configurations and Windows versions may vary based on updates.
Product Overview
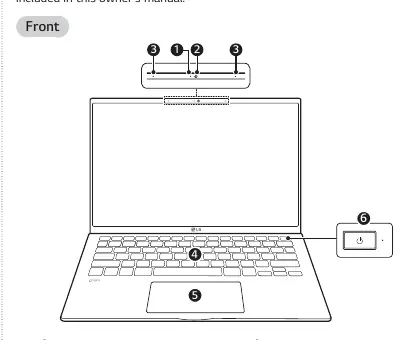
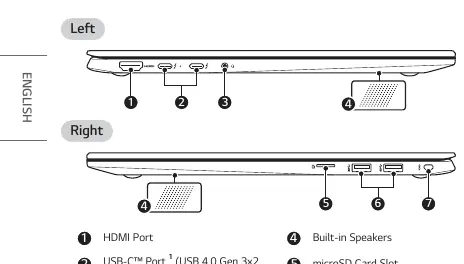
The notebook features a front-facing webcam, built-in microphone, keyboard, touchpad, and a power button that doubles as a fingerprint sensor on supported models. The left side houses the HDMI port, USB-C port (supporting USB 4.0 Gen 3x2, Thunderbolt, and power delivery), and a 4-pole headphone/microphone port. The right side includes built-in speakers, a microSD card slot, a USB 3.2 Gen 2x1 port, and a security keyhole.
Setup and Connections
Connecting the LAN Adapter: Connect the LAN adapter to the USB-C port on the PC, then connect your network cable (CAT5 or higher recommended) to the adapter.
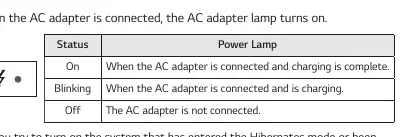
Power Connection: Use only the provided AC adapter (100 V to 240 V). Connect the cable to the adapter and a power outlet, then plug the adapter jack into the PC's USB-C port. The AC adapter lamp indicates status: On (charged), Blinking (charging), or Off (not connected).
Battery and Power Management
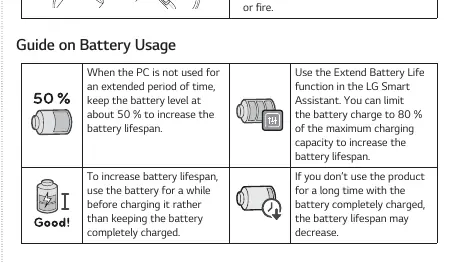
To extend battery lifespan, keep the battery level at approximately 50% if not using the PC for an extended period. You can also use the Extend Battery Life function in the LG Smart Assistant to limit the charge to 80% of maximum capacity. Avoid leaving the battery fully charged for long periods without use.
Safety Precautions
- Do not use the product on soft surfaces like carpets or beds, as this may cause overheating.
- Keep the battery away from heat sources and metallic objects.
- Do not store or use the product in high humidity or temperatures above 60 °C.
- If you detect leakage or a bad odor from the battery, contact a service center.
- Do not excessively bend the AC adapter cable to prevent electric shock or fire.
Troubleshooting
If you encounter issues, check the following before contacting support:
- Power issues: If the system does not turn on, disconnect the power cord, then hold the power button for at least 6 seconds to reset the system.
- Touchpad: If not functioning, check if it is disabled or in 'Auto' mode via LG Smart Assistant > Dashboard > Touchpad.
- Wireless network: Press [Fn] + [F6] to toggle wireless/airplane mode.
- Screen color: If colors seem distorted, check if 'Reader Mode' is enabled and turn it off via LG Smart Assistant > Display Setting.
Manufacturer information
LG Electronics
Practical help
Common problems
The power does not turn on
Check if the power cord is connected. If it still does not turn on, disconnect the adapter and hold the power button for at least 6 seconds to reset the system.
The touchpad is not functioning properly
Check if the touchpad is disabled or set to 'Auto' (disabled when a mouse is connected). Adjust settings in LG Smart Assistant > Dashboard > Touchpad.
The wireless network is not connected
Press [Fn] + [F6] to check if the wireless device is turned off or in airplane mode.
Screen color does not display properly
Check if 'Reader Mode' is on. Turn it off via LG Smart Assistant > Display Setting.
Before use
- Charge the battery pack completely before first use.
- Ensure the AC adapter is connected firmly.
- Back up all critical user data to an external storage device.
- Use only the provided AC adapter.
Specs in practice
- 4-pole Ear Microphone Port
- Supports US type 4-pole standards; external microphones may not be supported.
- AC Adapter Lamp
- On (charged), Blinking (charging), Off (not connected).
Images and diagrams
- Front view: Webcam, microphone, keyboard, touchpad, and power button/fingerprint sensor.
- Left side: HDMI, USB-C, and headphone ports.
- Right side: Speakers, microSD slot, USB port, and security keyhole.
Model compatibility
- Recommended network cable is CAT5 or higher.
- AC adapter input range is 100 V to 240 V.

Manual page author
Michael Turner
Technical manual editor
Reviews PDF manuals for structure, safety notes, and practical product details so readers can find the right information quickly.