Lighting / Outdoor Lighting
User Manual for Lightpro Ixion 182W Outdoor LED Wall Lamp
Quick guide for the Lightpro Ixion 182W outdoor LED wall lamp. Includes installation steps, wiring instructions, brightness adjustment, and safety guidelines for the 12V system.
Quick answers from the manual
Quick answer
- The Lightpro Ixion 182W is a 12V outdoor LED wall lamp. It is installed by mounting the backplate to the wall, connecting it to the 12V system, and adjusting the light angle and brightness via the built-in controls. p. 6, 7, 8, 9
Key actions
- Mounting the lamp p. 2, 6, 8
- Adjusting brightness p. 3, 6, 8
- Wiring to system p. 5, 10, 11
Problems and fixes
Cable routing through wall
Drill a 10mm hole, feed the plug through, and connect to the female connector.
p. 4, 6, 8Maintenance and reset
- Clean regularly with a soft, clean cloth. Use stainless steel cleaner every 6 months for stainless parts. p. 10, 11
Technical specifications
| Parameter | Value | Meaning | Pages |
|---|---|---|---|
| Power | 9W | Maximum power consumption | p. 6, 8 |
| Protection | IP44 | Ingress protection rating | p. 6, 8 |
| Light Colour | 3000K | Warm white light | p. 6, 8 |
Where to find it in the PDF
- Installation Steps p. 2, 3, 4
- Wiring Diagram p. 5
- Specifications and Safety p. 6, 7, 8, 9
Table of contents
Manual images
Click an image to enlargeQuick guide from the manual
The Lightpro Ixion 182W is a 12V outdoor LED wall lamp. This guide provides essential steps for installation and operation. Always ensure the product is connected to a compatible 12V Lightpro system. The lamp features adjustable light angles via shutters and 6 levels of brightness.
Product Description
The Ixion is designed for outdoor wall mounting. It is a low-voltage (12V) fixture. Any modifications to the product may affect safety, warranty, and system performance.
Installation
Follow these steps for proper mounting:
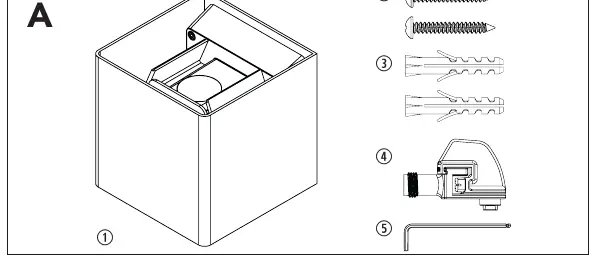

- Preparation: Check that all parts are present: fixture, screws, plugs, connector, and hex key.
- Mounting (Step B): Fix the backplate to the wall using the provided screws and plugs.
- Assembly (Step C-D): Place the lamp over the backplate and secure it with the screws.
- Adjustment (Step E): Adjust the shutters to set the desired light angle.
- Brightness (Step F): Use the push button to set the brightness (6 levels available).
- Finishing (Step G-H): Place the shade over the lamp and secure it with the screw.
Cable Routing: If you need to feed the cable through the wall, drill a 10mm hole. Feed the small plug through the hole and connect it to the corresponding female connector.
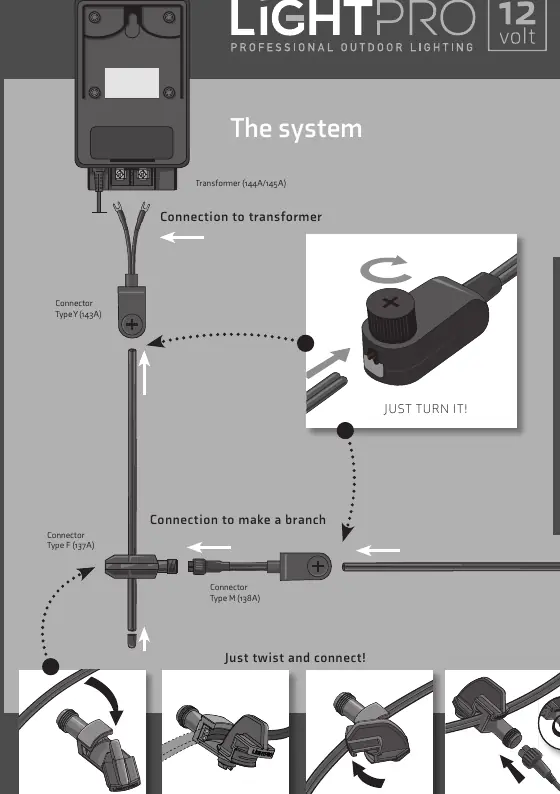
Wiring and System
The lamp must be connected to the Lightpro 12V system. Refer to the wiring diagram on page 5 of the manual for connecting to the transformer and creating branches using the provided connectors.
Safety and Maintenance
- Maintenance: Clean regularly with a soft, clean cloth. Do not use abrasives.
- Stainless Steel: Clean parts with stainless steel cleaner once every 6 months.
- Restrictions: Do not use high-pressure washers or aggressive chemicals.
- Environment: Suitable for temperatures between -20°C and 50°C.
- Safety: Do not install in areas where combustible gases or liquids are stored. Always ensure the product remains accessible for maintenance.
Practical help
Common problems
Light not working
Check the connection to the 12V transformer and ensure the system is powered.
Cable too short for surface mounting
The cable can be fed through the wall. Drill a 10mm hole and route the cable through the back.
Before use
- Ensure you have a compatible 12V Lightpro transformer.
- Verify all parts are present: fixture, screws, plugs, connector, hex key.
- Choose a mounting location that allows access for future maintenance.
- Ensure the installation surface is suitable for drilling.
Specs in practice
- Protection Class
- IP44, suitable for outdoor use.
- Temperature Range
- -20°C to 50°C.
Images and diagrams
- Steps A-I: Visual guide for mounting the backplate, attaching the lamp, and adjusting settings.
- Page 5: Wiring diagram showing how to connect the lamp to the transformer and branch connectors.
Model compatibility
- Must be used with the Lightpro 12-volt system.
- Not for use in areas with combustible gases or liquids.

Manual page author
Emily Carter
User documentation editor
Prepares concise manual descriptions and highlights the most useful setup, operation, and maintenance information for readers.