Electronics / USB Extenders
Lindy EDID Recorder and Emulator User Guide
Quick guide for Lindy EDID Recorder (32120) and EDID Emulators (32104, 32121, 32122). Learn how to clone, store, and reset EDID data for HDMI, VGA, and DVI displays.
Table of contents
Quick guide from the manual
This manual covers the Lindy EDID Recorder (32120) and the EDID Emulator range (32104, 32121, 32122). These devices are designed to solve EDID compatibility issues when using splitters, extenders, or switches by cloning and storing display EDID data.
Safety Instructions
- Do not open the product; there are no user-serviceable parts inside.
- For indoor use only.
- Keep away from water, moisture, and direct heat sources.
- Ensure adapters are firmly secured before inserting into a wall socket.
Installation
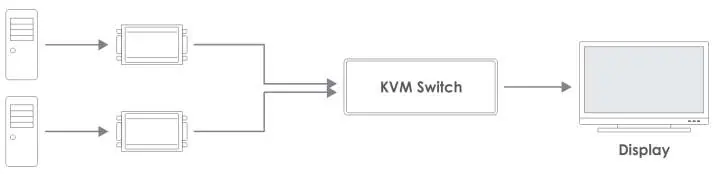
The emulators can be installed by connecting the male interface directly to the graphics card or as shown in the diagrams below.
Cloning Procedure (32120)
- Ensure the display is switched off.
- Switch the recorder to "Copy".
- Connect the recorder to your monitor using an HDMI, VGA, or DVI cable.
- Switch the display on.
- Connect the power supply to the DC jack of the recorder.
- The Power LED will illuminate Blue (learning).
- The Pass LED will illuminate Green when the EDID is successfully stored.
Re-write EDID to the Emulator
Note: This will overwrite pre-set EDID data.
- Switch the recorder to "Copy".
- Connect the HDMI, VGA, or DVI Emulator to the corresponding port on the recorder.
- Connect the power supply.
- The Power LED will illuminate Blue, followed by the Write LED flashing Green (copying).
- The Write LED will turn solid Green, followed by the Pass LED flashing Green when successful.
Reset to Pre-set EDID Procedure
- Switch the recorder to "EDID".
- Connect the Emulator to the corresponding port.
- Connect the power supply.
- The Power LED will illuminate Blue and the EDID LED will illuminate Orange, followed by the Write LED flashing Green.
- The Write LED will turn solid Green, followed by the Pass LED flashing Green when reset is complete.
Practical help
Common problems
EDID not cloning
Ensure the display is switched on before starting the cloning process.
Emulator not working
Ensure only one emulator is connected to the recorder at any one time.
Power LED not illuminating
Check that the power supply is securely connected to the DC jack of the recorder.
Before use
- Ensure the display is switched off before starting the cloning process.
- Verify the correct cable (HDMI, VGA, or DVI) is used.
- Ensure the power supply is connected to the DC jack of the recorder.
- Check that the switch on the recorder is set to the correct mode (Copy or EDID).
Specs in practice
- Barrel Size 3.5/1.35mm
- Connector size for the power supply.
Images and diagrams
- Extender setup: PC -> DDC Emulator -> Video/KVM Extender -> Display.
- Switch setup: PC -> DDC Emulator -> KVM Switch -> Display.
Model compatibility
- 32104: HDMI 10.2G Emulator.
- 32121: VGA Emulator.
- 32122: DVI Emulator.
- Only one emulator can be used at any one time.

Manual page author
Michael Turner
Technical manual editor
Reviews PDF manuals for structure, safety notes, and practical product details so readers can find the right information quickly.