Garden / Garden Structures
User Manual for 12V Ride-on Dump Truck
Quick start guide and user manual for the 12V Ride-on Dump Truck. Includes assembly instructions, safety warnings, charging procedures, remote control pairing, and troubleshooting tips.
Table of contents
Manual images
Click an image to enlargeQuick guide from the manual
This ride-on dump truck is designed for children aged 3 and older, with a maximum weight capacity of 30 kg. Before first use, the battery must be charged for 4-6 hours. The vehicle features both manual and remote control operation modes. Always ensure the vehicle is assembled by an adult and used under supervision.
Assembly instructions
Front Axle: Turn the vehicle body upside down, remove cable ties, and attach the front axle springs to the supports. Secure with M8 lock nuts.
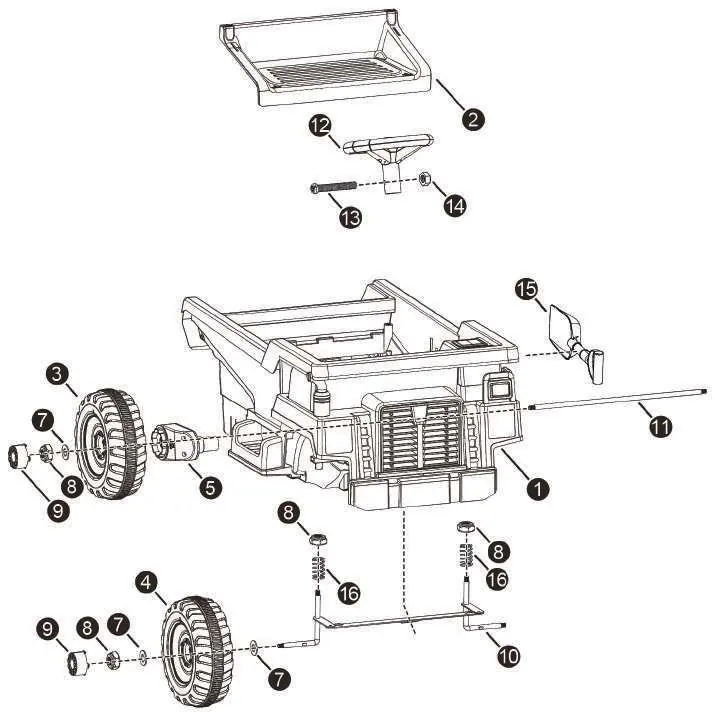
Front Wheels: Slide a M10 washer, the wheel, another M10 washer, and a M8 lock nut onto the axle. Secure with a socket wrench and snap on the hubcap.
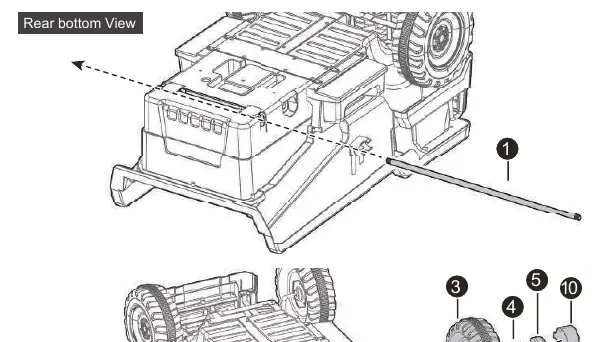
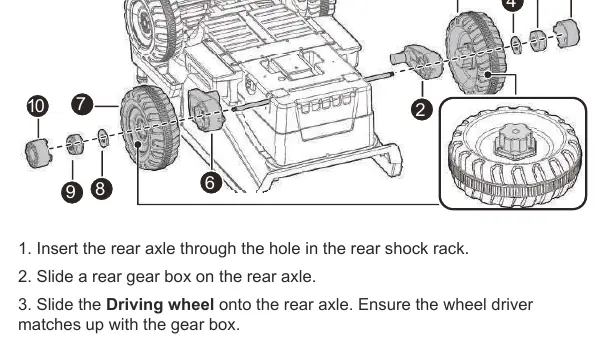
Rear Wheels: Insert the rear axle, slide on the gear box, driving wheel, M10 washer, and lock nut. Ensure the wheel driver matches the gear box.
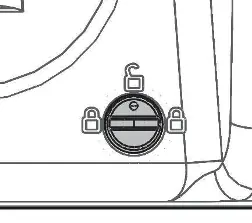
Seat and Electronics: Connect the red battery connector and white motor connectors. Insert the seat into the body and secure the locks using a screwdriver or coin.
Steering Wheel: Attach the steering wheel to the column, insert the M5 lock nut, and secure with the M5x30 machine screw.
Operating the vehicle
The vehicle is controlled via the dashboard switches and the accelerator pedal:
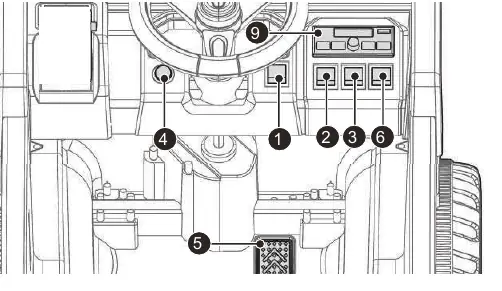
- Power switch: Turns the vehicle on and off.
- High/Low speed switch: Adjusts the driving speed.
- Forward/Reverse switch: Sets the direction. The vehicle stops when the switch is in the middle.
- Accelerator pedal: Press to move, release to brake.
- Dump switch: Operates the dump bed.
- RC/Manual switch: Located under the seat. Set to 'RC' for remote control or 'Manual' for pedal operation.
Audio player
The audio player features a display screen, volume knob, and track/channel selection buttons. It supports FM radio, USB input (MP3 format), and wireless connection. Use the 'Mode' button to switch between sources.
Remote control
The remote control requires two AAA (LR03) batteries. To pair: long-press the forward and reverse buttons for 3 seconds until the speed indicator flashes, then power on the vehicle. The indicator will stay lit when the connection is successful.
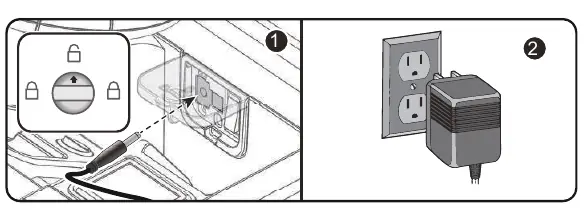
Charging the battery
The charging port is located under the seat. Always turn the power switch to OFF before charging. Charge for 4-6 hours initially, and 8-12 hours after use (maximum 20 hours). Do not exceed 10 hours of charging to prevent overheating.
Maintenance and safety
Regularly inspect the battery, charger, wires, and plugs for damage. Do not use the vehicle if parts are damaged. Keep the vehicle away from water, heat sources, and loose dirt. Store indoors or cover with a tarp. Clean with a soft, dry cloth; do not use abrasive cleaners or car wax.
Troubleshooting
If the vehicle does not run, check the battery charge, ensure wire connections are secure, and check if the thermal fuse has tripped. If the vehicle runs sluggishly, reduce the load or check the battery condition. Contact support if the motor or electrical system is damaged.
Practical help
Common problems
Vehicle does not run
Check battery charge, reset thermal fuse, and ensure all battery connectors and wires are firmly plugged in.
Vehicle runs sluggishly
Recharge the battery, reduce the weight on the vehicle, or avoid using it in harsh conditions.
Battery will not recharge
Check that the charger is plugged into a working wall outlet and that the battery connector is secure.
Difficult shifting between forward and reverse
Completely stop the vehicle before changing direction.
Before use
- Charge the battery for 4-6 hours before the first use.
- Ensure all parts are correctly installed and hardware is tightened.
- Check that all wire connections are secure.
- Verify the RC/Manual switch is in the desired mode.
- Ensure the child wears protective equipment (helmet, pads).
- Check that the area is safe and flat.
Images and diagrams
- Parts Diagram: Shows the vehicle body, wheels, axles, and steering components.
- Wiring: Red to Red, White to White connectors.
Model compatibility
- Suitable for children 3+ years.
- Not for use in traffic.
- Maximum 1 rider.

Manual page author
Michael Turner
Technical manual editor
Reviews PDF manuals for structure, safety notes, and practical product details so readers can find the right information quickly.