Automotive / Car Audio
Installation Instructions for Metra 107-KI2HG Dash Kit
Quick guide for installing the Metra 107-KI2HG dash kit in a 2021-Up Kia K5. Includes step-by-step dash disassembly, kit preparation, and radio assembly instructions for Pioneer modular radios.
Table of contents
Manual images
Click an image to enlargeQuick guide from the manual
This kit is designed specifically for the Kia K5 2021-Up to accommodate Pioneer modular 6.8-inch radios (e.g., DMH-C2550NEX, DMH-C2500NEX). Before beginning, ensure you have a panel removal tool and a Phillips screwdriver.
Safety Warning: Always disconnect the negative battery terminal before starting the installation to prevent electrical shorts. Ensure all connections are secure before cycling the ignition to test the new radio.
Dash Disassembly
- Unclip and remove the trim panel from the passenger side of the dash.
- Remove the two Phillips screws exposed after removing the side panel.
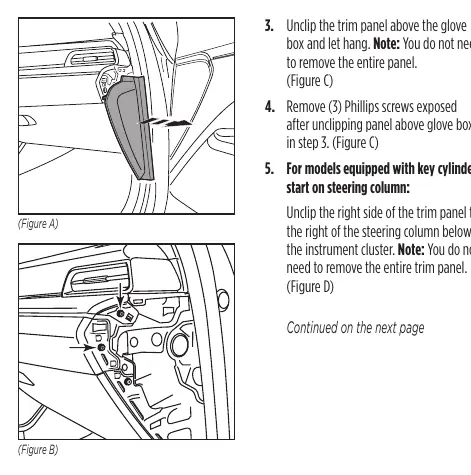
- Unclip the trim panel above the glove box and let it hang (you do not need to remove the entire panel).
- Remove the three Phillips screws exposed after unclipping the panel above the glove box.
- For models with a key cylinder start: Unclip the right side of the trim panel to the right of the steering column below the instrument cluster.
- Unclip and remove the trim panel below the radio.
- Unclip and remove the small trim panel behind the radio screen, then remove the two Phillips screws exposed.
- Remove the two Phillips screws below the radio screen.
- Unclip and remove the radio screen and chassis.
Kit Preparation
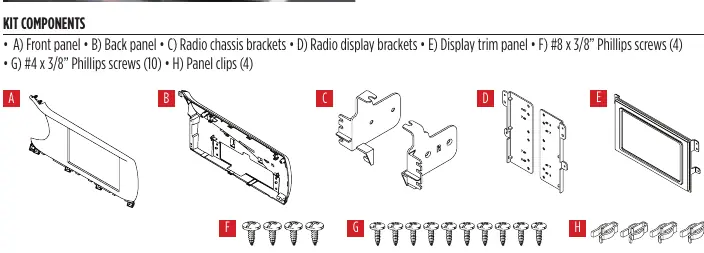
Secure the four included panel clips to the back panel before proceeding to assembly.
Kit Assembly

- Secure the radio chassis brackets to the back panel using four #8 x 3/8-inch screws.
- Secure the radio chassis to the radio chassis brackets using the screws supplied with the radio. Route the display cable to the inside of the panel.
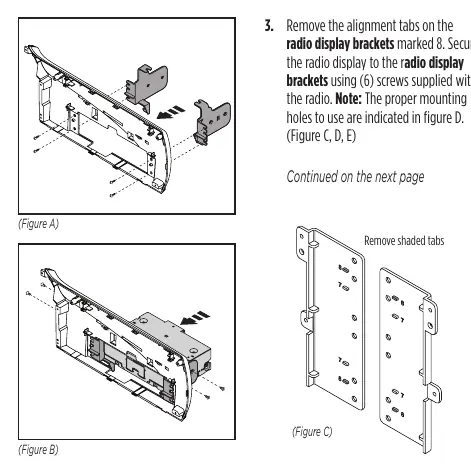
- Remove the alignment tabs on the radio display brackets marked 8. Secure the radio display to the brackets using six screws supplied with the radio. Note: Use the specific mounting holes indicated in the diagram for 7-inch displays.
- Connect the cable to the radio display, place the display trim panel over the display, and secure it to the back panel with four #4 x 3/8-inch screws.
- Secure the front panel to the radio/back panel assembly using six #4 x 3/8-inch screws.
- Locate the factory wiring harness and antenna connector in the dash and complete all necessary connections. Metra recommends using the proper mating adapter from Metra or Axxess.
- Clip the radio assembly into the dash and secure it using the factory screws.
- Reassemble the dash in reverse order of disassembly.
Practical help
Common problems
Radio does not fit or align correctly
Ensure you are using the correct mounting holes indicated in the diagram for 7-inch displays and that alignment tabs are removed as instructed.
Difficulty removing dash panels
Use a dedicated panel removal tool to avoid damaging the factory finish. Note that some panels only need to be unclipped, not fully removed.
Before use
- Disconnect the negative battery terminal
- Gather a panel removal tool and Phillips screwdriver
- Verify vehicle compatibility (Kia K5 2021-Up)
- Ensure you have the correct Pioneer modular radio (e.g., DMH-C2550NEX)
Specs in practice
- Pioneer Modular DDIN
- Designed specifically for Pioneer modular 6.8-inch radios.
Images and diagrams
- The diagram shows the specific mounting holes to use for 7-inch displays.
- The diagram indicates which alignment tabs must be removed from the radio display brackets.
Model compatibility
- Designed for Kia K5 2021-Up.
- Compatible with Pioneer modular 6.8-inch radios.

Manual page author
Michael Turner
Technical manual editor
Reviews PDF manuals for structure, safety notes, and practical product details so readers can find the right information quickly.