Automotive / Car Audio
Metra 107-TO7HG Dash Kit Installation Guide
A comprehensive installation guide for the Metra 107-TO7HG dash kit, designed for the 2020 Toyota Highlander. This manual covers dash disassembly, radio mounting procedures for ISO DDIN and Pioneer Modular units, and necessary wiring...
Table of contents
Manual images
Click an image to enlargeQuick Guide from the Manual
This installation kit is specifically designed for the 2020 Toyota Highlander (excluding models with the factory 12.3-inch screen). It supports ISO DDIN radios with an "L" shaped chassis or Pioneer modular 6.8-inch radios. Before beginning, ensure the vehicle has sat with the key out of the ignition for a few minutes to prevent errors during radio removal.
Tools Required
- Panel removal tool
- 10mm socket
- Phillips screwdriver
Dash Disassembly
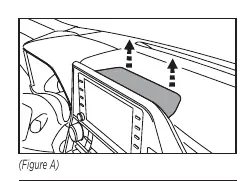
- Use a panel removal tool to unclip and remove the trim located behind the radio.
- Remove the four 10mm screws exposed after removing the trim.
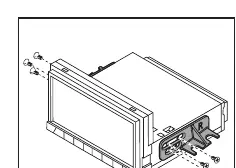
- Unclip, unplug, and remove the factory radio and panel assembly.
- Remove the four Phillips screws securing the factory radio to the dash panel.
Kit Assembly: ISO DDIN Radio Provision
- Secure the radio brackets to the aftermarket radio using the screws supplied with the radio.
- Slide the radio assembly into the dash and secure it using the factory screws.
- Secure the radio trim panel into the factory dash panel.
- Locate the factory wiring harness and antenna connector in the dash. Connect them to the radio using the appropriate mating adapter (Metra 70-1765 and 40-LX11 recommended).
- Test the radio for proper operation before reassembling the dash in reverse order.
Kit Assembly: Pioneer Modular Radio Provision
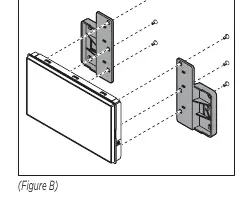
- Secure the radio brackets to the radio chassis using the screws supplied with the radio.
- Slide the radio chassis into the dash and secure it using the factory screws.
- Secure the radio display to the screen brackets using the screws supplied with the radio.
- Place the radio trim panel into the factory dash panel, then insert the radio screen assembly and secure it using the factory screws.
- Connect the radio display to the radio chassis.
- Complete wiring connections using the appropriate harness and antenna adapter.
- Test the radio and reassemble the dash.
Technical Support
If you encounter difficulties, contact Metra Tech Support at 386-257-1187 or via email at [email protected]. Support hours are Monday-Friday 9:00 AM - 7:00 PM, Saturday 10:00 AM - 7:00 PM, and Sunday 10:00 AM - 4:00 PM (Eastern Standard Time).
Practical help
Common problems
Radio does not fit properly
Ensure you are using the correct brackets for your specific radio type (ISO DDIN vs. Pioneer Modular) and that the radio chassis is positioned correctly.
Dash panel will not clip back into place
Verify that all factory screws are fully tightened and that the wiring harness is not obstructing the panel seating.
Before use
- Verify vehicle compatibility: 2020 Toyota Highlander (without factory 12.3-inch screen).
- Gather required tools: Panel removal tool, 10mm socket, Phillips screwdriver.
- Purchase required wiring harness (70-1765) and antenna adapter (40-LX11).
- Ensure the vehicle ignition is off and the key is removed for a few minutes before starting.
Specs in practice
- Pioneer Modular
- A specific radio design where the screen and chassis are separate components.
Images and diagrams
- Figure A (Disassembly): Illustrates the removal of the trim panel behind the radio.
- Figure B (Disassembly): Shows the removal of the radio and panel assembly.
- Figure C (Disassembly): Highlights the location of the four Phillips screws securing the factory radio.
Model compatibility
- Compatible with 2020 Toyota Highlander.
- Not compatible with vehicles equipped with the factory 12.3-inch screen.

Manual page author
David Miller
Documentation analyst
Organizes user manual content into clear summaries, with attention to model details, product context, and everyday usability.