Lighting / Fixtures
Installation Manual for PQL LED V3 Compass High Bay
Comprehensive installation guide for the PQL LED V3 Compass High Bay. Includes detailed wiring diagrams for standard and 1-10V dimming configurations, hook and bracket mounting procedures, and safety precautions for wet location...
Table of contents
Manual images
Click an image to enlargeImportant Safety Information
Before installing or servicing the PQL LED V3 Compass High Bay, please read all instructions carefully. Installation, service, and maintenance should be performed by a qualified licensed electrician. Ensure all electrical and grounded connections are made in accordance with the National Electrical Code and local requirements.
- Power: Always disconnect electrical power at the fuse or circuit breaker box before installation or maintenance.
- Wet Locations: This fixture is suitable for wet locations. Ensure all electrical connections and installation holes have a water-tight seal.
- Wiring: Do not expose wiring to edges of sheet metal or sharp objects. All connections must be capped with UL-approved wire connectors.
- Safety: Avoid direct eye exposure to the light source while it is on. Ensure the mounting surface is strong enough to hold the fixture's weight.
Hook Installation
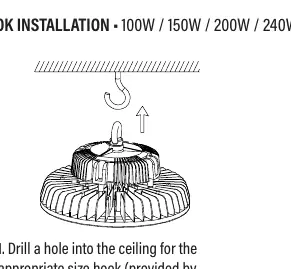
- Drill a hole into the ceiling for the appropriate size hook (provided by the installer).
- Secure the hook to the ceiling and hang the fixture from the hook.
- Connect the electrical cables: Black (Line), White (Neutral), and Yellow/Green (Ground).
Bracket Installation
Note: The bracket is sold separately.
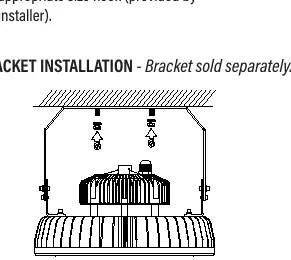
- Attach the bracket to the mounting surface.
- Connect the electrical cables: Black (Line), White (Neutral), and Yellow/Green (Ground).
- Adjust the bracket to the desired beam angle (120° adjustable).
Wiring Diagram
The fixture supports standard line voltage and 1-10V dimming.
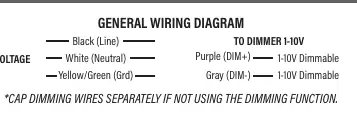
- Line Voltage: Black (Line), White (Neutral), Yellow/Green (Ground).
- 1-10V Dimming: Purple (DIM+), Gray (DIM-).
- Note: Cap dimming wires separately if the dimming function is not being used.
Emergency Driver Installation
Note: Emergency driver is sold separately and is for use with drivers that are 200W or less.
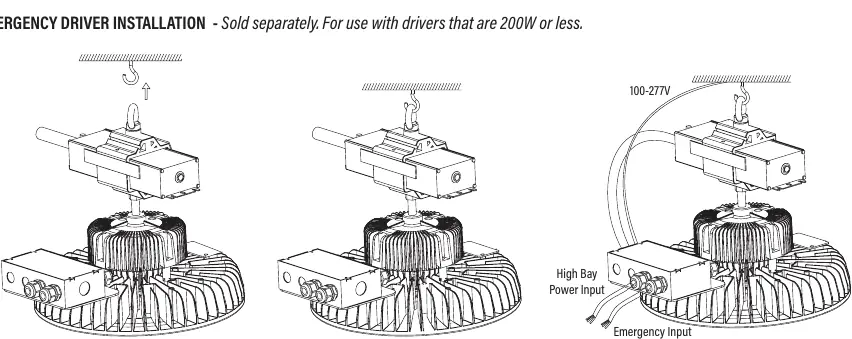
- Drill a hole into the ceiling for the appropriate size hook.
- Secure the hook to the ceiling and hang the fixture.
- Connect the electrical cables, ensuring the high bay power input and emergency input are correctly wired.
Practical help
Common problems
Dimming function not in use
Cap the purple (DIM+) and gray (DIM-) dimming wires separately to prevent short circuits.
Installation in wet locations
Ensure all electrical connections and installation holes are sealed to be water-tight.
Wiring damage
Do not expose wiring to edges of sheet metal or other sharp objects during installation.
Before use
- Verify that the supply voltage is correct by comparing it with the luminaire label.
- Ensure the mounting surface is of sufficient strength to hold the fixture weight.
- Turn off electrical power at the fuse or circuit breaker box.
- Ensure you have UL-approved wire connectors.
- Check if the bracket or emergency driver is required (sold separately).
Specs in practice
- White (Neutral)
- Standard neutral wire.
- Yellow/Green (Grd)
- Safety ground wire.
Images and diagrams
- Hook Installation: Illustrates drilling, hooking, and hanging the fixture.
- Bracket Installation: Shows how to attach the bracket and adjust the 120-degree beam angle.
- Wiring Diagram: Clearly distinguishes between standard line voltage connections and 1-10V dimming connections.
Model compatibility
- Bracket is sold separately.
- Emergency driver is sold separately and compatible with drivers 200W or less.
- Suitable for wet locations.

Manual page author
Michael Turner
Technical manual editor
Reviews PDF manuals for structure, safety notes, and practical product details so readers can find the right information quickly.