Home / Home Decor
Installation and Care Guide for Origin 21 24-IN Wall Cabinet
Quick guide for the Origin 21 24-IN Wall Cabinet (1688WC-24-274). Includes step-by-step installation instructions, wall mounting procedures, care tips, and replacement parts information.
Quick answers from the manual
Quick answer
- This manual provides assembly and installation instructions for the Origin 21 24-IN Wall Cabinet (Model 1688WC-24-274). It covers wall mounting, shelf installation, and maintenance. p. 1, 4, 5
Key actions
- Mounting the wall bracket p. 4
- Installing the handle p. 4
First start
- Unpack and verify parts p. 3
- Install handle p. 4
Show 2 more answers Show less
Maintenance and reset
- Cleaning p. 6
- Touch-up p. 6
Where to find it in the PDF
- Installation Instructions p. 4, 5
- Replacement Parts p. 7
Table of contents
Manual images
Click an image to enlargeQuick guide from the manual
This manual provides instructions for the assembly and installation of the Origin 21 24-IN Wall Cabinet. Key procedures include mounting the wall bracket to wall studs and attaching the cabinet. The manual also provides care instructions for maintaining the wood finish and a list of replacement parts.
Package Contents
Ensure all parts are present before beginning assembly:
- A: Cabinet
- B: Wall Bracket
- C: Shelf
- D: Flip Down Door (preassembled)
- AA: Touch Up Pen
Preparation
Estimated installation time is 20 minutes. Required tools (not included): Phillips screwdriver, utility knife or scissors, power drill with drill bit. Helpful tools: Measuring tape, level. Ensure two adults are available for assembly steps.
Installation Instructions
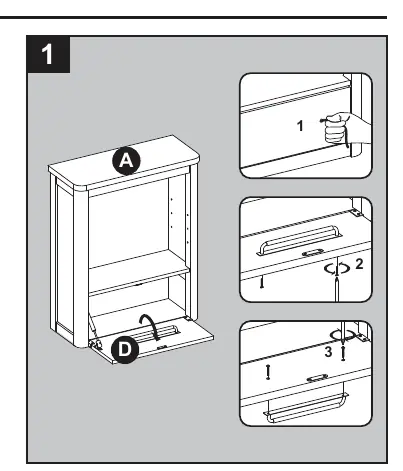
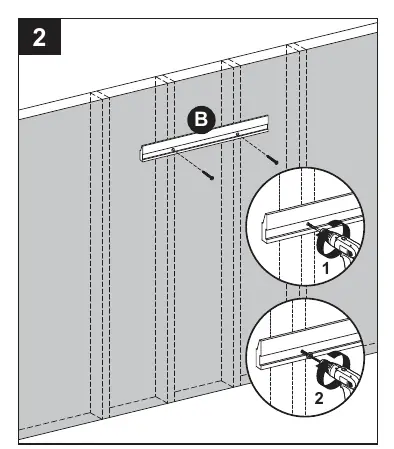
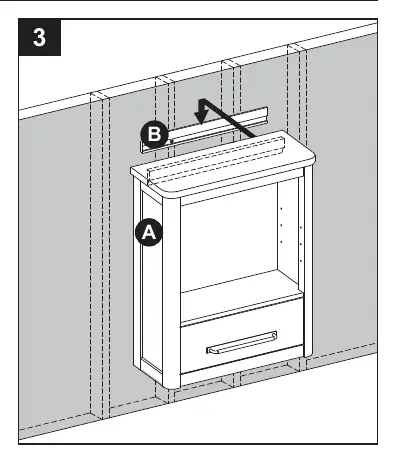
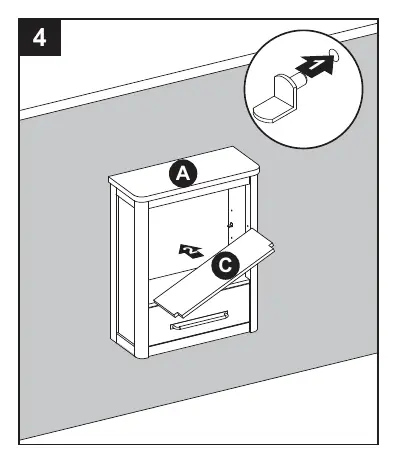
1. Handle Installation
The handle is attached to the inside of the flip-down door (D). Use the attached string to open the drawer initially. Unscrew the handle and reattach it to the outside of the drawer.
2. Wall Bracket Mounting
Locate and mark wall stud locations where the cabinet will be placed. Center the wall bracket (B) in the desired level location. Secure the wall bracket (B) to the wall into preferably 2 wall studs using hardware appropriate for your wall type (not included). Ensure the bracket is level and centered.
3. Cabinet Mounting
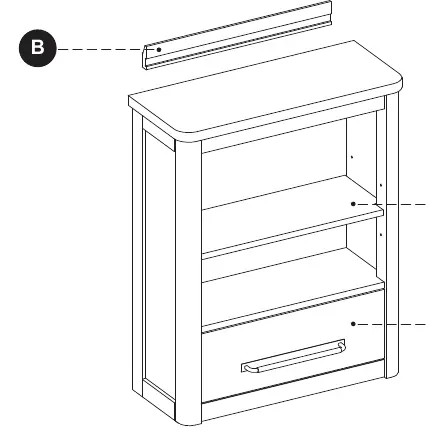
With the help of another adult, carefully lower the cabinet (A) down onto the wall bracket (B). Ensure the cabinet is secure to the wall before letting go.
4. Shelf Installation
From the front of the assembly, insert shelf pins at the desired height, ensuring they are level. Place the shelf (C) on top of the shelf pins.
Care and Maintenance
- Dust the wall cabinet regularly with a soft, non-lint producing cloth or household dusting product.
- Clean with a gentle, non-abrasive household cleaner.
- Dry the wood immediately with a soft cloth or towel.
- For scratches, use the touch-up pen (AA) by stroking in the direction of the scratch and rubbing off excess colorant promptly.
Warranty
The manufacturer warrants this item against defects in materials and workmanship for a period of one (1) year from the date of original retail purchase. This warranty applies only to the original purchaser and does not cover damage from accident, misuse, modification, or improper installation.
Practical help
Common problems
Missing parts or hardware
Compare parts with the package contents list. If missing, contact customer service at 888-251-1026.
Handle is not visible on the outside
The handle is attached to the inside of the flip-down door (D). Use the attached string to open the door initially to access the handle.
Before use
- Verify all parts (Cabinet, Wall Bracket, Shelf, Flip Down Door) are present.
- Ensure you have a Phillips screwdriver, utility knife/scissors, and a power drill.
- Have a measuring tape and level ready for accurate placement.
- Ensure two adults are available for the assembly and mounting process.
- Locate wall studs for secure mounting.
Show more Show less
Images and diagrams
- Step 1: Shows the handle attached to the inside of the flip-down door and how to move it to the outside.
- Step 2: Illustrates marking wall studs and securing the wall bracket (B) to the wall.
- Step 3: Demonstrates lowering the cabinet (A) onto the wall bracket (B).
- Step 4: Shows inserting shelf pins and placing the shelf (C).
Model compatibility
- Requires wall studs for secure installation.
- Hardware for wall mounting is not included and must be appropriate for your specific wall type (e.g., cabinet screw or toggle bolt).

Manual page author
David Miller
Documentation analyst