Power / Transformers & Supplies
Installation Guide for Phanteks Glacier EZ-Fit 140RES-D5
Complete installation guide for the Phanteks Glacier EZ-Fit 140RES-D5 water cooling reservoir. Includes mounting options, water loop planning, D-RGB connection, and tube installation steps.
Table of contents
Manual images
Click an image to enlargeQuick Guide
Before starting the installation, plan your water loop inlet and outlet ports. Always check for leaks before turning on the system. Ensure the desktop PC is powered off and unplugged during the entire installation process. Use the provided tools (8mm Allen Key, 2.5mm Allen Key) for assembly.
Scope of Delivery
The package includes the following components:
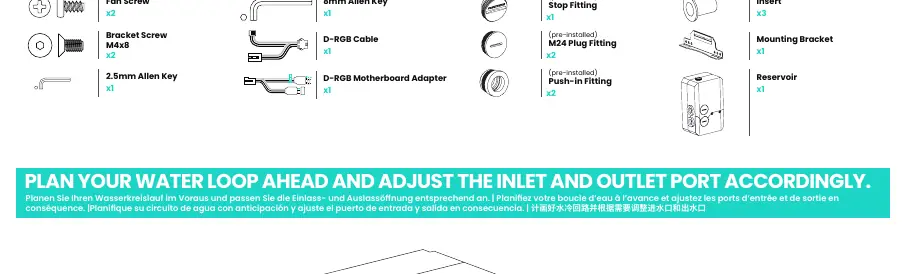
- Reservoir (140RES-D5)
- Mounting Bracket
- Fan Screws (x2)
- Bracket Screws M4x8 (x2)
- D-RGB Cable and Motherboard Adapter
- Pre-installed fittings: Push-in Fitting (x2), M24 Plug Fitting (x2), Stop Fitting (x1)
- Inserts (x3)
- 8mm and 2.5mm Allen Keys
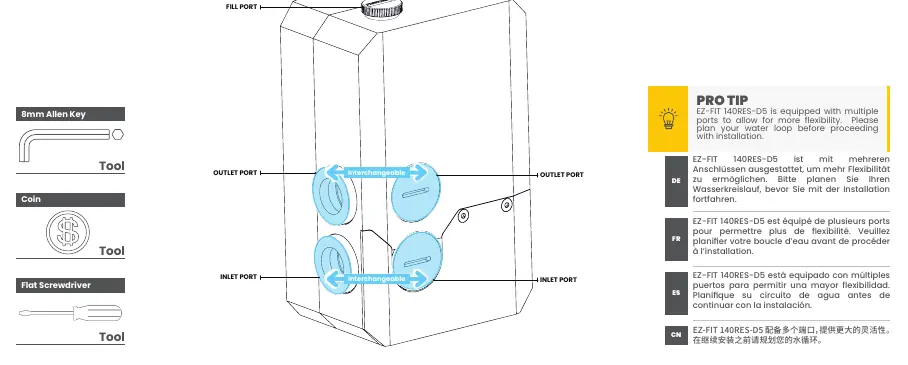
Planning the Water Loop
The EZ-Fit 140RES-D5 is equipped with multiple ports to allow for flexibility. Plan your water loop inlet and outlet ports before proceeding with the installation. The ports are interchangeable.
Mounting Options
There are three primary mounting options for the reservoir:

- Besides fan: Mounts the reservoir to the side of the fan.
- In front of fan: Mounts the reservoir directly in front of the fan.
- On top of fan: Mounts the reservoir on top of the fan assembly.
Use the provided Bracket Screws and 2.5mm Allen Key to secure the mounting bracket to the reservoir and the fan.
Connecting D-RGB Cables
Connect the D-RGB cable to the reservoir and then to other Phanteks D-RGB lighting products or the motherboard using the included adapter. Ensure the pump power cables (SATA and PWM) are connected to the power supply and motherboard respectively.
Installing the Waterloop
The reservoir supports both hard and soft tube installations.
- Soft Tube Installation: Press down on the ring of the fitting and insert the soft tube.
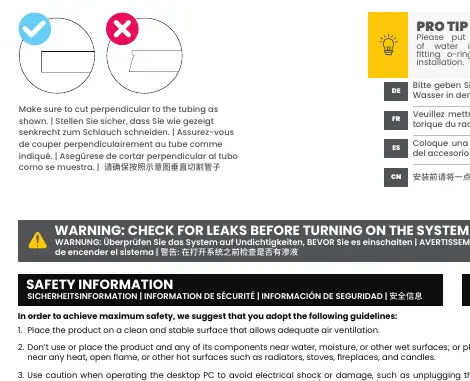
- Hard Tube Installation: Ensure the tube is cut perpendicular to the tubing before insertion.
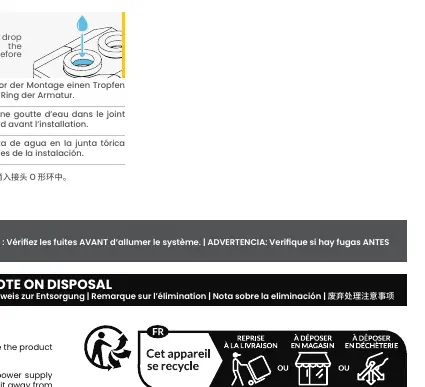
- Pro Tip: Put a drop of water into the fitting o-ring before installation to ensure a smooth fit.
Tube Removal
To remove a tube, press down on the ring of the fitting and pull the tube out.
Safety Information
Always place the product on a clean, stable surface. Do not place the product near water, moisture, heat sources, or open flames. Handle glass components with extra caution. Ensure the PC is off and unplugged before installing or uninstalling any internal components. Check for leaks thoroughly before powering on the system.
Practical help
Common problems
System leaks
Check for leaks thoroughly before turning on the system. Ensure all fittings are properly installed.
Difficulty inserting tubes
Put a drop of water into the fitting o-ring before installation to facilitate the process.
Tube not fitting
Ensure the tube is cut perpendicular to the tubing as shown in the manual.
Before use
- Plan your water loop inlet and outlet ports.
- Ensure the desktop PC is powered off and unplugged.
- Verify all components from the scope of delivery are present.
- Check for leaks before powering on the system.
- Ensure tubes are cut perpendicular.
Specs in practice
- M24 Plug Fitting
- Pre-installed plug used to seal unused ports on the reservoir.
- Push-in Fitting
- Pre-installed fitting designed for quick and secure tube connection.
Images and diagrams
- Mounting options show three distinct configurations for attaching the reservoir to a 120mm or 140mm fan.
- Tube installation diagrams illustrate the mechanism of pressing down on the fitting ring to insert or remove tubing.
Model compatibility
- Compatible with 120mm and 140mm fan mounts.
- Supports both hard and soft tubing.

Manual page author
David Miller
Documentation analyst
Organizes user manual content into clear summaries, with attention to model details, product context, and everyday usability.