Computers / Cooling Systems
Noctua NF-A12x25 G2 LS-PWM Fan Installation Guide
A quick guide to installing and connecting the Noctua NF-A12x25 G2 LS-PWM fan. Includes instructions for mounting, cable management, using included adapters, and maintenance tips.
Table of contents
Quick guide from the manual
This guide covers the installation, connection, and maintenance of the Noctua NF-A12x25 G2 LS-PWM fan. Before starting, ensure you have removed the protective paper from the inside of the fan frame. Always check the airflow direction arrows on the frame to ensure proper orientation for your setup.
Installation
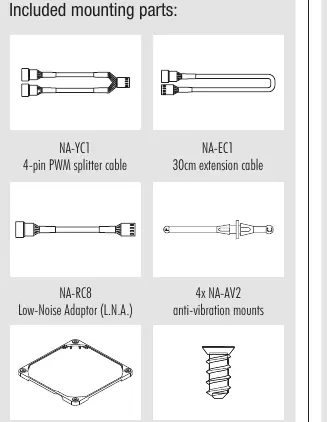
The fan can be installed using the supplied mounting screws or the NA-AV2 silicone anti-vibration mounts. When using the NA-AV2 mounts:
- Pull the F (fan) side through the fan's mounting holes.
- Turn the fan around and pull the C (case) side through the mounting holes of the case.
- If the long ends of the mounts obstruct installation, they can be trimmed with scissors, though this makes reinstallation difficult.
For CPU heatsinks or watercooling radiators, use the mounting mechanism supplied with the cooler (clips, screws, etc.). The included NA-AVG1 gasket can be used instead of pre-installed pads for a tighter seal on radiators.
Connection
The fan features a 4-pin PWM connector for automatic speed control. It is compatible with 3-pin headers, though it will run at full speed unless the motherboard supports voltage-based speed control.
- Splitter Cable (NA-YC1): Use this to connect multiple fans to a single PWM header.
- Extension Cable (NA-EC1): Use the 30cm extension if the 20cm primary cable is too short.
- Low-Noise Adaptor (NA-RC8): Use this to reduce the fan speed from 1100 to 850rpm.
Cleaning and maintenance
To maintain performance, clean the fan regularly using a duster, slightly moist tissue, or canned air. Do not use a vacuum cleaner, as it may apply excessive force. When using compressed air, hold the fan blades to prevent them from spinning at high speeds, which could damage the bearing. The fan is not designed to be taken apart; removing the impeller will void the warranty.
Warranty and support
The product includes a 6-year manufacturer's warranty. If you encounter issues, consult the FAQ section at faqs.noctua.at or contact support at [email protected].
Official resources from the manual
Practical help
Common problems
Fan speed is too high
Use the included NA-RC8 Low-Noise Adaptor to cap the speed at 850rpm.
Cable is too short
Connect the included 30cm NA-EC1 extension cable.
Anti-vibration mounts are difficult to install
Ensure the F side is pulled through the fan first, then the C side through the case. You may trim the ends with scissors if necessary.
Before use
- Remove protective paper from the inside of the fan frame.
- Check airflow direction arrows on the fan frame.
- Identify fan headers on the motherboard.
- Select appropriate mounting hardware (screws or NA-AV2 mounts).
- Verify if the NA-AVG1 gasket is needed for your specific radiator application.
Specs in practice
- 4-pin PWM Connector
- Allows for fully automatic speed control via the motherboard.
- NA-RC8 Adaptor
- Reduces fan speed from 1100 to 850rpm.
- NA-AVG1 Gasket
- Provides a tighter seal for watercooling radiators.
Images and diagrams
- F side: Fan side of the anti-vibration mount.
- C side: Case side of the anti-vibration mount.
Model compatibility
- Compatible with 3-pin fan headers (runs at full speed).
- Not designed to be taken apart; removing the impeller voids the warranty.

Manual page author
Michael Turner
Technical manual editor
Reviews PDF manuals for structure, safety notes, and practical product details so readers can find the right information quickly.