Electronics / Projectors
User Manual for Philips NeoPix 130W Smart Home Projector
Quick start guide and setup instructions for the Philips NeoPix 130W Smart Home Projector. Learn how to connect devices, use the remote, adjust focus, and mount your projector.
Table of contents
Manual images
Click an image to enlargeQuick guide from the manual
This guide provides essential information for setting up and using your Philips NeoPix 130W Smart Home Projector. For detailed software information and advanced settings, please refer to the full user manual available at www.philips.com/support.
Box contents
Ensure your package includes the following items:
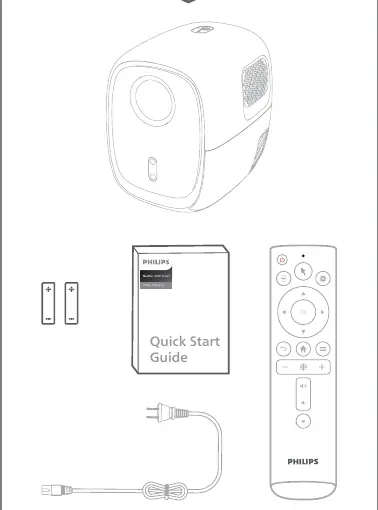
- Philips NeoPix 130W Smart Home Projector
- Remote control
- Batteries
- Power cable
- Quick Start Guide
Device overview and connections
The projector features several ports and buttons for connectivity:
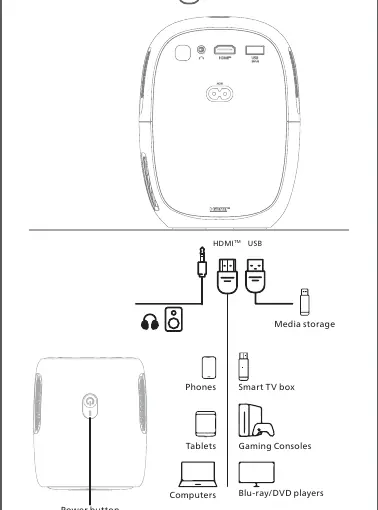
- Power button: Located on the device for manual power control.
- HDMI port: For connecting devices like gaming consoles, Blu-ray/DVD players, computers, and smart TV boxes.
- USB port: For connecting media storage devices.
- Headphone/Audio out: For external audio output.
Remote control functions
The remote control allows you to navigate the interface and adjust settings:
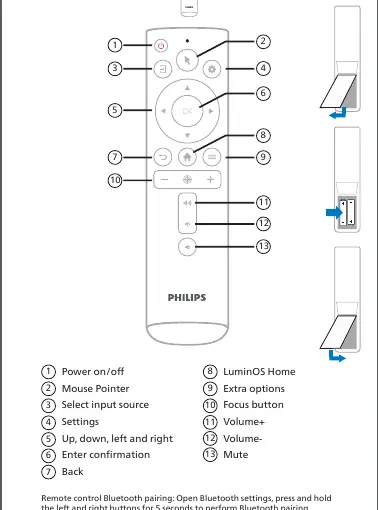
- Power on/off: Turns the projector on or off.
- Mouse Pointer: Activates the on-screen pointer.
- Select input source: Switches between connected devices.
- Settings: Accesses the menu.
- Navigation: Up, down, left, and right arrows for menu navigation.
- Enter confirmation: OK button.
- LuminOS Home: Returns to the home screen.
- Focus button: Used for auto-focus adjustments.
- Volume controls: Volume+, Volume-, and Mute.
Bluetooth Pairing: To pair the remote, open Bluetooth settings on the projector, then press and hold the left and right buttons on the remote for 5 seconds.
Setup and power
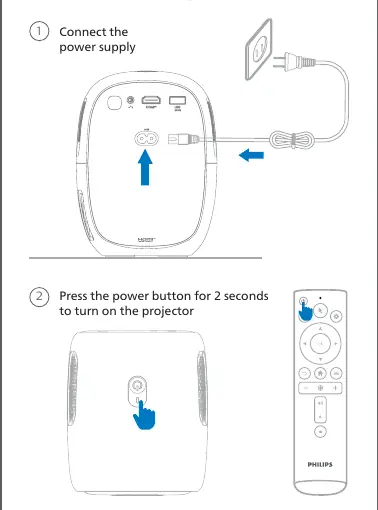
- Connect the power cable to the projector and a power outlet.
- Press and hold the power button on the projector or remote for 2 seconds to turn it on.
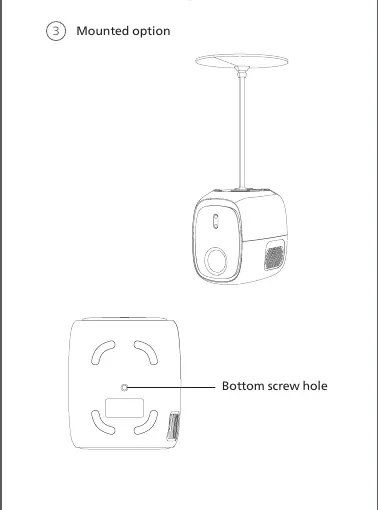
Mounting
The projector features a bottom screw hole, allowing it to be mounted on compatible stands or ceiling mounts.
Focus adjustment
Auto focus: Ensure the projector is 1.2-3M away from the wall. Short press the focus button on the remote. You can also enable "Displacement Autofocus" in the menu to trigger automatic focus when the projector is moved.
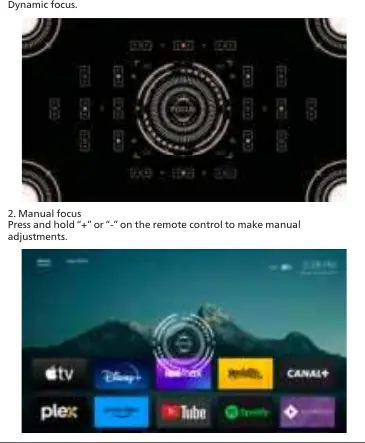
Manual focus: Press and hold the "+" or "-" buttons on the remote to make manual adjustments.
Support
If you need assistance, you can contact Philips support via:
- Facebook: m.me/philipsprojection
- YouTube: youtube.com/philipsprojection
- Email: [email protected]
- Website: www.philips.com/support
Official resources from the manual
Manufacturer information
Philips
Practical help
Common problems
Projector not focusing
Ensure the projector is 1.2-3M from the wall. Use the focus button on the remote or manually adjust using '+' or '-' buttons.
Remote control not responding
Ensure batteries are installed correctly. Perform Bluetooth pairing by holding the left and right buttons for 5 seconds.
Before use
- Check box contents: Projector, remote, batteries, power cable.
- Place the projector 1.2-3M from the projection surface.
- Connect the power supply.
- Connect desired media devices via HDMI or USB.
Images and diagrams
- Page 4 illustrates the connection ports and compatible devices.
- Page 5 details the remote control button layout and functions.
- Page 6 shows the power connection and power-on procedure.
- Page 7 indicates the location of the bottom screw hole for mounting.
Model compatibility
- Supports HDMI devices (Gaming Consoles, Blu-ray/DVD players, Computers, Smart TV boxes).
- Supports USB media storage.

Manual page author
David Miller
Documentation analyst
Organizes user manual content into clear summaries, with attention to model details, product context, and everyday usability.