Lighting / Stage Lighting
QTX Crystalizer 152.747UK Mini Animation Laser User Manual
Quick guide for the QTX Crystalizer 152.747UK Mini Animation Laser. Learn about setup, DMX channel configuration, safety precautions, and troubleshooting.
Table of contents
Manual images
Click an image to enlargeQuick guide from the manual
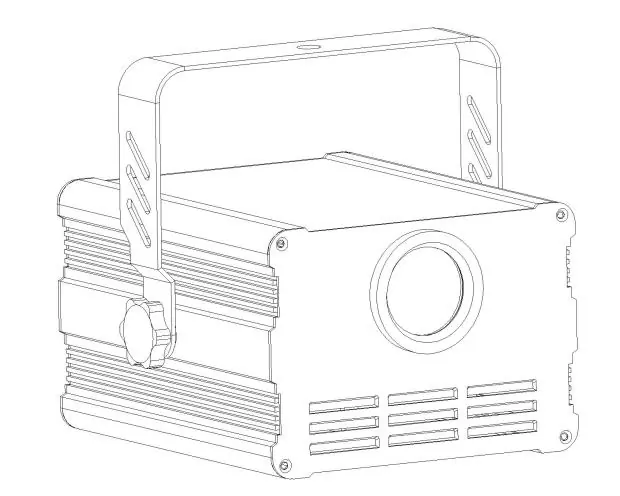
The QTX Crystalizer is a Class 3B laser effect unit. Before use, ensure you have all components: the main unit with bracket, UK IEC mains lead, and the laser key. This device is intended for use by trained personnel only due to the nature of Class 3B laser radiation. Always ensure the unit is kept away from damp or dusty environments and that there is adequate ventilation around the housing.
Safety Precautions
- Laser Radiation: This is a Class 3B laser. Avoid pointing directly towards eyes as it can cause injury.
- Installation: Use the included mounting bracket to fix to a stand or lighting truss. If mounting overhead, always use secondary safety fixings.
- Environment: Keep away from rain, damp, or dusty environments.
- Maintenance: Do not open the cover; the unit contains high voltage and is not serviceable by the end user. Refer to qualified personnel for service.
Rear Panel Controls
The rear panel provides access to all connections and settings:
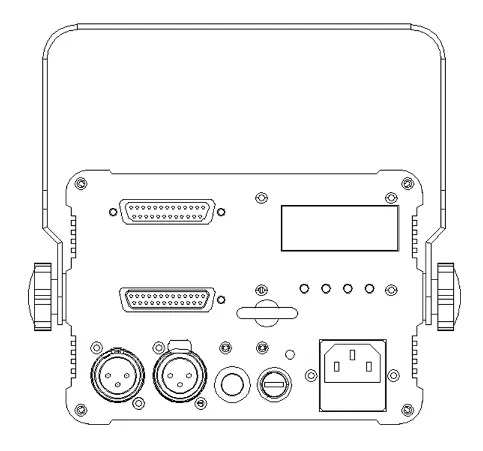
- 1. ILDA output / 2. ILDA input: For ILDA signal connections.
- 3. DMX output / 4. DMX input: For DMX512 signal control.
- 5. LED display: Shows current menu settings and DMX status.
- 6. Manual controls: Buttons (MENU, UP, DOWN, ENTER) to navigate settings.
- 7. Microphone: For sound-to-light mode.
- 8. Laser key: Physical key switch to enable/disable laser output.
- 9. IEC mains input: Power connection.
Manual Control Menu
Press the MENU button to enter the settings menu, use UP and DOWN to navigate, and ENTER to confirm.
- Addr: DMX address settings (A001-A512).
- Auto: Auto mode (Aut0-Aut9, slow to fast).
- SoUn: Sound to light mode (SoU0-SoU9, sensitivity low to high).
- vEr: Displays software version (vE1.2).
DMX Operation
To control the unit via DMX, connect the signal source to the DMX input using a balanced XLR lead. Select A001 from the menu and confirm the start address. The 'A' on the LED display will flash when a DMX signal is received. The unit utilizes 16 DMX channels for full control over laser on/off, colour, pattern selection, zoom, rotation, and movement effects.
Cleaning and Maintenance
- Use a soft cloth with a neutral detergent to clean the casing.
- Use a vacuum cleaner to clear ventilation grilles of dust or debris.
- Do not use strong solvents.
Troubleshooting
- No power: Check mains voltage, outlet, IEC lead, and fuse.
- No laser output: Check mode settings, DMX controller settings, and ensure the laser key is turned on.
- Unresponsive to DMX: Ensure the unit is in DMX mode and the 'A' is flashing on the display. Check DMX address and cables.
- Overheating: Ensure adequate ventilation and that the unit is not too close to a heat source.
Practical help
Common problems
No power (mains)
Check that the mains voltage is correct, the outlet is switched on, and the IEC lead is securely connected. Check the fuse.
No laser or light output
Check control panel mode settings, verify DMX controller settings (dimmer levels, blackout), and ensure the laser key on the rear panel is turned on.
Unresponsive to DMX
Ensure the unit is in DMX mode, the 'A' on the display is flashing, the correct DMX address is set, and DMX cables are connected properly.
Overheating/cutting out
Ensure adequate ventilation around the unit and that it is not positioned too close to a heat source.
Before use
- Verify package contents: main unit with bracket, UK IEC mains lead, laser key, and user guide.
- Ensure the installation environment is dry and dust-free.
- If mounting overhead, attach secondary safety fixings.
- Ensure the laser key is inserted and turned to the 'on' position.
- Check that there is adequate air-flow around the fixture housings.
Specs in practice
- Laser Class 3B
- Requires trained personnel for installation and operation; do not look directly into the beam.
- DMX Channels: 16
- The unit requires 16 channels on your DMX controller for full functionality.
- Power Consumption: 22W (max)
- Maximum power draw of the unit during operation.
- Fuse Rating: F2A
- The required fuse type for the IEC mains input.
Images and diagrams
- The rear panel features 9 key elements: ILDA I/O, DMX I/O, LED display, manual control buttons, microphone, laser key switch, and IEC power input.
Model compatibility
- Compatible with DMX512 controllers.
- Requires balanced XLR leads for DMX signal transmission.

Manual page author
Michael Turner
Technical manual editor
Reviews PDF manuals for structure, safety notes, and practical product details so readers can find the right information quickly.