Lighting / Stage Lighting
User Manual for QTX Pentaflash 151.743UK 5-in-1 LED and Laser Effect Light
Quick guide for the QTX Pentaflash 151.743UK 5-in-1 LED and Laser Effect Light. Learn how to set up, use DMX control, operate via remote, and troubleshoot common issues.
Table of contents
Manual images
Click an image to enlargeQuick Guide
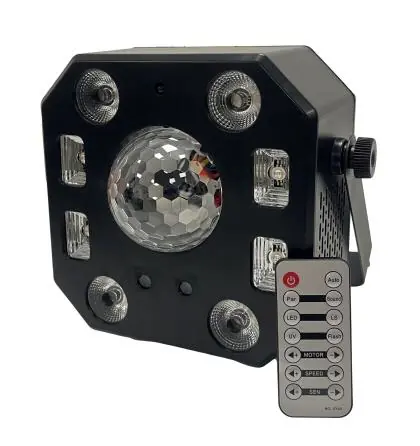
The QTX Pentaflash is a 5-in-1 lighting effect combining a 12W RGBW effect ball, 4x White Strobe/UV LEDs, 4x 6W RGBW PARs, and a dual-colour laser. It can be operated via integrated automatic programs, sound-to-light mode, an IR remote control, or 18-channel DMX.
Safety and Placement
- Laser Safety: This is a Class 3B laser. Avoid pointing directly at eyes. Installation and operation should be performed by trained personnel in accordance with HS(G)95 guidelines.
- Placement: Use the included mounting bracket to fix to a stand or lighting truss. Use secondary safety fixings for overhead mounting.
- Environment: Keep away from damp or dusty environments. Ensure adequate airflow around the fixture.
Rear Panel Controls
The rear panel features the LCD display, DMX signal input/output (XLR), power input (IEC), and the laser key switch.
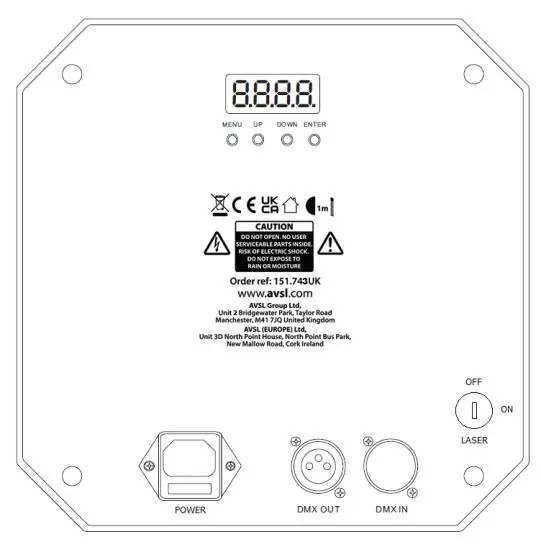
- Menu: Press to enter the settings menu.
- Up/Down: Navigate through setting functions.
- Enter: Confirm the desired setting.
- Laser Key: Must be turned on to enable laser output.
Operation Modes
Manual Control Menu
Use the menu buttons to select built-in programs:
- A001: DMX address settings.
- LE1-LE5: Magic ball effects (red, green, blue, white, auto).
- LS: Laser auto run.
- Pu: UV light intensity.
- Par: Colour wash effects (red, green, blue, white, auto).
- FL: Strobe speed.
- Au: Auto run (all features).
- S1-S2: Sound-to-light sequences.
Remote Control
The included IR remote allows for quick access to power, auto run, par wash, sound-to-light, magic ball, laser, strobe, and speed/sensitivity adjustments.
DMX Mode
Connect the DMX signal source to the DMX input via a balanced XLR lead. Daisy-chain extra fixtures using the DMX output. Select A001 from the menu to enter DMX mode. The unit uses 18 channels for full control over motor rotation, laser, master dimmer, strobe, and individual LED patterns.
Cleaning and Maintenance
- Use a soft cloth with a neutral detergent to clean the casing.
- Use a vacuum cleaner to clear ventilation grilles of dust or debris.
- Do not use strong solvents.
Troubleshooting
- No power: Check mains voltage and outlet. Check IEC lead and fuse.
- No light output: Check control panel mode settings and DMX controller settings.
- No laser output: Ensure the laser key on the rear panel is turned on.
- Unresponsive to DMX: Ensure the unit is in DMX mode (A on display flashes when receiving signal). Check DMX controller settings, master dimmer, and cables.
- Overheating: Ensure adequate ventilation and distance from heat sources.
Practical help
Common problems
No laser output
Ensure the physical laser key on the rear panel is turned to the ON position.
Unresponsive to DMX
Verify the unit is in DMX mode (A on display should flash). Check that the DMX controller is not set to blackout and that the correct address is set.
No power
Check mains voltage, the outlet, and the IEC lead. Inspect the fuse (F3A).
Overheating/cutting out
Ensure the unit has adequate ventilation and is not positioned too close to a heat source.
Before use
- Verify the package contains the main unit, bracket, UK IEC lead, and manual.
- Ensure the unit is not exposed to rain or damp environments.
- Check that the laser key is turned on if laser effects are required.
- Ensure adequate airflow around the fixture housing.
- If mounting overhead, ensure secondary safety fixings are used.
Specs in practice
- Power supply
- 110-240Vac, 50/60Hz (IEC connection).
- DMX channels
- 18 channels required for full DMX control.
- Light source
- Includes 12W RGBW effect ball, 4x UV/White LEDs, 4x 6W RGBW PARs, and a dual-colour laser (150mW Red, 50mW Green).
Images and diagrams
- The rear panel contains the LCD display, menu buttons (Menu, Up, Down, Enter), DMX In/Out ports, Power input, and the Laser key switch.
Model compatibility
- Requires a DMX controller for advanced channel-based operation.
- Compatible with standard lighting stands and trusses using the included mounting bracket.

Manual page author
David Miller
Documentation analyst
Organizes user manual content into clear summaries, with attention to model details, product context, and everyday usability.