Toys / RC Components
Eachine 2.4Ghz 5CH Radio Controller
A quick guide for the Eachine 2.4Ghz 5CH Radio Controller, covering antenna installation, battery charging, and receiver binding procedures.
Quick answers from the manual
Quick answer
- To bind the transmitter to the receiver, power on both devices within 50cm of each other, press the ID SET button on the receiver for over 1 second until the LED flashes, and wait for the LED to turn solid. p. 2
Key actions
- Charge the transmitter battery p. 1
- Bind transmitter to receiver p. 2
First start
- Charge the battery and perform the binding process before the first flight. p. 1, 2
Problems and fixes
Low battery warning
The green indicator flashes with a D D warning tone; charge the battery immediately.
p. 1Where to find it in the PDF
- Controller Diagram and Installation p. 1
- Binding Instructions p. 2
Table of contents
Manual images
Click an image to enlargeQuick guide from the manual
This document provides essential setup instructions for the Eachine 2.4Ghz 5CH Radio Controller. The most critical procedures include proper antenna placement to ensure signal range and the binding process to link the transmitter with the receiver.
Antenna installation
Proper antenna positioning is vital for maintaining signal integrity and control range:
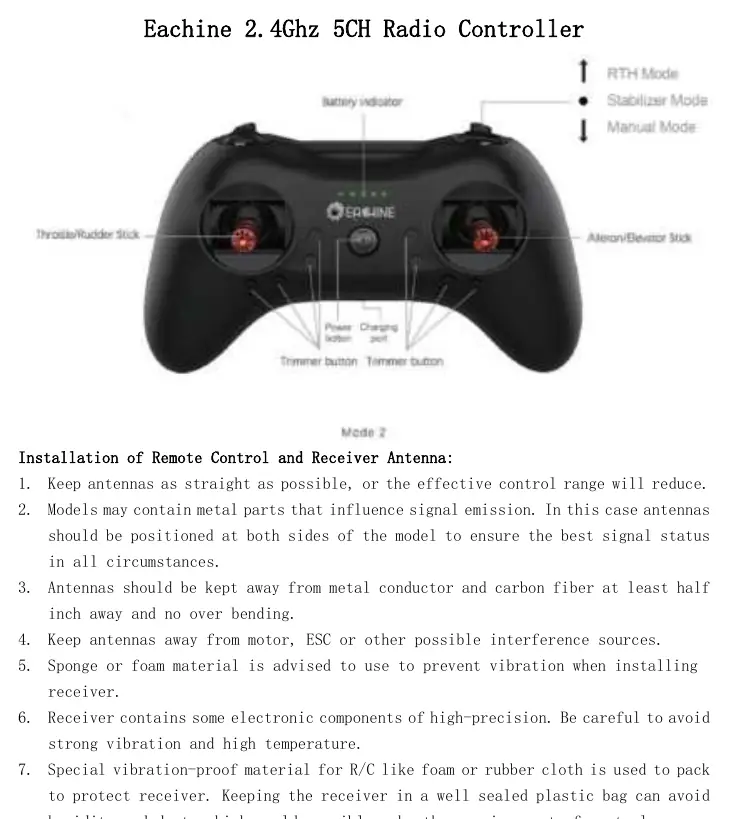
- Keep antennas as straight as possible.
- Position antennas on both sides of the model if it contains metal parts.
- Maintain a distance of at least half an inch from metal conductors and carbon fiber.
- Avoid bending the antennas.
- Keep antennas away from motors, ESCs, or other interference sources.
- Use sponge or foam material to protect the receiver from vibration.
- Keep the receiver in a well-sealed plastic bag to protect it from humidity and dust.
Remote control battery charging
The transmitter features a built-in 1S lithium battery.
- When the voltage is low, the green indicator will flash, and a D D warning tone will sound.
- Charge the battery promptly to prevent damage from over-discharge.
- Use a standard Android USB data cable connected to a computer or portable charger to charge the radio.
Binding the transmitter and receiver
Every transmitter has a unique ID code. You must bind the transmitter to the receiver before the first use.
- Place the transmitter and receiver close to each other (within 50 centimeters).
- Power on both the transmitter and the receiver. The receiver will automatically bind to the closest transmitter.
- Press the ID SET button on the side of the receiver for more than 1 second. The flashing LED indicates that binding has started.
- When the LED stops flashing and remains solid, the binding process is complete.
- Verify the binding by checking if the servos move in response to transmitter commands.
Note: You do not need to rebind unless you are using a new receiver or a different transmitter.
Manufacturer information
Eachine
Practical help
Common problems
Short control range
Ensure antennas are straight, not bent, and kept away from metal, carbon fiber, motors, and ESCs.
Receiver not responding
Perform the binding process again to ensure the transmitter and receiver are linked.
Before use
- Charge the transmitter battery using an Android USB cable.
- Ensure the receiver is protected from vibration using foam or sponge.
- Place the receiver in a sealed bag to protect from dust and humidity.
- Perform the binding process before the first flight.
Specs in practice
- Battery Type
- 1S Lithium battery (built-in).
- Binding Distance
- Keep transmitter and receiver within 50cm during the binding process.
Images and diagrams
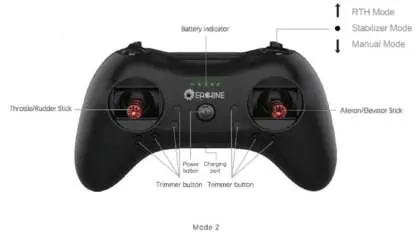
- The controller features a battery indicator, power button, charging port, and trimmer buttons.
- The controller supports RTH Mode, Stabilizer Mode, and Manual Mode.
Model compatibility
- The receiver will bind to the closest transmitter during the binding process.

Manual page author
Emily Carter
User documentation editor
Prepares concise manual descriptions and highlights the most useful setup, operation, and maintenance information for readers.