Toys / RC Components
User Manual for Eachine TX16S Remote Control
Quick guide for the Eachine TX16S remote control. Includes setup, protocol selection, battery charging instructions, and technical specifications.
Quick answers from the manual
Quick answer
- To set up a model, press the MDL button, navigate to the MODEL SETUP page, select MULTI, and choose the appropriate protocol for your receiver. p. 3
Key actions
- Binding the receiver p. 3
- Testing range p. 3
Problems and fixes
Incorrect battery type used
Do not use 3.6V Li-ion, 2S 6.6V LiFE, or LiFEP04 cells. Use only 2-cell 7.4V Li-ion or LiPo packs.
p. 4, 5Technical specifications
| Parameter | Value | Meaning | Pages |
|---|---|---|---|
| Frequency | 2.400GHz-2.480GHz | Operating frequency range | p. 3 |
| Display | 4.3-inch TFT | Screen size and type | p. 3 |
Where to find it in the PDF
- Remote control overview p. 3
- Specifications p. 3
Table of contents
Quick guide from the manual
The Eachine TX16S is a versatile 2.4GHz remote control system suitable for fixed-wing aircraft, gliders, helicopters, boats, robotics, and multi-rotor aircraft. Before operating, ensure the model is powered off and propellers are removed during assembly or maintenance. Do not operate the system in severe weather, near high-voltage lines, or in areas with high 2.4GHz interference.
Remote control overview
The transmitter features a 4.3-inch color screen and various controls, including:
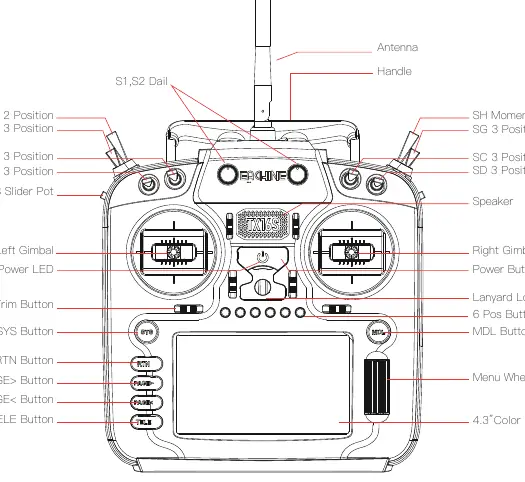
- Gimbals: Left and Right gimbals for control.
- Switches: Multiple 2-position and 3-position switches (SF, SE, SB, SA, SG, SC, SD) and a momentary switch (SH).
- Navigation: SYS, MDL, RTN, PAGE, and TELE buttons, along with a menu wheel.
- Trims: T1-T6 trim buttons.
- Sliders: LS and RS sliders.
Model and protocol selection
The TX16S uses a 4-in-1 multi-protocol module. To configure a model:
- Press the MDL button to enter the MODEL settings.
- Navigate to the MODEL SETUP page.
- Select MULTI in the mode options.
- Select the specific protocol required for your receiver in the sub-options.
The system automatically activates the corresponding RF chip for the selected protocol and shuts down unused chips to prevent interference. Use the Bind button to start the linking process and the Range button to reduce power for distance testing.
Power and charging
The TX16S features a built-in USB charging function for 2-cell 7.4V battery packs. The charging circuit is compatible with:
- 2 x 3.7V Lithium-ion 18650 cells.
- 2 x 3.7V Lithium-ion 21700 cells.
- 2 x 3.7V LiPo batteries.
Warning: Do not use 3.6V Li-ion cells, 2S 6.6V LiFE battery packs, or LiFEP04 cells. Using incorrect battery types may cause damage or fire. Always charge in a safe area away from flammable materials and never leave the device unattended while charging.
Specifications
- Frequency: 2.400GHz-2.480GHz
- Display: 4.3-inch TFT (480 x 272 resolution)
- Channels: Up to 16 channels
- Working Voltage: 6.6-8.4V DC
- Working Current: 400mA
- Firmware: OpenTX
Manufacturer information
Eachine
Practical help
Common problems
Radio not binding to receiver
Ensure the correct protocol is selected in the MODEL SETUP menu and that the receiver is in bind mode.
Battery not charging
Verify you are using compatible 2-cell 7.4V battery packs (18650, 21700, or LiPo). Do not use LiFE or 3.6V Li-ion cells.
Firmware issues
Only update firmware if you are experienced. Incorrect updates can render the radio inoperable.
Before use
- Check that battery voltage is between 6.6V and 8.4V.
- Ensure propellers are removed from the model during setup.
- Verify that the area is free from high-voltage lines or heavy 2.4GHz interference.
- Inspect the remote control for any physical damage.
- Ensure you are not under the influence of drugs or alcohol.
Specs in practice
- Transmission frequency
- Operates in the 2.400GHz to 2.480GHz range.
- Working voltage
- Requires 6.6V to 8.4V DC power supply.
Images and diagrams
- The front panel contains the power button, gimbals, trim buttons, and navigation buttons (SYS, MDL, RTN, PAGE, TELE).
- Switches are located on the top shoulders of the transmitter for easy access during flight.
Model compatibility
- Compatible with DSM2/X, Flysky, Flysky 2A, and FrSKY protocols.
- Supports USB-C online updates and SD card offline updates.

Manual page author
Michael Turner
Technical manual editor
Reviews PDF manuals for structure, safety notes, and practical product details so readers can find the right information quickly.