Computers / Keyboards Input
User Manual for RadioShack Ergonomic 2.4Ghz Mouse 2606086
Quick guide for the RadioShack Ergonomic 2.4Ghz Mouse (2606086). Learn how to connect, charge, adjust DPI, and troubleshoot common issues with this wireless mouse.
Quick answers from the manual
Quick answer
- To use the RadioShack 2606086 mouse, turn the power switch on the bottom to ON and plug the USB receiver into your computer's USB port. p. 4
Key actions
- Charging the mouse p. 4
First start
- Initial setup p. 4
Problems and fixes
Device won't power on
Verify power switch is ON, charge battery with supplied cable, check for visible damage.
p. 5Maintenance and reset
- Cleaning p. 4
Technical specifications
| Parameter | Value | Meaning | Pages |
|---|---|---|---|
| DPI | 800-1200-1600-2400-3200-4800 | Adjustable sensitivity settings | p. 3 |
| Battery | 500 mA | Built-in lithium-ion capacity | p. 3 |
Where to find it in the PDF
- Product Description and Specs p. 2, 3
- Quick Start Guide p. 4
- Troubleshooting p. 5
Table of contents
Manual images
Click an image to enlargeQuick guide from the manual
The RadioShack Ergonomic 2.4Ghz Mouse (2606086) is a wireless device designed for professional use. To start using the mouse, turn the power switch on the bottom to the ON position and insert the USB receiver into your computer's USB port. The mouse features adjustable DPI settings and a rechargeable battery.
Product Description
This ergonomic mouse features a high-precision sensor and programmable macro functionality. It is designed for comfort and performance.
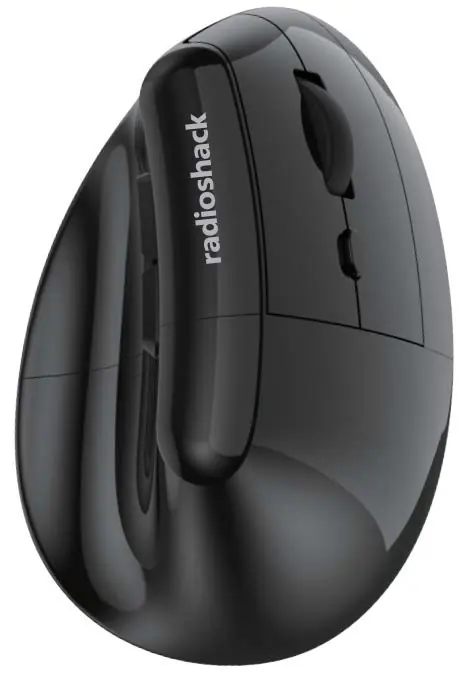
- Connectivity: 2.4 GHz wireless
- Sensor: Hunter Sun + PAW3212
- DPI Settings: 800, 1200, 1600, 2400, 3200, 4800
- Battery: Built-in 500 mA lithium-ion
- Battery Life: ~38 hours (typical), ~300 days standby
- Switches: > 5 million silent clicks
Package Contents
- 1x Gaming mouse
- 1x USB receiver (stored in the mouse)
- 1x User manual
- 1x Type-C cable
Quick Start Guide
Connectivity
- Remove the mouse from the packaging.
- Turn the power switch on the bottom to the ON position. The red indicator light will illuminate briefly.
- Insert the USB receiver into a USB port on your computer. The connection should establish automatically.
Charging
When the battery is low, charge the mouse using the provided Type-C cable. The red LED indicator will turn on during charging and turn off when the process is complete.
Maintenance and Care
- Clean the device with a dry or slightly damp cloth.
- Avoid using harsh chemicals.
- Do not attempt to disassemble the mouse.
- Store in a cool, dry place.
Troubleshooting
If you experience issues, check the following:
- Device won't power on: Ensure the power switch is ON and the battery is charged.
- Receiver not recognized: Re-seat the receiver or try a different USB port.
- Cursor skips: Clean the optical sensor area and ensure you are using a clean, flat surface.
- Connectivity drops: Move the mouse closer to the host or away from interference sources like microwave ovens or routers.
Practical help
Common problems
Device won't power on
Verify the power switch is set to ON and charge the battery using the supplied cable.
2.4G receiver not recognized
Re-seat the receiver, try a different USB port (preferably USB 2.0), or update OS/drivers.
Cursor skips or stalls
Clean the optical sensor area, ensure the surface is clean and flat, or recharge the battery.
Connectivity intermittently drops
Move closer to the host device and away from interference sources like microwave ovens or routers.
Before use
- Charge the mouse fully using the provided Type-C cable.
- Locate the USB receiver (usually stored in the mouse).
- Ensure the power switch on the bottom is set to ON.
- Connect the USB receiver to an available USB port on your computer.
Specs in practice
- Polling Rate
- The frequency at which the mouse reports its position to the computer (125 Hz).
Images and diagrams
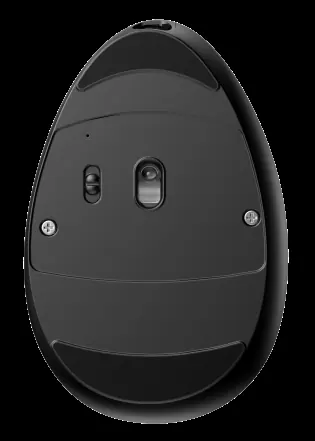
- The top view identifies the Left Key, Right Key, Scroll Wheel, DPI Key, Forward button, and Backward button.
- The bottom view identifies the On/Off switch and the optical sensor.
Model compatibility
- Requires an available USB port for the 2.4GHz receiver.
- Compatible with standard USB 2.0/2.4G support.

Manual page author
Emily Carter
User documentation editor
Prepares concise manual descriptions and highlights the most useful setup, operation, and maintenance information for readers.