Toys / RC Models & Drones
User Manual for Redcat RC-MT10E 1/10th Scale Monster Truck
Quick guide for the Redcat RC-MT10E 1/10th Scale Monster Truck. Includes setup, transmitter operation, ESC programming, troubleshooting, and safety warnings.
Table of contents
Manual images
Click an image to enlargeImportant Information
The Redcat RC-MT10E is a high-performance 1/10th scale RC monster truck. Before operating, ensure you perform a radio range check: turn on the transmitter, then the vehicle, and test controls at a distance of 50 yards. Warning: This is not a toy. It requires adult supervision and is intended for users 14 years and older. Always use LiPo-specific chargers and charging bags when charging batteries. Avoid running in water unless you have waterproofed the bearings and metal parts, and dry the vehicle thoroughly afterward.
Product Features and Specifications
The vehicle features a factory-assembled chassis with waterproof electronics, a brushless motor, and a 4WD drivetrain.
- Ground Clearance: 55mm
- Length: 428mm
- Width: 343mm
- Wheelbase: 270mm
- Motor: Powerful 4400KV Brushless Motor
- ESC: Heavy Duty Waterproof 80A 2S-3S ESC
- Radio System: 2.4GHz
Setup and Preparation
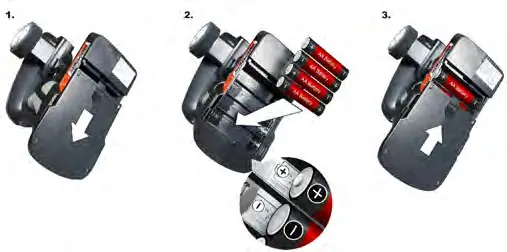
To operate the vehicle, you will need 4 AA batteries for the transmitter, a 2S (7.4V) or 3S (11.1V) LiPo battery, and a compatible LiPo charger. Essential tools include a cross wrench (17mm), hex wrenches (1.5mm, 2.0mm, 2.5mm, 3.0mm), and a 5.5mm nut driver.
Transmitter Operation
The transmitter controls steering and throttle. To bind the transmitter to the receiver:
- Insert the BIND PLUG into the BIND/VCC port on the receiver.
- Plug the ESC into CH2 and power on the vehicle. The receiver LED should blink.
- Press and hold the BIND button on the transmitter while turning it on.
- Release the BIND button when the transmitter LED flashes green.
- Wait for the receiver LED to pause for 1 second and then blink steadily.
- Remove the BIND PLUG and power cycle the vehicle and transmitter.
ESC Calibration and Programming
The ESC must be calibrated to the transmitter's throttle range:
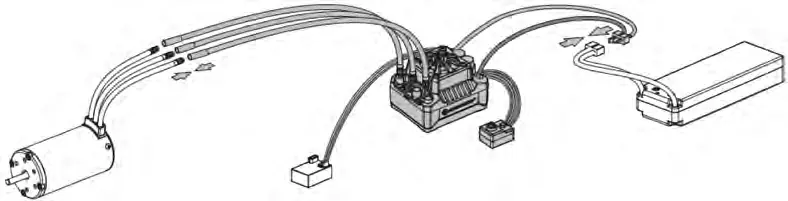
- Turn on the transmitter and set throttle EPA to 100% with trim centered.
- With the ESC off, press and hold the SET button while powering on the ESC.
- Release the SET button when the LED flashes.
- Set the trigger to neutral and press SET.
- Pull the trigger to full throttle and press SET.
- Push the trigger to full brake and press SET.
You can program settings like Running Mode, LiPo Cells, and Low-Voltage Cutoff using the SET button and observing LED flash patterns as detailed in the programming flow chart.
Troubleshooting
If the vehicle does not operate correctly, check the following:
- No power: Check battery connections and ESC switch.
- Motor beeps/doesn't work: Check battery voltage, re-calibrate throttle range, or check for signal loss.
- Vehicle runs in reverse: Swap any two motor wires.
- Stuttering: Check for loose solder joints between motor and ESC.
Practical help
Common problems
Motor does not work and emits beeps
Check battery voltage, ensure throttle wire is plugged into the correct receiver channel, or re-calibrate the ESC.
Vehicle runs in reverse when steering forward
Swap any two of the three motor wires to reverse the motor rotation.
ESC overheating
Ensure the cooling fan is clear of debris and operating, or check for binding in the drivetrain.
Vehicle stutters or runs poorly
Check all solder joints between the motor and ESC; re-solder if necessary.
Before use
- Install 4 AA batteries into the transmitter.
- Charge the LiPo battery pack fully.
- Perform a radio range check at 50 yards.
- Ensure all ESC and motor connections are secure.
- Check that steering and throttle trims are centered on the transmitter.
Specs in practice
- Continuous/Burst Current
- 80A / 520A - The ESC's capacity to handle power delivery.
- Ground Clearance
- 55mm - The distance between the lowest point of the chassis and the ground.
Images and diagrams
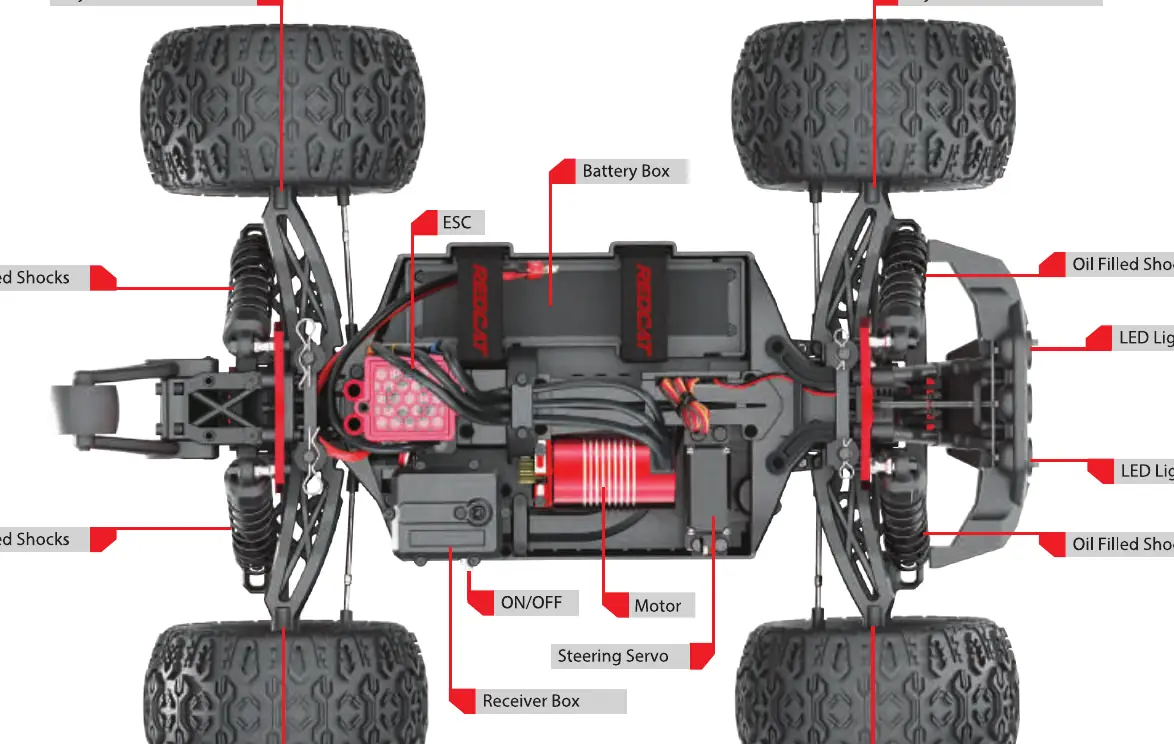
- The chassis diagram identifies the location of the ESC, motor, steering servo, battery box, and adjustable pillow balls.
- The transmitter diagram shows the location of the steering wheel, throttle trigger, and trim adjustment knobs.
Model compatibility
- Compatible with 2S (7.4V) or 3S (11.1V) LiPo batteries.
- Electronics are waterproof, but bearings and metal parts should be dried after water exposure.

Manual page author
Michael Turner
Technical manual editor
Reviews PDF manuals for structure, safety notes, and practical product details so readers can find the right information quickly.