Smart Home / Smart Plugs & Strips
User Manual for Renkforce 1015A-CMB-SXMS Smart Power Strip
Quick guide for the Renkforce 1015A-CMB-SXMS master/slave power strip. Learn how to set the switching threshold, connect devices, replace the fuse, and operate safely.
Table of contents
Quick guide from the manual
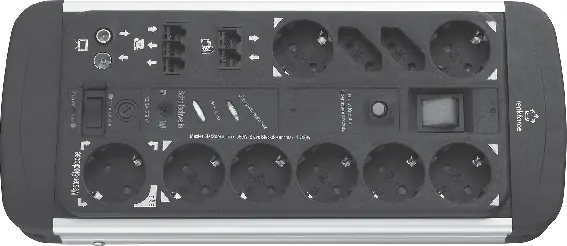
The Renkforce 1015A-CMB-SXMS is a 10-way power strip featuring master/slave functionality, surge protection, and continuous power sockets. It is designed for indoor use only. The master/slave function allows you to automatically control up to 5 devices based on the power consumption of a device connected to the master socket.
Product description
The power strip includes:
- 1 Master socket (controls 5 slave sockets).
- 5 Slave sockets (automatically switched on/off).
- 4 Continuous current sockets (always on when the main switch is active).
- Surge protection for power, RJ11 (phone), RJ45 (network), and TV aerial connections.
- Adjustable switching threshold (8 - 80 W).
- Overload protection with a reset button and replaceable fuse.
Controls & Connections
The main switch (0/I) controls all 10 sockets. The master/slave function is toggled via the 'Master on/off' switch. If the overload protection trips, switch off the unit, let it cool, and press the Reset button.
Operation
Operation without master/slave function
Set the 'Master on/off' switch to 'Master on'. All sockets will function as standard continuous power outlets controlled by the main switch.
Operation with master/slave function
- Set the 'Master on/off' switch to 'Master off'.
- Use a small screwdriver to turn the threshold adjustment control (6) fully counter-clockwise to the '8 W' position.
- Connect your master device (e.g., PC) to the master socket. Ensure its power consumption is between 8 W and 550 W.
- Switch off the master device. The 'Slave on' LED should turn off.
- If the 'Slave on' LED remains lit, slowly turn the threshold control clockwise until the LED turns off.
- Switch on the master device; the slave sockets should now activate automatically.
Fuse replacement
If the master socket stops working due to high power consumption, the fuse may have blown.
- Disconnect the power strip from the wall socket.
- Unscrew the fuse holder (7) by turning it counter-clockwise.
- Replace the blown fuse with an identical microfuse (5 x 20 mm, T2.5 A, 250 V).
- Reinsert the holder and screw it back in.
Safety & Maintenance
- Indoor use only: Do not use in damp or wet environments.
- Do not cover: Operating while covered can cause overheating and fire.
- No daisy-chaining: Do not connect other power strips to this one.
- High-load devices: Do not use with devices that have high starting currents, such as power tools or kettles.
- Cleaning: Disconnect from power before cleaning. Use a dry, soft cloth. Do not use aggressive chemicals.
Technical Data
- Operating voltage: 250 V/AC, 50 Hz
- Total max load: 3680 W (16 A)
- Master socket max load: 550 W (2.5 A)
- Slave sockets total max load: 1700 W (7.4 A)
- Surge protection: Integrated for power, RJ11, RJ45, and TV
- Ambient temperature: 0 °C to +40 °C
Practical help
Common problems
Slave sockets do not turn off when the master device is off.
The master device likely consumes more than 8W in standby. Slowly turn the threshold adjustment control (6) clockwise until the 'Slave on' LED turns off.
Overload protection tripped.
Switch off the power strip using the main switch, allow it to cool down, then press the Reset button.
Master socket stopped working.
The fuse may have blown due to excessive power consumption. Check the fuse (T2.5 A) and replace if necessary.
Before use
- Ensure the power strip is used only in dry, indoor environments.
- Fully unwind the mains cable before use.
- Verify that the total power consumption of all connected devices does not exceed 3680W.
- Ensure the master device power consumption is between 8W and 550W for master/slave operation.
- Check that the wall socket is easily accessible.
Specs in practice
- Master socket
- The socket that monitors power consumption to trigger the 5 slave sockets.
- Switching threshold
- Adjustable between 8-80W; determines the power level at which slave sockets turn on.
- Continuous sockets
- 4 sockets that remain powered as long as the main switch is on, regardless of the master device.
Images and diagrams
- 1: Master socket
- 2: Slave sockets
- 3: Main switch
- 4: Reset button
- 6: Threshold adjustment control
Model compatibility
- Not suitable for devices with high starting currents (e.g., power tools, kettles).
- Do not connect other power strips to this unit (no daisy-chaining).

Manual page author
David Miller
Documentation analyst
Organizes user manual content into clear summaries, with attention to model details, product context, and everyday usability.