Automotive / Car Audio
User Guide for RetroSound Denver Radio Face 068DENM1BB
Quick start guide for the RetroSound Denver Radio Face 068DENM1BB. Includes installation steps, control layout, and basic operation instructions for power, tuning, and system settings.
Table of contents
Manual images
Click an image to enlargeQuick Start Guide
This guide provides essential instructions for installing and operating the RetroSound Denver Radio Face (068DENM1BB). For comprehensive instructions, refer to the user manual included with your motor box or visit the manufacturer's website at help.retromanufacturing.com.
What's in the Box
- Denver Radio Face
- Shafts (x2)
- Hardware (Screws x4, Washers/Nuts x8/x6)
Installation
Ensure the backstrap is mounted securely before proceeding.
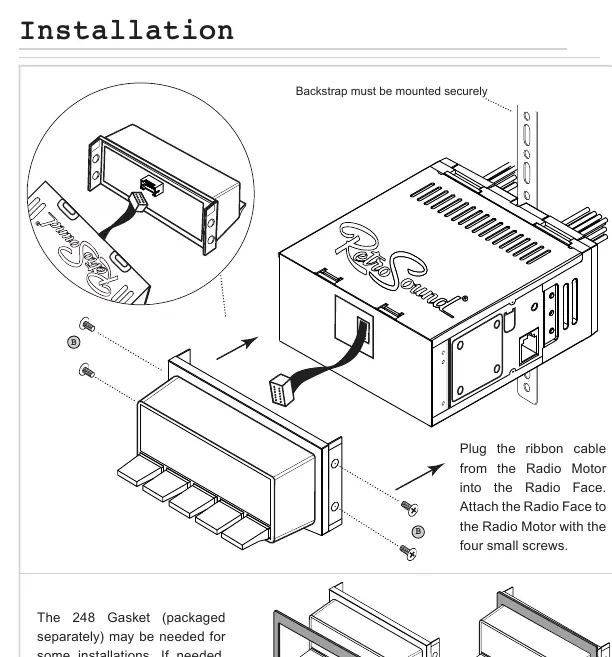
- Plug the ribbon cable from the Radio Motor into the Radio Face.
- Attach the Radio Face to the Radio Motor using the four small screws provided.
- If necessary for your specific dash installation, add the 248 Gasket to the Radio Face before installing the radio into the dash.
Control Layout
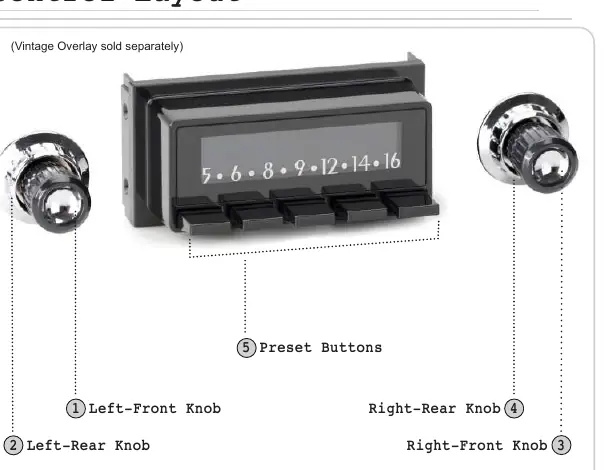
- Left-Front Knob (1): Power, Volume, EQ settings.
- Left-Rear Knob (2): Source modes.
- Right-Front Knob (3): Tuning, Mute, System Settings (Clock, Display Color, Beep).
- Right-Rear Knob (4): Radio bands.
- Preset Buttons (5): Radio presets.
Basic Operation
- Power On/Off: Press the Left-Front Knob to power on; press and hold to power off.
- Volume: Rotate the Left-Front Knob.
- Changing Source/Bands: Rotate the Left-Rear Knob for source modes; rotate the Right-Rear Knob counter-clockwise for bands.
- Tune/Mute: Rotate the Right-Front Knob to tune; press to mute/unmute.
- Equalizer (EQ): Press the Left-Front Knob to enter the Tone Control sub-menu. Adjust settings by rotating the knob and pressing to move to the next item.
- System Settings (Clock, Display Color, Beep): Press and hold the Right-Front Knob to enter the System Settings sub-menu. Rotate to cycle through choices (CLK, SCAN, BEEP ON/OFF), press to select, and adjust as needed.
Radio Presets
- Setting Presets: Tune to the desired station, then press and hold the desired Preset Button (5) for two seconds.
- Recalling Presets: Press the Preset Button (5) corresponding to the station.
Official resources from the manual
Practical help
Common problems
Radio face not fitting properly in the dash
Check if the 248 Gasket is needed for your specific installation and add it to the Radio Face before installing.
Cannot change system settings like clock or beep
Ensure you are in the correct sub-menu by holding the Right-Front Knob to enter System Settings, then rotate to cycle through options.
Before use
- Verify all hardware (shafts, screws) is present
- Ensure the ribbon cable is securely connected to the Radio Motor
- Mount the backstrap securely
- Install the 248 Gasket if required for your dash
Images and diagrams
- The installation diagram shows the ribbon cable connection and the use of the 248 gasket.
- The control layout identifies the four knobs and the preset buttons.
Model compatibility
- Some features mentioned in the manual may not be available on all radios.

Manual page author
David Miller
Documentation analyst
Organizes user manual content into clear summaries, with attention to model details, product context, and everyday usability.