Electronics / Audio
RetroSound 068REDM1BS Redondo RS M2B Digital Media Receiver Quick Start Guide
Quick start guide for the RetroSound 068REDM1BS Redondo RS M2B Digital Media Receiver. Includes installation instructions for InfiniMount brackets and control shafts, as well as basic operation for tuning, presets, and system settings.
Table of contents
Manual images
Jump to the sectionQuick guide from the manual
This document provides essential installation and operation instructions for the RetroSound 068REDM1BS Redondo RS M2B Digital Media Receiver. It covers the assembly of control shafts, mounting the radio, and navigating basic functions such as tuning, presets, and system settings.
Installation
The installation process involves attaching the InfiniMount brackets to the radio motor and securing the control shafts.
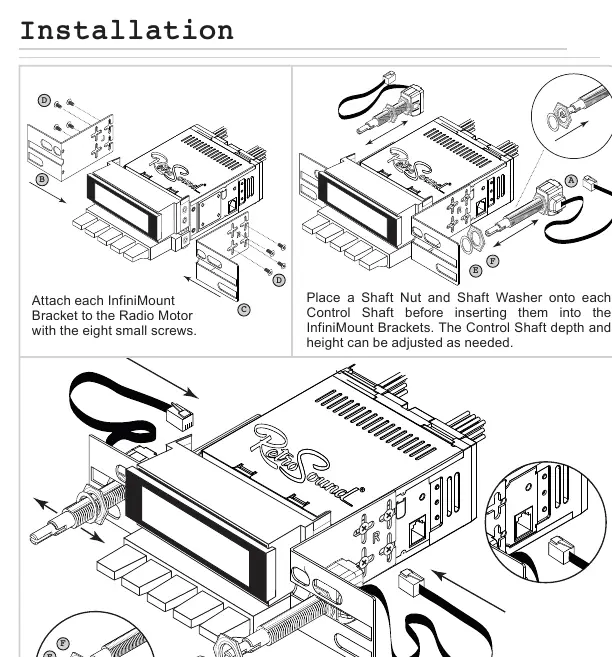
- Attach each InfiniMount bracket to the radio motor using the eight small screws provided.
- Place a shaft nut and shaft washer onto each control shaft before inserting them into the InfiniMount brackets.
- Adjust the control shaft depth and height as needed for your dashboard.
- Secure each control shaft with a shaft nut and shaft washer, then plug each shaft into the side of the radio motor.
- Use the optional hardware if needed to help mount the radio to the dash.
Control Layout
The receiver features four main knobs and a set of preset buttons:
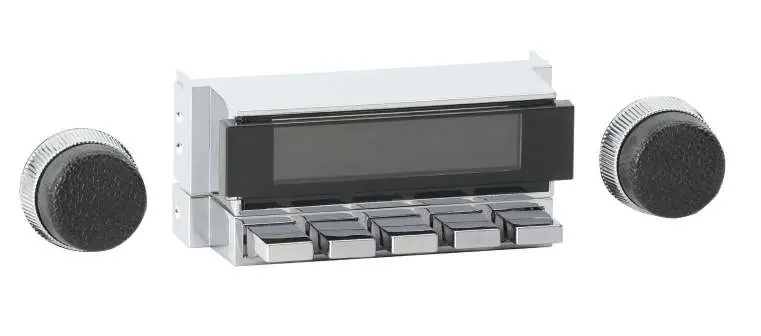
- Left-Front Knob (1): Power, Volume, and Tone Control sub-menu.
- Left-Rear Knob (2): Source modes.
- Right-Front Knob (3): Tuning, Mute, System Settings (Clock, Display Color, Beep).
- Right-Rear Knob (4): Radio bands.
- Preset Buttons (5): Radio station presets.
Basic Operation
Power On/Off: Press the Left-Front Knob (1) to power on. Press and hold to power off.
Volume: Rotate the Left-Front Knob (1).
Changing Source/Bands: Rotate the Left-Rear Knob (2) clockwise for source modes. Rotate the Right-Rear Knob (4) counter-clockwise for radio bands.
Equalizer (EQ): Press the Left-Front Knob (1) to enter the Tone Control sub-menu. Press and release to cycle through EQ settings. Rotate to adjust. Let the unit time out to save.
System Settings (Clock, Display Color, Beep): Press and hold the Right-Front Knob (3) to enter the System Settings sub-menu. Rotate to cycle through choices (CLK, SCAN, BEEP ON/OFF). Press to select, rotate to adjust, and let the unit time out to save.
Radio Presets
Setting Presets: Tune to the desired station, then press and hold the desired Preset Button (5) for two seconds.
Recalling Presets: Simply press the Preset Button (5) corresponding to the saved station.
Support
For more comprehensive instructions, refer to the user manual included in your motor box or visit the website at help.retromanufacturing.com. You can also contact support via email at [email protected].
Official resources from the manual
Practical help
Common problems
Features not working
Note that some features described in the manual are not available on all radio models.
Before use
- Verify all hardware is present (Control Shafts, InfiniMount Brackets, Screws, Nuts, Washers).
- Ensure the Radio Motor is ready for installation.
- Check dashboard space for proper radio mounting.
- Have the Radio Motor box manual available for more comprehensive instructions.
Specs in practice
- Left-Front Knob (1)
- Controls Power, Volume, and Tone Control/EQ settings.
- Left-Rear Knob (2)
- Controls Source modes.
- Right-Front Knob (3)
- Controls Tuning, Mute, and System Settings (Clock, Color, Beep).
- Right-Rear Knob (4)
- Controls Radio bands.
Images and diagrams
- The installation diagram illustrates the assembly of the InfiniMount brackets to the radio motor using eight small screws.
- The diagram shows the correct placement of the shaft nut and shaft washer on the control shaft before insertion.
- The control layout diagram identifies the specific functions of the four knobs and the preset buttons.
Model compatibility
- Some features mentioned in the manual are not available on all radio models.

Manual page author
David Miller
Documentation analyst
Organizes user manual content into clear summaries, with attention to model details, product context, and everyday usability.