Electronics / Speakers Soundbars
RetroSound 068DENM1BB Radio Face User Guide
Quick start guide for the RetroSound 068DENM1BB Radio Face. Learn how to install the unit, connect the ribbon cable, and operate the radio controls, presets, and system settings.
Table of contents
Manual images
Jump to the sectionQuick guide from the manual
This guide provides essential instructions for installing and operating the RetroSound 068DENM1BB Radio Face. Key procedures include connecting the ribbon cable, securing the unit to the Radio Motor, and utilizing the control knobs for audio adjustments and system configurations.
Installation
Before installing the radio into the dashboard, ensure all components are ready. Follow these steps to assemble the unit:
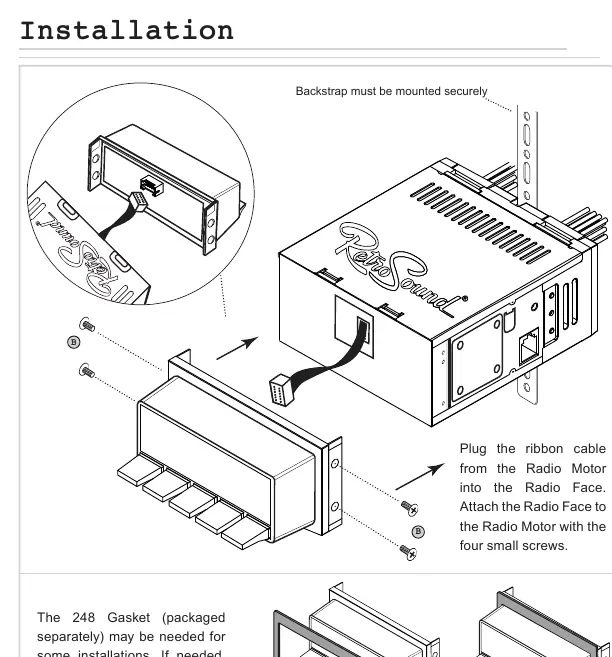
- Connect the ribbon cable from the Radio Motor into the Radio Face.
- Attach the Radio Face to the Radio Motor using the four small screws provided.
- If required for your specific dashboard, install the 248 Gasket (sold separately) onto the Radio Face before mounting.
- Ensure the backstrap is mounted securely to support the radio unit.
Control Layout
The radio is operated using four knobs and five preset buttons:
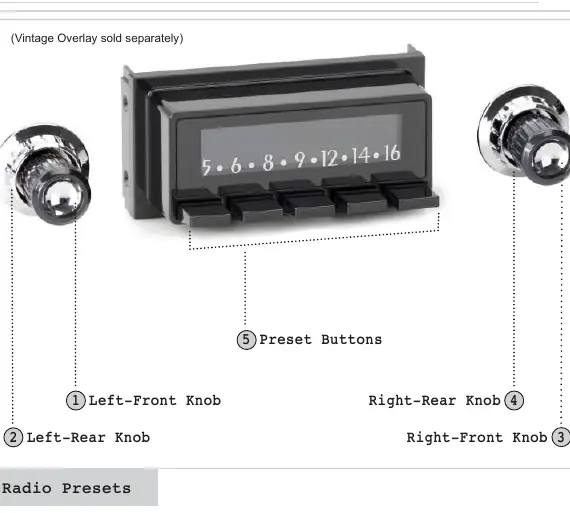
- Left-Front Knob (1): Controls Power (press/hold), Volume (rotate), and EQ/Tone Control (press to enter menu).
- Left-Rear Knob (2): Used to change source modes (rotate clockwise).
- Right-Front Knob (3): Used for Tuning (rotate), Mute (press), and System Settings (press and hold).
- Right-Rear Knob (4): Used to cycle through radio bands (rotate counter-clockwise).
- Preset Buttons (5): Used to save and recall radio stations.
Basic Operation
Power and Audio: Press the Left-Front Knob (1) to power the unit on; press and hold to power off. Rotate the same knob to adjust volume. Press the Right-Front Knob (3) to mute or unmute the audio.
System Settings: To access the System Settings sub-menu (Clock, Display Color, Beep), press and hold the Right-Front Knob (3). Rotate the knob to cycle through options (CLK, SCAN, BEEP ON/OFF), press to select, and adjust as needed. Let the unit time out to save settings.
Equalizer (EQ): Press the Left-Front Knob (1) to enter the Tone Control sub-menu. Press and release the knob to navigate through EQ settings, rotate to adjust, and press to move to the next item.
Radio Presets
Setting Presets: Tune to the desired station, then press and hold the desired Preset Button (5) for two seconds.
Recalling Presets: Simply press the Preset Button (5) corresponding to the station you wish to listen to.
Practical help
Common problems
Features not working as expected
Note that some features mentioned in the manual may not be available on all radio models.
Radio face does not fit flush in the dash
Check if the 248 Gasket is required for your specific installation and ensure the backstrap is mounted securely.
Before use
- Verify all hardware (shafts, screws, nuts) is present.
- Connect the ribbon cable from the Radio Motor to the Radio Face.
- Determine if the 248 Gasket is required for your specific dash installation.
- Ensure the backstrap is mounted securely to support the radio unit.
Specs in practice
- Left-Front Knob (1)
- Power, Volume, and EQ/Tone Control.
- Left-Rear Knob (2)
- Source mode selection.
- Right-Front Knob (3)
- Tuning, Mute, and System Settings (Clock, Color, Beep).
- Right-Rear Knob (4)
- Radio band selection.
Images and diagrams
- The installation diagram illustrates the connection of the ribbon cable and the attachment of the Radio Face to the Radio Motor using four screws.
- The control layout diagram identifies the four knobs and five preset buttons used for all operations.
Model compatibility
- Some features are not available on all radios.
- Vintage Overlay is sold separately.

Manual page author
David Miller
Documentation analyst
Organizes user manual content into clear summaries, with attention to model details, product context, and everyday usability.