Electronics / Audio
User Guide for RetroSound Redondo RT M1B Digital Media Receiver
Quick start guide for the RetroSound Redondo RT M1B Digital Media Receiver. Includes installation steps, control layout, configuration for Redondo mode, and basic operation instructions.
Table of contents
Manual images
Jump to the sectionQuick guide from the manual
This document provides essential setup and operation instructions for the RetroSound Redondo RT M1B Digital Media Receiver. Before using the device, ensure the hardware is correctly installed and the unit is configured for the Redondo thumb-roller controls. Key procedures include the physical installation of the thumb-rollers and the specific reboot sequence required to enable Redondo mode.
Installation
Follow these steps to install the thumb-rollers:
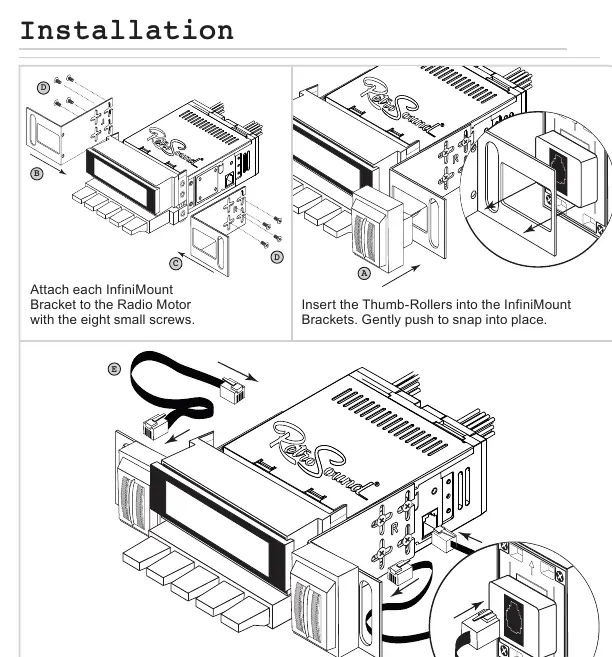
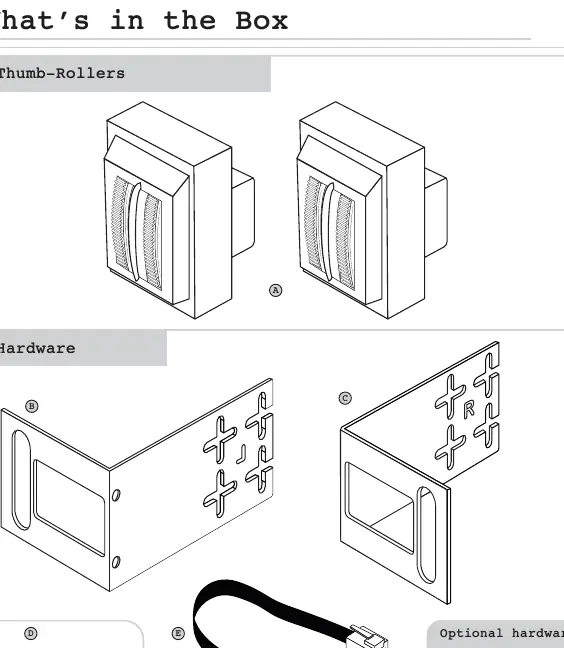
- Attach Brackets: Secure each InfiniMount Bracket to the Radio Motor using the eight small screws provided.
- Insert Thumb-Rollers: Place the Thumb-Rollers into the InfiniMount Brackets and push gently until they snap into place.
- Connect Cables: Plug one end of the modular cable into the left Thumb-Roller and the other end into the left side of the Radio Motor. Repeat this process for the right side.
- Mounting: Use the optional hardware if necessary to secure the radio to the dashboard.
Control Layout
The system utilizes five primary controls:
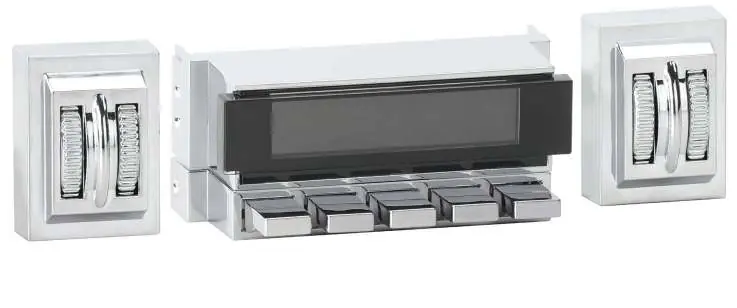
- Left-Inside Thumb-Roller: Power, Source Modes.
- Left-Outside Thumb-Roller: Volume, EQ settings.
- Right-Inside Thumb-Roller: Radio Bands, System Settings.
- Right-Outside Thumb-Roller: Tuning, Mute, System Settings navigation.
- Preset Buttons: Saving and recalling radio stations.
Redondo Mode Configuration
To ensure the Radio Motor functions correctly with the Redondo Thumb-Roller controls, you must perform the following configuration:
- Press and hold the Left-Inside Thumb-Roller for approximately 15 seconds to reboot the radio into SEL PANEL mode.
- While holding the button, the unit will cycle through: RETROSOUND, RADIO, GOODBYE, TIME DISPLAY, SEL PANEL.
- Continue holding until SEL PANEL is displayed, then release.
- Immediately press and release the Left-Inside Thumb-Roller to cycle through choices until REDONDO appears.
- The display will flash REDONDO 5 times and turn off. The radio is now configured.
Basic Operation
- Power: Press the Left-Inside Thumb-Roller to turn on; press and hold to turn off.
- Volume: Rotate the Left-Outside Thumb-Roller up or down.
- Source Modes: Rotate the Left-Inside Thumb-Roller down.
- Radio Bands: Rotate the Right-Inside Thumb-Roller up.
- Tune: Rotate the Right-Outside Thumb-Roller.
- Mute: Press the Right-Outside Thumb-Roller.
- Equalizer (EQ): Press the Left-Outside Thumb-Roller to enter the Tone Control sub-menu. Adjust settings by rotating the roller, then press to move to the next item.
- System Settings (Clock, Color, Beep): Press and hold the Right-Inside Thumb-Roller to enter the System Settings sub-menu. Use the Right-Outside Thumb-Roller to cycle through options and adjust values.
Radio Presets
- Setting Presets: Tune to the desired station, then press and hold the desired Preset Button for two seconds.
- Recalling Presets: Simply press the Preset Button corresponding to the saved station.
Practical help
Common problems
Radio controls not responding or functioning incorrectly
Perform the Redondo Mode configuration sequence to ensure the motor is synced with the thumb-roller controls.
Settings (Clock, EQ, Color) not saving
After adjusting settings, allow the unit to time out naturally to save the changes.
Before use
- Verify all hardware (brackets, screws) is present in the box.
- Ensure modular cables are connected to both the thumb-roller and the radio motor.
- Perform the Redondo Mode configuration before first use.
- Check that the radio is securely mounted to the dash using optional hardware if needed.
Specs in practice
- Redondo Mode
- A specific configuration mode required to sync the radio motor with the physical thumb-roller controls.
- System Settings Sub-menu
- Accessed by holding the Right-Inside Thumb-Roller; used for Clock, Color, and Beep settings.
- Tone Control Sub-menu
- Accessed by pressing the Left-Outside Thumb-Roller; used for EQ adjustments.
Images and diagrams
- The installation diagram shows the attachment of InfiniMount Brackets to the Radio Motor and the routing of modular cables.
- The control layout identifies the five specific input points: Left-Inside, Left-Outside, Right-Inside, Right-Outside rollers, and Preset Buttons.
Model compatibility
- Some features mentioned in the guide may not be available on all radio models.

Manual page author
Emily Carter
User documentation editor
Prepares concise manual descriptions and highlights the most useful setup, operation, and maintenance information for readers.