Lighting / Controllers & Dimmers
User Manual for MiBoxer 2-in-1 LED Controller
Quick guide for the MiBoxer 2-in-1 LED Controller. Learn how to set up output modes, link remotes, configure app control, and use voice assistants like Alexa and Google Home.
Quick answers from the manual
Quick answer
- The MiBoxer 2-in-1 LED Controller supports Zigbee 3.0 and 2.4G RF control. It allows for dimming, color temperature adjustment, and integration with Tuya, Philips Hue, Alexa, and Google Home. p. 2
Key actions
- Link Remote p. 4
- Unlink Remote p. 4
- Pair App p. 6
First start
- Connect power, set output mode using the SET button (Red=Single Color, Green=Dual White), then link your remote or pair with the gateway. p. 3, 6
Problems and fixes
Linking failed
Check if light is blinking slowly; repeat steps.
p. 4
Unlinking failed
Check if light is blinking quickly; repeat steps.
p. 4Maintenance and reset
- Factory reset is performed by turning the light on and off 3 times or long pressing the SET key until the indicator flashes. p. 6
Technical specifications
| Parameter | Value | Meaning | Pages |
|---|---|---|---|
| High Frequency | 16KHz | PWM frequency setting | p. 5 |
| Low Frequency | 250Hz | PWM frequency setting | p. 5 |
| Transmission Distance | 30m | Auto transmitting distance | p. 5 |
Where to find it in the PDF
- Contents p. 1
- Product features p. 2
- Set up output mode p. 3
- Linking/Unlinking p. 4
- Smart Home Setup p. 6, 7, 8, 9
Table of contents
Manual images
Click an image to enlargeQuick guide from the manual
This document provides instructions for the MiBoxer 2-in-1 LED Controller. Key operations include setting the output mode, linking/unlinking 2.4G RF remotes, and pairing the device with smart home ecosystems like Tuya, Philips Hue, Alexa, and Google Home.
Product features
The controller utilizes Zigbee 3.0 wireless technology with low power consumption and anti-interference capabilities. It supports dimming, color temperature adjustment, and group control. It is compatible with 2.4G RF remotes and requires a Zigbee 3.0 gateway for app and voice control.
Set up output mode
You must configure the output mode based on your light's requirements:
- Press the SET button continuously to switch modes.
- Red Light: Single Color Mode.
- Green Light: Dual White Mode.
- The device will log out of setting mode if there is no operation within 3 seconds.
PUSH Dimming
The controller supports a physical PUSH switch:
- Short press: Turn ON/OFF light.
- Long press: Stepless dimming brightness. Long press and release, then repeat to increase or decrease brightness.
2.4G RF Remote control
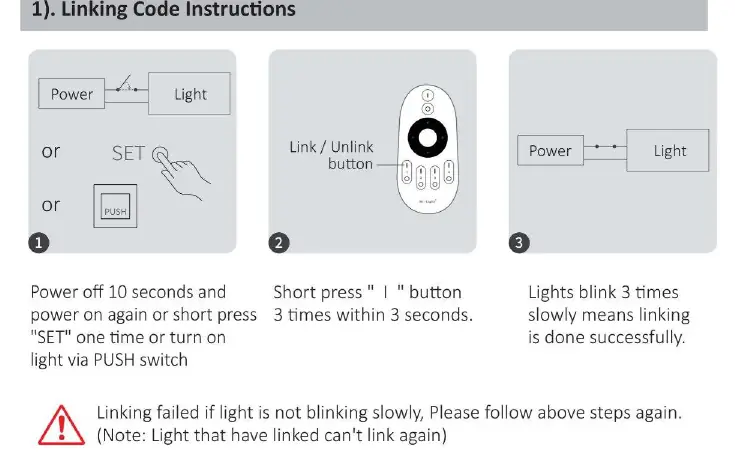
Linking Code
- Power off the light for 10 seconds, then power on again (or short press SET once/turn on via PUSH switch).
- Short press the I button on the remote 3 times within 3 seconds.
- The light will blink 3 times slowly, indicating successful linking.
Unlinking Code
- Power off the light for 10 seconds, then power on again (or short press SET once/turn on via PUSH switch).
- Short press the I button on the remote 5 times within 3 seconds.
- The light will blink 10 times quickly, indicating successful unlinking.
Auto transmitting and PWM frequency
Auto transmitting: The light can transmit signals to another light automatically if the distance between them is within 30m.
PWM frequency switching:
- High frequency (16KHz): Press OFF 1 time within 3 seconds, then press ON 5 times. Light flashes 2 times quickly.
- Low frequency (250Hz): Press ON 1 time within 3 seconds, then press OFF 5 times. Light flashes 2 times slowly.
Do Not Disturb mode
This mode is activated by default. It ensures the light remains OFF after a power outage until manually turned on.
- Turn ON mode: Press OFF 3 times within 3 seconds, then press ON 3 times. Light flashes 4 times quickly.
- Turn OFF mode: Press ON 3 times within 3 seconds, then press OFF 3 times. Light flashes 4 times slowly.
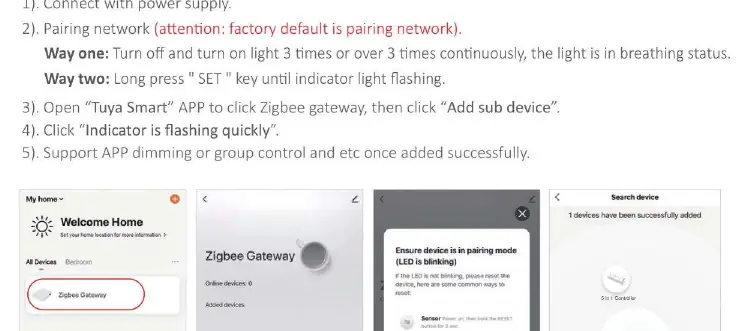
Smart Home Integration
To use app or voice control, add the device to a Zigbee 3.0 gateway (e.g., Tuya Smart App). Ensure the device is in pairing mode (breathing status) by turning the power on/off 3 times or long-pressing the SET button.
Safety
- Turn off the power supply before installation.
- Do not disassemble the device.
- Avoid installation in areas with wide-range metal or strong electromagnetic waves, as this will affect remote distance.
Practical help
Common problems
Linking failed
Ensure the light is blinking slowly; if not, repeat the process. Note that already linked lights cannot be linked again.
Unlinking failed
Ensure the light is blinking quickly; if not, repeat the process.
Remote distance issues
Do not install in areas with wide-range metal or strong electromagnetic waves.
Before use
- Turn off power supply before installation
- Confirm output mode (Red=Single Color, Green=Dual White)
- Ensure Zigbee 3.0 gateway is available for app/voice control
- Verify remote compatibility (FUT006, FUT007, B1/T1, etc.)
Specs in practice
- High Frequency
- 16KHz
- Low Frequency
- 250Hz
Images and diagrams
- Linking/Unlinking requires power cycling and specific button presses on the remote.
- App pairing involves putting the device into pairing mode (breathing status).
Model compatibility
- Requires Zigbee 3.0 gateway for app/voice control.
- Compatible with specific 2.4G RF remotes (FUT006, FUT007, B1/T1, B2/T2, K1/K1-B, FUT087, S1-B/S1-W/S1-G, WL-Box1).

Manual page author
Emily Carter
User documentation editor
Prepares concise manual descriptions and highlights the most useful setup, operation, and maintenance information for readers.