Lighting / Stage Lighting
ROBE ROBIN LEDBeam 150 and 150Q Stage Light User Guide
Quick guide for the ROBE ROBIN LEDBeam 150 and 150Q stage lights. Includes installation, DMX setup, control menu navigation, maintenance, and technical specifications.
Table of contents
Manual images
Click an image to enlargeQuick guide from the manual
The ROBE ROBIN LEDBeam 150 and 150Q are professional-grade moving head fixtures designed for indoor use. This manual provides essential instructions for safe installation, operation, and maintenance. Always ensure the fixture is connected to a mains socket with a protective earthing connection and never connect it to a dimmer pack.
Installation
Fixtures must be installed by a qualified electrician in accordance with local regulations. The device features auto-switching power supply (100-240V, 50-60Hz).
Rigging
The fixture can be placed on the floor or rigged on a truss. When rigging overhead, always use a secondary safety wire capable of holding at least 10 times the fixture's weight. Ensure there is no highly inflammable material within 0.4 meters of the device.
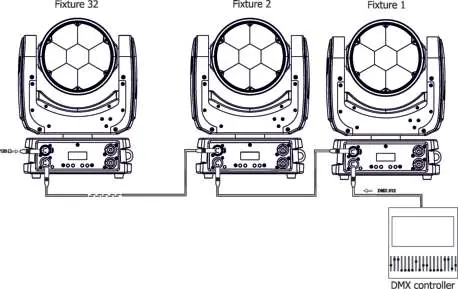
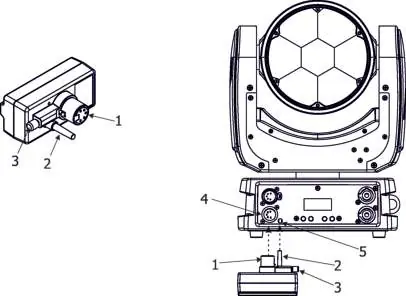
DMX and Wireless Connection
The fixture uses 5-pin XLR sockets for DMX input and output. For a serial DMX chain, connect the output of the controller to the first fixture, and daisy-chain subsequent fixtures. Terminate the last fixture with a 120-ohm resistor. For wireless operation, an external ROBE Wireless CRMX Dongle is required.
Accessories
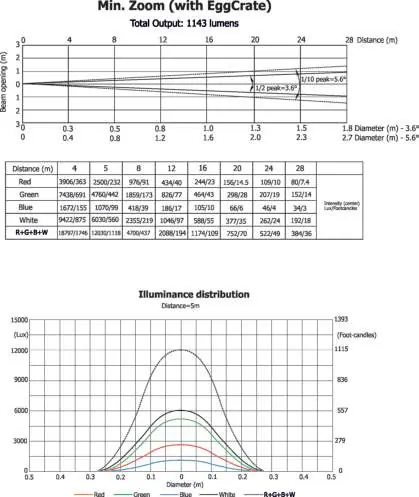
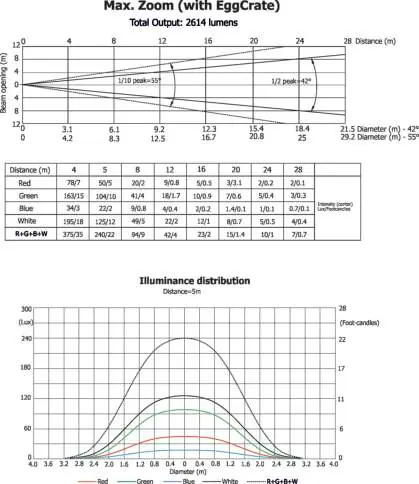
The fixture supports the installation of an eggcrate or a 2° diffuser. Disconnect from mains power before installing these accessories. Note that the 2° diffuser installation is a one-time process as screws are driven into plastic.
Control menu
The fixture is equipped with a 2-row LCD display and 4 buttons ([ESCAPE], [ENTER], [NEXT], [PREV]).
- Addressing (DMXA): Set the DMX start address and select the channel mode (Mode 1: 22 channels, Mode 2: 16 channels).
- Personality (Pers): Adjust settings like Pan/Tilt movement, display behavior, fan modes (Auto, High, Quiet), and LED frequency.
- Stand-alone (St Alone): Run built-in test programs or user-created programs without an external controller.
- Special: Access RDM information, perform fine adjustments, calibrate white color, and update software.
Maintenance and cleaning
Regular cleaning is essential to maintain light output. Use a soft, lint-free cloth with a weak detergent solution for the covers. Never use alcohol or solvents on the front lens array. Clean the interior and cooling fans at least annually.
Troubleshooting
- Short Err: Indicates a short circuit on the LED PCB.
- Tilt Err: Indicates a malfunction in the magnetic-indexing circuit or a defective motor/driver.
- Foggy lens: Potential condensation on the front lens array does not affect function and is not considered a fault.
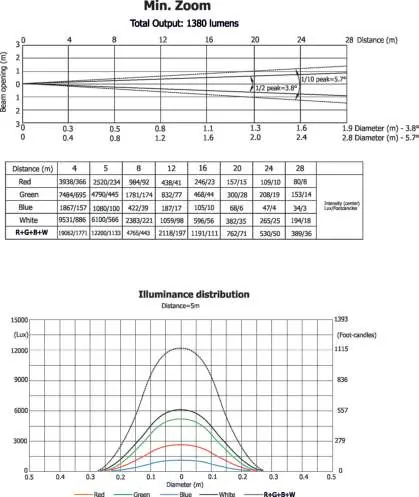
Technical specifications
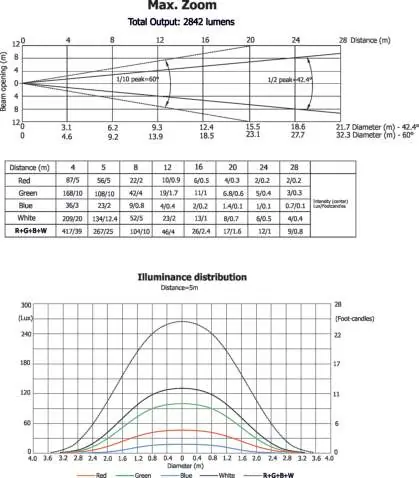
The fixture features 7 high-power RGBW multichip LEDs with a minimum life expectancy of 20,000 hours. It offers a zoom range of 3.8°-60° and a smooth 0-100% dimmer. The unit weighs 5.7 kg and operates in ambient temperatures up to 45°C.
Practical help
Common problems
Short Err
Indicates a short circuit on the LED PCB. Contact service.
Tilt Err
Magnetic-indexing circuit malfunction or defective motor. Contact service.
Foggy front lens
This does not influence the function of the fixture and is not considered a fault.
Before use
- Verify mains voltage is 100-240V.
- Ensure the fixture is earthed (Class I).
- Do not connect to a dimmer pack.
- Ensure proper ventilation for cooling openings.
- Use a secondary safety wire for overhead rigging.
- Check that the housing is firmly closed.
Specs in practice
- Power consumption
- Max 220W.
- Ambient temperature
- Max 45°C.
Images and diagrams
- Exterior view: Identifies ports, mounting points, and control panel.
- DMX connection: Shows daisy-chain wiring between fixtures.
- Rigging: Illustrates omega bracket and safety chain attachment.
- Wireless DMX: Shows dongle connection to the fixture.
Model compatibility
- Professional application only; not for household use.
- Wireless DMX requires external ROBE Wireless CRMX Dongle.
- Supports USITT DMX-512 and RDM protocols.

Manual page author
Emily Carter
User documentation editor
Prepares concise manual descriptions and highlights the most useful setup, operation, and maintenance information for readers.