Health / Laboratory Equipment
Instruction Manual for Rocker PP Heavy-Duty Vacuum Bottle
A comprehensive guide for the Rocker PP Heavy-Duty Vacuum Bottle. Includes instructions for installation, vacuum connections, maintenance, autoclaving, and operation of the drain device and quick-coupling connectors.
Quick answers from the manual
Quick answer
- The Rocker PP Heavy-Duty Vacuum Bottle is designed for laboratory suction applications. Installation involves assembling the cap with the silicone tube and overflow protection, then connecting the AIR port to a vacuum source and the LIQ port to a liquid source. p. 1, 2
Key actions
- Remove the cap before autoclaving to prevent bottle deformation. p. 1
- Connect the AIR outlet to the vacuum source and the LIQ inlet to the liquid source. p. 2
First start
- Verify package contents, assemble the cap with the silicone tube and overflow protection, and connect to vacuum/liquid sources. p. 1, 2
Problems and fixes
Liquid overflow
The overflow protection device automatically blocks the AIR outlet when the liquid is full to prevent aspiration into the pump.
p. 1Maintenance and reset
- Clean with non-abrasive, neutral detergent. Autoclave at 121-123°C for 15-20 minutes (remove cap first). p. 1
Technical specifications
| Parameter | Value | Meaning | Pages |
|---|---|---|---|
| Autoclaving Temp | 121 - 123 °C | Safe temperature range for sterilization. | p. 1 |
| Autoclaving Pressure | 1.0 bar | Required pressure for sterilization. | p. 1 |
Where to find it in the PDF
- Product Overview and Maintenance p. 1
- Usage Guide and Ordering Information p. 2
Table of contents
Manual images
Click an image to enlargeQuick Guide
Before using your Rocker PP Heavy-Duty Vacuum Bottle, carefully inspect the shipping carton for damage and verify all items against the standard package list. If you have any questions, preserve the serial number and shipping carton for quick resolution.
Installation and Operation
Follow these steps to set up your vacuum bottle:
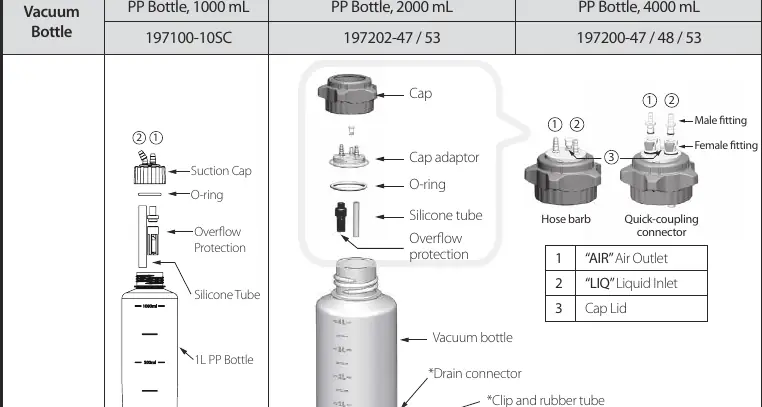
- Cap Assembly: Install the silicone tube and overflow protection device on the cap inside, labeled "LIQ" and "AIR" respectively. Push the cap adaptor upward to stick to the cap.
- Vacuum Connection: Connect the "AIR" air outlet (1) to your vacuum source using a silicone tube.
- Liquid Connection: Connect the "LIQ" liquid inlet (2) to the liquid source (e.g., manifold or suction kit) using another silicone tube.
- Pressure Release: Plug the 3rd opening on the cap adaptor with the cap lid to maintain an airtight seal. Remove the lid when pressure release is required.
- Sterile Filtration: For sterile pressure equalization, a 0.2 μm syringe filter can be inserted into the port of the suction cap.
Maintenance
Proper maintenance ensures the longevity and safety of your equipment:
- Cleaning: Use a non-abrasive, neutral, non-film-forming detergent.
- Autoclaving: The bottle is autoclavable at 121 - 123 °C (250 - 253 °F) at 1.0 bar (100 kPa, 15 psi) for 15 - 20 minutes. Important: Remove the cap from the bottle before autoclaving to prevent deformation. The rubber tube of the drain device is not autoclavable.
- Chemical Compatibility: The PP bottle is applicable to most low-concentrated chemicals; refer to a chemical compatibility chart before use. Do not store strong organic compounds long-term.
- Vacuum Performance: The thick, durable wall can hold near-full vacuum for 24 hours.
Drain Device and Quick-Coupling
Specific features for certain models:
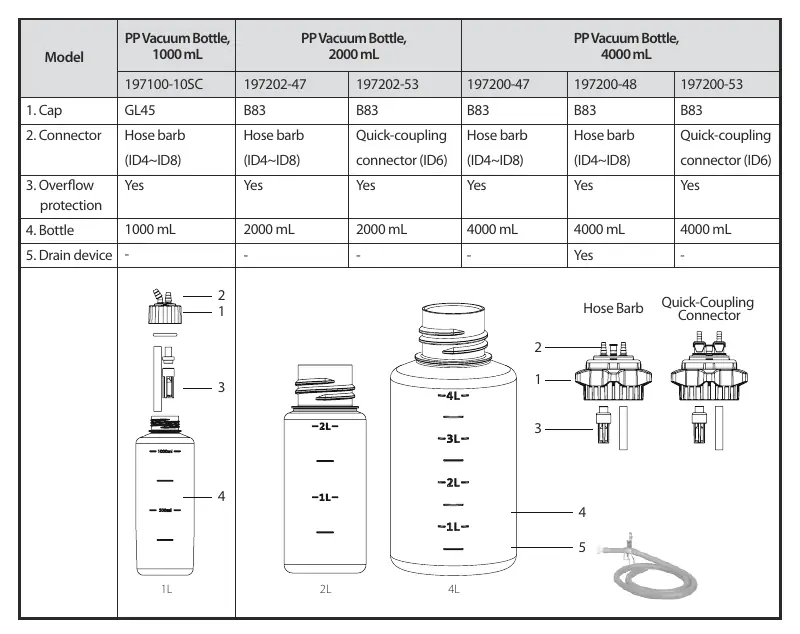
- Quick-Coupling Connectors (for 197200-53, 197202-53): Press and hold the button on the female fitting to release the male fitting. The female fitting will close immediately to maintain an airtight seal.
- Drain Device (for 197200-48): Connect the rubber tube to the drain connector and clip the tube to seal liquid. To drain waste, remove the cap lid for pressure release, then remove the clip or clip on the drain connector.
Practical help
Common problems
Bottle deformation during autoclaving
Always remove the cap from the bottle before autoclaving.
Liquid being aspirated into the pump
Ensure the overflow protection device is correctly installed; it blocks the AIR outlet when the liquid is full.
Loss of vacuum/airtight seal
Ensure the 3rd opening on the cap adaptor is plugged with the cap lid.
Before use
- Check shipping carton for damage
- Verify items against standard package list
- Ensure silicone tube and overflow protection are installed on the cap
- Check chemical compatibility for intended substances
Specs in practice
- Autoclaving Temperature
- 121 - 123 °C (250 - 253 °F) at 1.0 bar for 15-20 minutes.
- Vacuum Capacity
- The bottle can hold near-full vacuum for 24 hours.
Images and diagrams
- The cap assembly includes a cap, cap adaptor, O-ring, silicone tube, and overflow protection.
- The AIR outlet (1) connects to the vacuum source.
- The LIQ liquid inlet (2) connects to the liquid source.
Model compatibility
- Rubber tube of the drain device is not autoclavable.
- Not suitable for long-term storage of strong organic compounds.
- Compatible with most low-concentrated chemicals.

Manual page author
Michael Turner
Technical manual editor
Reviews PDF manuals for structure, safety notes, and practical product details so readers can find the right information quickly.