Health / Laboratory Equipment
Quick Start Guide for A&D BA Series Analytical Balances
Quick start guide for A&D BA Series analytical balances (BA-6E, BA-6DE, BA-225, BA-225D, BA-125D). Includes assembly, installation, leveling, basic operation, sensitivity adjustment, and error code troubleshooting.
Table of contents
Manual images
Click an image to enlargeQuick guide from the manual
This guide provides essential information for installing and operating the A&D BA Series analytical balances. For detailed functions and advanced operations, please refer to the full instruction manual available on the A&D website.
Assembly and Installation
The BA series balance is a precision instrument. Handle with care during unpacking and assembly.


- Unpacking: Ensure all components are present, including the weighing unit, display unit, breeze break unit, and cables.
- Assembly: Assemble the breeze break unit onto the weighing unit, then assemble the weighing pan components according to the specific model (BA-6E/BA-6DE or BA-225/BA-225D/BA-125D).
- Connections: Connect the weighing unit, breeze break unit, and display unit using the provided cables. Ensure the AC adapter is unplugged before making connections.
Installation Considerations
To ensure optimal performance, install the balance in an environment with stable temperature (20°C ±2°C) and humidity (45% to 60% RH). Avoid dust, vibrations, direct sunlight, and magnetic fields. Use a solid, horizontal table, such as an anti-vibration or stone table.

Leveling
Level the balance by adjusting the leveling feet until the bubble in the spirit level is centered in the red circle.
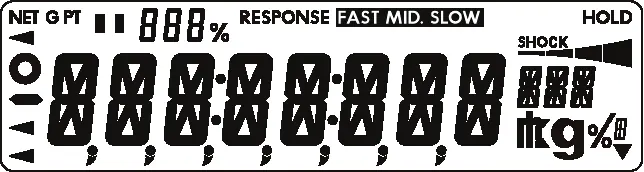
Display and Key Panel
The display shows weighing values, units, and status indicators (e.g., stability, net/gross, processing). The key panel includes standard weighing keys (ON/OFF, CAL, MODE, SAMPLE, PRINT, TARE, RE-ZERO) and IR sensors for touchless operation.
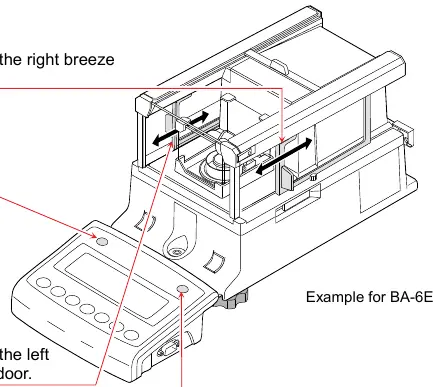
IR Sensors and Auto Doors
The balance features IR sensors that allow for touchless operation of the breeze break doors. By default, the left and right sensors are assigned to open/close the breeze break doors.
Sensitivity Adjustment
The balance supports automatic sensitivity adjustment using an internal weight, which can be triggered by temperature changes or manually via the CAL key. External weight calibration is also supported.
Error Displays
The balance displays error codes to assist in troubleshooting. Common errors include stability issues (Error 1), overload (E), and communication errors (EC,E00). Refer to the error table for specific descriptions and corrective actions.
Ionizer (AX-ION-25)
The AX-ION-25 ionizer is standard with BA-6E/BA-6DE models. It removes static electricity from samples to ensure accurate weighing. Use the IR sensor on the ionizer to start the static elimination process.
Specifications
The BA series includes various models with different capacities and readabilities. Refer to the specifications table for details on weighing capacity, readability, and repeatability for your specific model.
Practical help
Common problems
Error 1 (Stability error)
The weighing value is unstable. Check around the pan for obstructions, drafts, or static electricity. Improve the installation environment.
Error E (Overload error)
The sample exceeds the balance's weighing capacity. Remove the object from the pan.
Error -E (Weighing pan error)
The weighing value is too light. Check that the weighing pan is installed correctly.
ConErr (Weighing unit error)
Data from the weighing unit is not received. Check the connection between the weighing unit and the display unit, then power cycle the balance.
door Err (Breeze break unit error)
Communication with the breeze break unit is not possible. Unplug the power and reconnect the cable between the breeze break unit and the weighing unit.
Before use
- Unpack the balance carefully and retain packing materials.
- Assemble the weighing unit and display unit.
- Connect cables A, B, and C (if using ionizer) correctly, noting arrow directions.
- Place the balance on a solid, horizontal, vibration-free table.
- Level the balance using the leveling feet and bubble spirit level.
- Warm up the balance for at least 1 hour (4 hours for BA-6E/BA-6DE) with the AC adapter connected.
Specs in practice
- Weighing capacity
- The maximum weight the balance can measure.
Images and diagrams
- Assembly diagrams show the correct stacking order of the weighing pan components for different models.
- Connection diagrams illustrate how to connect the display unit, weighing unit, and ionizer.
- Leveling diagrams show how to adjust feet based on the bubble position in the spirit level.
Model compatibility
- The Ionizer AX-ION-25 comes standard with BA-6E and BA-6DE models.

Manual page author
David Miller
Documentation analyst
Organizes user manual content into clear summaries, with attention to model details, product context, and everyday usability.