Lighting / Fixtures
User Manual for SEBSON SET_6_UNDER 12V LED Under Cabinet Light
Quick guide for the SEBSON SET_6_UNDER 12V LED under cabinet light. Includes installation steps, safety warnings, technical specifications, and maintenance instructions.
Table of contents
Quick guide from the manual
This guide provides essential information for the SEBSON SET_6_UNDER 12V LED under cabinet light. Before starting, ensure the product is free from external damage and that all packaging materials are removed. The system must be connected to the power supply only after all cables are properly linked.
Intended use
This LED light is designed for indoor use only. It is suitable for mounting on furniture such as cupboards, shelves, or walls. It is not suitable for outdoor use.
Scope of delivery
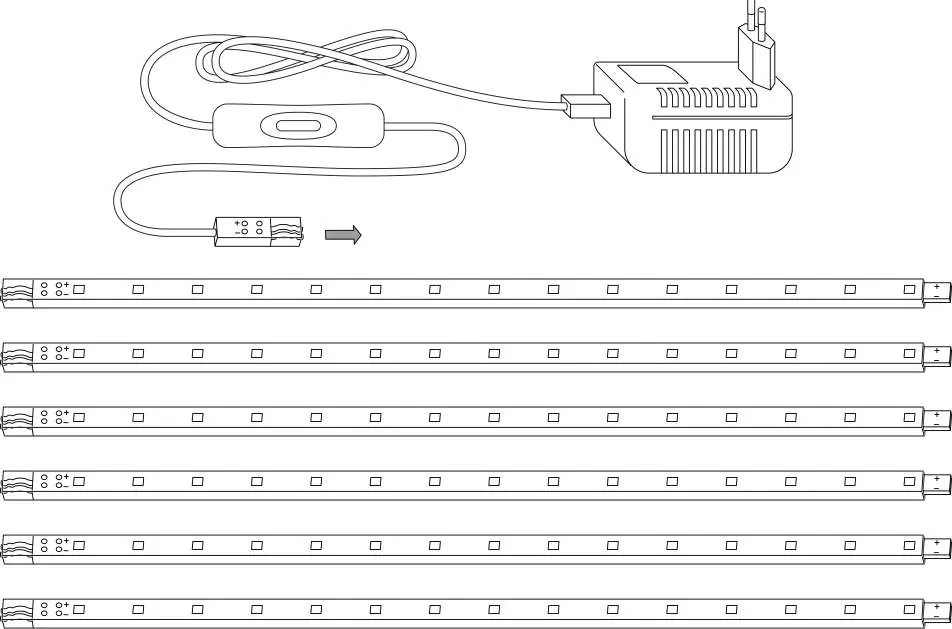
- 6 LED Under Cabinet Light Bars
- 1 Power plug (12V)
- 2 Long connection cables
- 5 Short connection cables
- 12 Screw holders
- 12 Adhesive strips
- 3 End caps
General safety information
- Danger: In case of damage or contact with water, immediately disconnect the product from the power supply and ensure it cannot be restarted.
- Suffocation hazard: Keep away from children and animals; the package contains small parts.
- Eye safety: Never point the light beam directly at people or animals and avoid looking directly into the light source.
- Modifications: Do not remodel or modify the product, as this voids the warranty and compromises safety.
- Dimming: Do not connect a dimmer, as it may damage the lamp.
- Heat: Do not cover the light with heat-insulating materials.
Installation
Follow these steps for a proper installation:
- Choose a stable, dry, and non-conductive mounting surface capable of supporting the weight of the light.
- Connect all cables between the LED bars and the power supply before plugging it into the mains.
- Ensure the mains voltage matches the specifications in the Technical Data section.
- Mount the bars using the provided screw holders or adhesive strips.
- Maintain a minimum distance of 50cm between the illuminated area and the lamp.
- Ensure cables are not strongly bent, pulled, or twisted during installation.
Cleaning and maintenance
Before cleaning, always disconnect the product from the power supply by pulling the plug from the socket. Use a slightly moistened cloth for cleaning. Do not allow water to penetrate the housing, never clean under running water, and do not use solvent-containing cleaners.
Technical data
- Operating voltage: 12V DC
- Power: 6 x 1.8W
- Nominal luminous flux: 6 x 190lm
- Color temperature: 3000K
- Protection class: IP20
- Electrical protection: Class III
Practical help
Common problems
Light does not turn on
Ensure all cables are securely connected and the power plug is properly inserted into the socket.
Overheating
Ensure the light is not covered with heat-insulating materials and that there is adequate ventilation.
Dimming issues
Do not connect a dimmer to this product; it is not compatible and may cause damage.
Before use
- Check the product for any external damage.
- Remove all packaging materials.
- Verify that the mains voltage matches the 12V DC requirement.
- Ensure the mounting surface is stable, dry, and non-conductive.
- Confirm all cables are connected before plugging into the power outlet.
Images and diagrams
- The installation diagram illustrates how to connect the LED bars using the provided cables.
- The diagram shows the two mounting methods: using screw holders or adhesive strips.
Model compatibility
- Indoor use only.
- Not suitable for outdoor use.
- Do not use with a dimmer.
- Suitable for mounting on normally flammable surfaces.

Manual page author
David Miller
Documentation analyst
Organizes user manual content into clear summaries, with attention to model details, product context, and everyday usability.