Automotive / Electrical Accessories
Installation Guide for Scanstrut Nest 3 Coil 15W Wireless Charger
Installation and setup guide for the Scanstrut Nest 3 Coil 15W waterproof wireless charger. Includes drilling templates, wiring instructions, LED indicator meanings, and technical specifications.
Table of contents
Manual images
Click an image to enlargeQuick Installation Guide
This document provides the installation instructions for the Scanstrut Nest 3 Coil 15W wireless charger (Model SC-CW-6GT). The installation requires cutting a hole in the mounting surface, drilling pilot holes, sealing the unit, and connecting it to a 12V or 24V DC power supply. Ensure you read the important safety information leaflet before beginning the installation.
Installation Steps
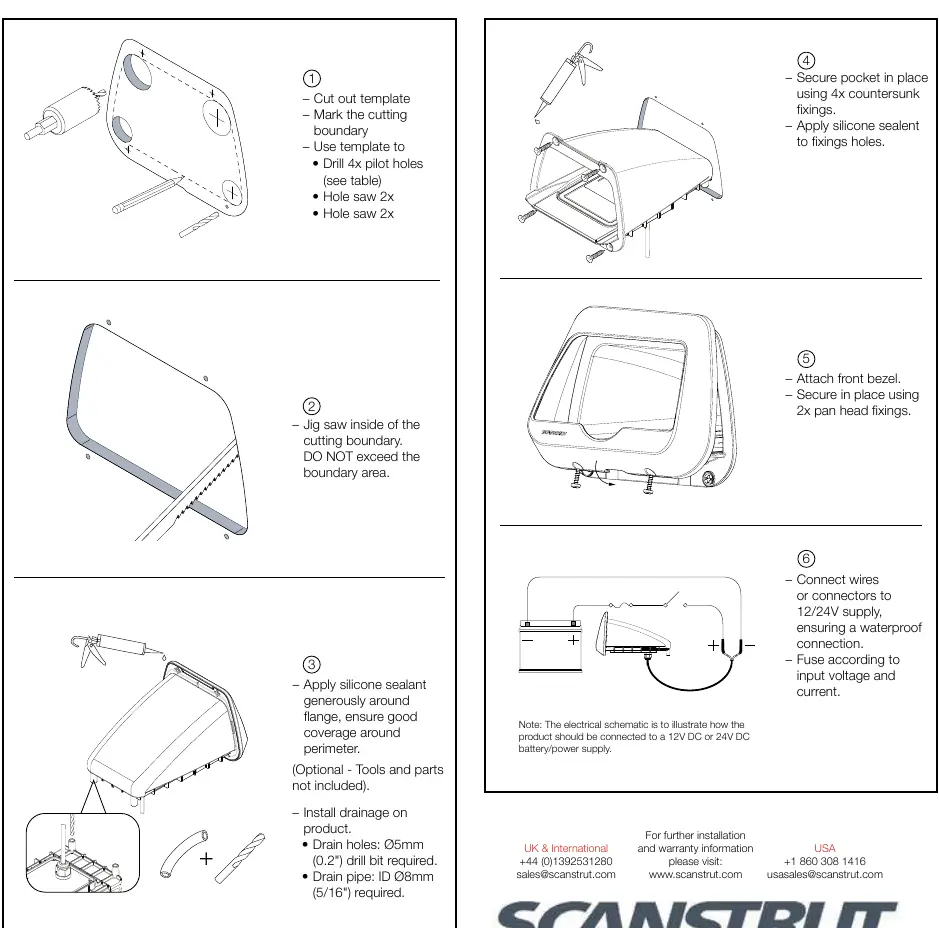
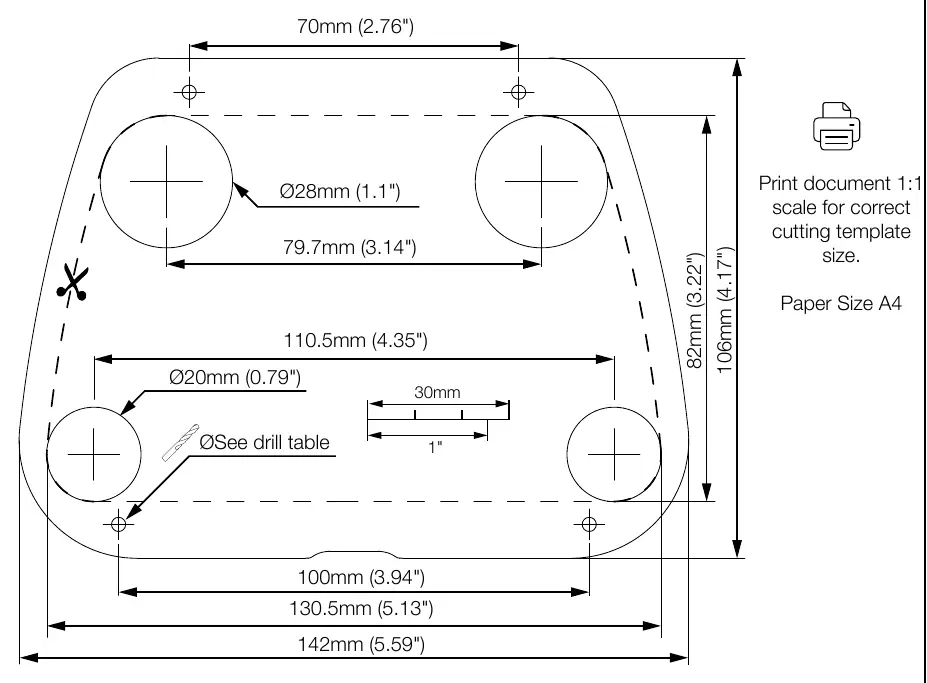
- Cut out template: Mark the cutting boundary using the provided template.
- Cut the hole: Use a jig saw inside the cutting boundary. Do not exceed the boundary area.
- Drill holes: Use the template to drill 4 pilot holes and the required hole saw cuts (refer to the drill table for specific bit sizes).
- Seal and secure: Apply silicone sealant generously around the flange. Secure the pocket in place using 4 countersunk screws. Apply silicone sealant to the fixing holes.
- Attach bezel: Attach the front bezel and secure it in place using 2 pan head fixings.
- Connect wires: Connect wires or connectors to a 12/24V supply, ensuring a waterproof connection. Fuse according to input voltage and current.
Drilling and Mounting
The installation requires specific drill sizes depending on the material of the mounting surface:
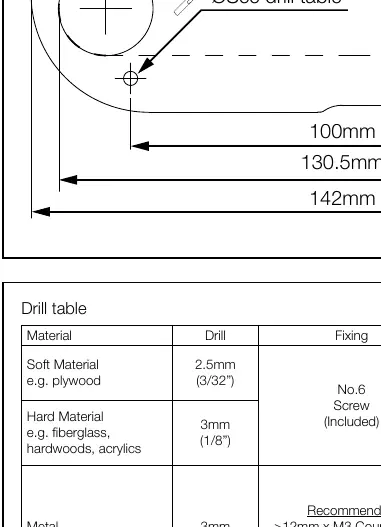
- Soft Material (e.g., plywood): Use a 2.5mm (3/32") drill bit. Use No.6 screws (included).
- Hard Material (e.g., fiberglass, hardwoods, acrylics): Use a 3mm (1/8") drill bit. Use No.6 screws (included).
- Metal (e.g., Steel, aluminium): Use a 3mm (1/8") drill bit. Use >12mm x M3 Countersunk Bolt with washer and Nyloc (not included).
Optional drainage can be installed by drilling a 5mm (0.2") hole and attaching an 8mm (5/16") ID drain tube.
LED Charging Indicators
- White LED Constant: Device is charging.
- Red LED Constant: Standby (power ON).
- Red LED Flashing: Foreign object detection (metallic object placed on top that is not Qi compatible) OR Thermal cutout (internal temperature is too high/low; wait for the product to return to operating temperature).
Technical Specifications
- IP Waterproof Rating: IPX6 (Front and back).
- Input Voltage: 10-30V DC (12/24V System).
- Input Current Max: 2A.
- Output Power Max: 15W (9V 1.25A).
- Standby Power Max:<1.2W.
- Certifications: CE, UKCA, FCC, ROHS, C-Tick, UN ECE R10, E24, PSE Certified.
Practical help
Common problems
Red LED is flashing
Check for metallic objects on the charger (foreign object detection) or wait for the device to cool down if the temperature is too high (thermal cutout).
Before use
- Verify input voltage is 10-30V DC.
- Ensure you have the correct drill bit size based on the material (Soft, Hard, or Metal).
- Check that the mounting surface is suitable for the cutout dimensions.
- Prepare silicone sealant for a waterproof installation.
- Ensure you have a 12V or 24V DC power supply available.
Specs in practice
- Input Voltage
- Supports 12V or 24V DC systems.
- Output Power
- Max 15W (9V 1.25A) wireless charging.
Images and diagrams
- The installation diagram shows the 6-step process: cutting, drilling, sealing, securing the pocket, attaching the bezel, and wiring.
- The drill table provides specific drill bit sizes and fixing types for soft materials, hard materials, and metal.
Model compatibility
- Compatible with Qi-enabled devices.
- Requires 12V or 24V DC power supply.

Manual page author
Emily Carter
User documentation editor
Prepares concise manual descriptions and highlights the most useful setup, operation, and maintenance information for readers.