Home / Windows & Doors
User Manual for LAP 1121S Coach Outdoor Lantern
Quick guide for the LAP 1121S Coach Outdoor Lantern. Includes installation steps, wiring diagrams, maintenance tips, and technical specifications.
Table of contents
Manual images
Click an image to enlargeQuick guide from the manual
This document provides essential installation and maintenance instructions for the LAP 1121S Coach Outdoor Lantern. Before beginning, ensure the power supply is switched off at the mains. The product is rated IP44, ensuring splash-proof protection when correctly installed and sealed. Always refer to the provided wiring diagram and ensure all electrical connections are secure.
Installation
The installation process involves mounting the lantern to a suitable surface and connecting the electrical wiring. Ensure the mounting surface can support the weight of the light fitting.
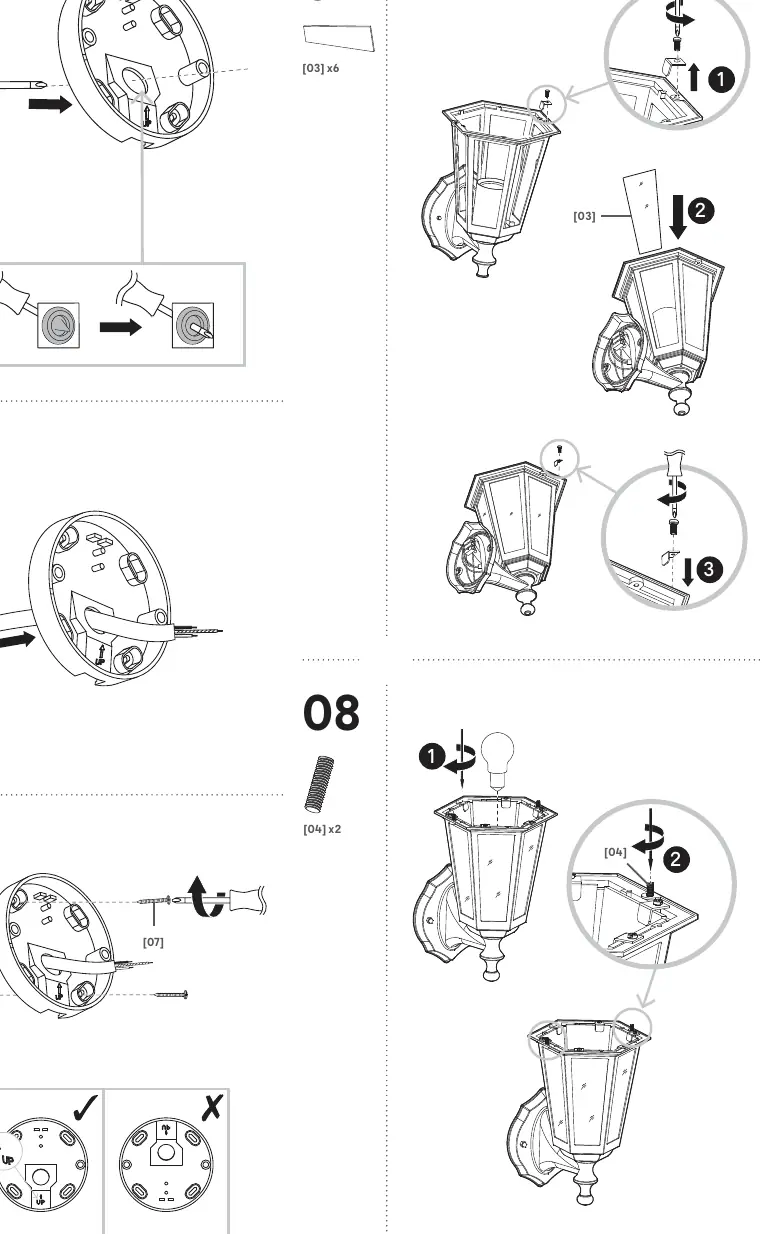
- Preparation: Turn off the electricity supply. Ensure you have all parts listed in the manual.
- Mounting: Use the provided screws and wall plugs, which are suitable for masonry walls only. If mounting on a different surface, use appropriate fixings.
- Drilling: Take care not to drill into pipes or mains cables beneath the surface.
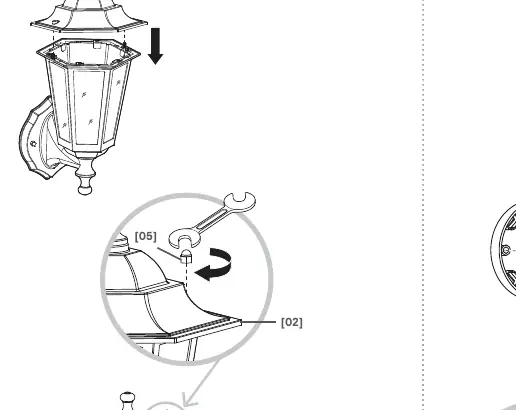
- Assembly: Follow the numbered steps (1-12) provided in the manual to assemble the lantern components and secure the unit to the wall.
Wiring
The wiring diagram is for reference only. Always check the terminal markings on the product.
- L (Live): Connect the Brown or Red wire.
- N (Neutral): Connect the Blue or Black wire.
- Earth: Connect the Green/Yellow wire to the earth terminal.
- Ensure all connections are tight and no loose strands are left outside the terminal block.
Maintenance and Care
To keep the surface in good condition, follow a regular maintenance schedule. Always disconnect the product from the mains at least 10 minutes before performing any maintenance or adjustments to allow it to cool down. Do not use abrasive materials or harsh chemicals for cleaning.
Technical Data
- Supply Voltage: 220-240 V~, 50 Hz
- Bulb Type: 1 x Max. 60 W E27 (check bulb dimensions to ensure fit)
- IP Rating: IP44 (Splash-proof)
- Class: Class I (must be connected to earth)
Safety
This product must be installed by a competent person in accordance with local regulations. Never hang anything on the product or use the terminal cables to support its weight. If the product fails to light after installation, check for electricity failure and ensure all connections are secure.
Practical help
Common problems
Product does not light after installation
Ensure there is no electricity failure and verify that all electrical connections are secure.
Before use
- Read the separate safety guide before use
- Check the pack to ensure all parts are present
- Ensure the mounting surface can support the full weight of the light
- Turn off the electricity supply at the mains
- Verify the wall type is suitable for the provided fixings (masonry)
Specs in practice
- Supply Voltage
- 220-240 V~, 50 Hz
Images and diagrams
- Wiring: L (Brown/Red) to Live, N (Blue/Black) to Neutral, Earth symbol to Green/Yellow.
Model compatibility
- Supplied screws and wall plugs are suitable for masonry walls only; other surfaces require appropriate fixings.

Manual page author
David Miller
Documentation analyst
Organizes user manual content into clear summaries, with attention to model details, product context, and everyday usability.