Computers / Tablets
User Manual for Hyundai Solar Flood Light LD-SFL-10W
Quick guide for the Hyundai Solar Flood Light LD-SFL-10W. Learn how to install, operate, and configure the different lighting modes and power bank functions.
Table of contents
Manual images
Click an image to enlargeQuick guide from the manual
The Hyundai Solar Flood Light is a versatile lighting solution featuring a double-sided solar panel and a built-in power bank function. It can be used for both indoor and outdoor applications. The device supports multiple working modes depending on whether it is connected to the solar panel or used independently.
Installation methods
The lamp offers three installation options:
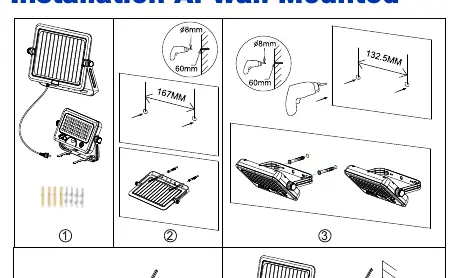
- Installation A (Wall Mounted): Drill two 8mm holes with a depth of 60mm and a spacing of 167mm for the solar panel, and 132.5mm for the lamp. Fix the components to the wall, connect the solar panel wire to the lamp, and tighten the connection.
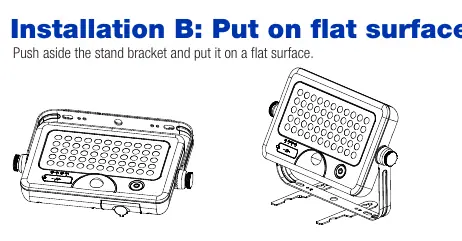
- Installation B (Flat Surface): Simply push aside the stand bracket and place the lamp directly on a flat surface.
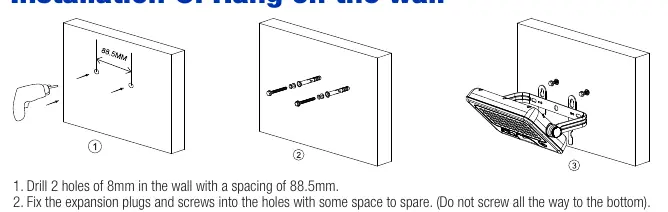
- Installation C (Hang on the wall): Drill two 8mm holes with a spacing of 88.5mm. Insert expansion plugs and screws, leaving some space. Push aside the stand bracket, align the hanging holes with the screws, and hang the lamp. The recommended height is less than 2m.
Working modes
The lamp operates in two main configurations:
- Mode A (Constant Lighting - Not connected to solar panel):
- Mode A1: 30% constant brightness.
- Mode A2: 100% constant brightness.
- Mode A3: Turn off.
- Mode B (Sensor Mode - Connected to solar panel):
- Mode B1: Automatically turns on to 100% brightness when motion is detected (range ≤6m) and dims to 5% after 20 seconds of no motion.
- Mode B2: Automatically turns on at 100% brightness for 5 hours. After 5 hours or if battery capacity drops below 30%, it switches to Mode B1.
- Mode B3: Turn off.
Additional Power Bank Function
The device includes a USB interface that can be used as a power bank. It features a DC-Micro input (5.0V/1.0A) and a USB output (5.0V/1.0A). Battery capacity indicators (25%, 50%, 75%, 100%) are provided to monitor charge levels.
Technical specifications
- Model: LD-SFL-10W Twinspad-PIR
- Lumens: 1100Lm
- Battery: 7200mAh/3.7V 18650 Lithium (replaceable)
- IP Class: IP65
- PIR Sensor: 120° detection angle, ≤6m range
- Working Temperature: -20°C to 50°C
- Solar Panel Cable: 3 meters
Manufacturer information
Hyundai
Practical help
Common problems
Lamp does not turn on
Ensure the lamp is in the correct mode. If in Mode B, ensure it is dark enough or the solar panel is not receiving light. Check battery charge level.
Motion sensor not triggering
Verify that the detection range is within 6 meters and the angle is within 120 degrees. Ensure the lamp is in Mode B.
Battery not charging
Check the connection between the solar panel and the lamp. Ensure the solar panel is placed in a location with sufficient sunlight.
Before use
- Check the lamp, accessories, and tools (drill, screwdriver) before starting.
- Ensure the installation surface is suitable for the chosen mounting method.
- Verify the solar panel cable is securely connected to the lamp.
- Adjust the solar panel and lamp to the correct position based on local latitude and lighting direction.
- Charge the battery fully before initial use.
Specs in practice
- 7200mAh Battery
- High-capacity lithium battery providing power for lighting and USB charging.
Images and diagrams
- Installation A requires specific hole spacing (167mm for panel, 132.5mm for lamp).
- Installation C is for hanging, requiring 88.5mm hole spacing.
- The USB port serves as both an input for charging and an output for power bank functionality.
Model compatibility
- The lamp is designed for outdoor and indoor use.
- Mode A is for independent use; Mode B requires the solar panel connection.
- Recommended hanging height for Installation C is less than 2 meters.

Manual page author
Emily Carter
User documentation editor
Prepares concise manual descriptions and highlights the most useful setup, operation, and maintenance information for readers.