HVAC / Heaters & Fireplaces
Terma HX Radiator Mounting Instructions (57-65 mm)
Installation guide for the Terma HX radiator mounting kit. Includes step-by-step instructions for wall drilling, bracket installation, and radiator mounting, including specific steps for water and dual-fuel versions.
Quick answers from the manual
Quick answer
- The Terma HX mounting kit is installed by drilling 10mm holes (80mm deep), securing brackets to the wall, and attaching the radiator. Specific steps for water/dual-fuel versions are marked with an asterisk. p. 1, 2
Key actions
- Drill 10mm holes to a depth of 80mm. p. 1
- Adjust radiator distance from wall to 57-65 mm. p. 1
Technical specifications
| Parameter | Value | Meaning | Pages |
|---|---|---|---|
| Wall distance | 57-65 mm | Required distance from the wall for proper mounting. | p. 1 |
| Drill bit size | 10 mm | Size of the drill bit required for wall anchors. | p. 1 |
Where to find it in the PDF
- Mounting steps 1-7 p. 1
- Mounting steps 8a-8d p. 2
Table of contents
Manual images
Click an image to enlargeQuick guide from the manual
This document provides installation instructions for the Terma HX radiator mounting kit. The kit is designed for a wall distance of 57-65 mm. Please ensure you have all necessary tools before beginning the installation. Note that steps marked with an asterisk (*) apply only to water and dual-fuel versions of the radiator.
Tools required
- Drill with 10mm drill bit
- PZ3 screwdriver
- PZ1 screwdriver
- 22mm and 14mm wrenches
- #8 Allen key
Installation steps
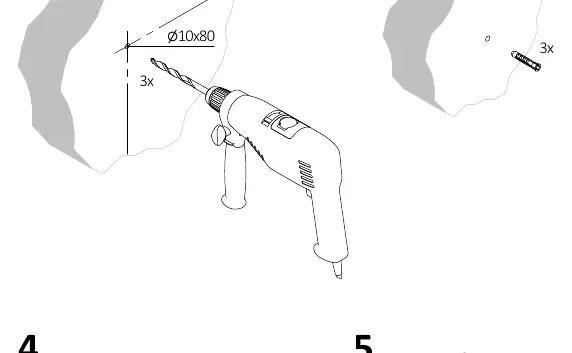
- Drilling: Mark the mounting points on the wall. Use a drill with a 10mm bit to drill holes to a depth of 80mm.
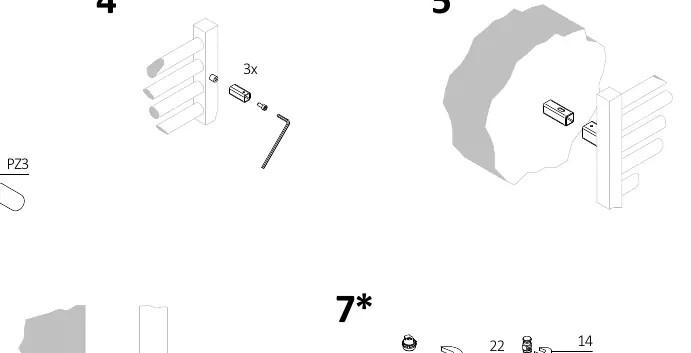
- Anchors: Insert the wall anchors into the drilled holes.
- Bracket mounting: Secure the mounting brackets to the wall using the provided screws and the PZ3 screwdriver.
- Radiator placement: Align the radiator with the mounted brackets.
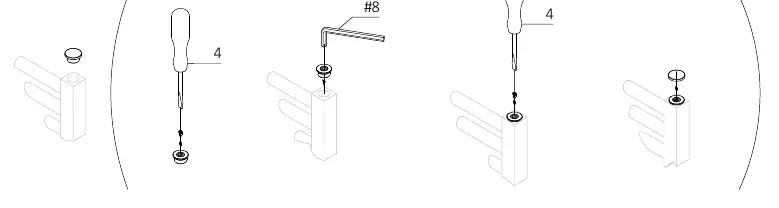
- Securing: Tighten the mounting elements to secure the radiator to the wall.
- Adjustment: Use the PZ1 screwdriver to make final adjustments to the bracket position to achieve the required 57-65 mm distance from the wall.
- Water/Dual-fuel specific: For water and dual-fuel versions, follow the additional steps using the 22mm and 14mm wrenches to secure the valve and plug components.
- Final assembly: Complete the installation by securing the top caps or plugs as shown in the detailed diagrams (steps 8a-8d).
Important notes
The steps marked with an asterisk (*) are specific to water and dual-fuel radiator versions. Ensure you identify your radiator type before proceeding with these specific steps to avoid improper installation.
Practical help
Common problems
Radiator not level or distance incorrect
Ensure the wall distance is adjusted to the 57-65 mm range using the bracket adjustment screws.
Difficulty installing water/dual-fuel components
Verify that you are following the specific steps marked with an asterisk (*) and using the correct 22mm/14mm wrenches.
Before use
- Drill with 10mm bit
- PZ3 screwdriver
- PZ1 screwdriver
Specs in practice
- Wall distance
- The radiator must be mounted at a distance of 57-65 mm from the wall.
Images and diagrams
- Steps 1-3 cover the drilling and initial wall anchor installation.
- Steps 4-6 cover the physical mounting of the radiator to the wall brackets.
- Steps 7-8 cover the specific installation of valves and plugs for water/dual-fuel versions.
Model compatibility
- Steps marked with an asterisk (*) apply only to water and dual-fuel versions.

Manual page author
Emily Carter
User documentation editor
Prepares concise manual descriptions and highlights the most useful setup, operation, and maintenance information for readers.