Tools / Power Tools
User Manual for Sealey WBR150E Electric Wheelbarrow
Quick guide for the Sealey WBR150E Electric Wheelbarrow. Includes assembly instructions, operation, charging, maintenance, and troubleshooting steps.
Table of contents
Manual images
Click an image to enlargeQuick guide from the manual
The Sealey WBR150E is an electric wheelbarrow designed for transporting loads across rugged terrain. Before use, ensure the battery is fully charged and the emergency stop button is unlocked. Always inspect the unit for damage to cables, controls, and structural fixings before operation. Do not use in rain or damp environments.
Specifications
- Model: WBR150E
- Voltage: 24V DC
- Power Output: 500W
- Max Capacity: 150kg
- Bucket Capacity: 75L
- Max Speed: 7km/h
- Operating Time: 8 hours
- Charge Time: 4.5 hours
Assembly
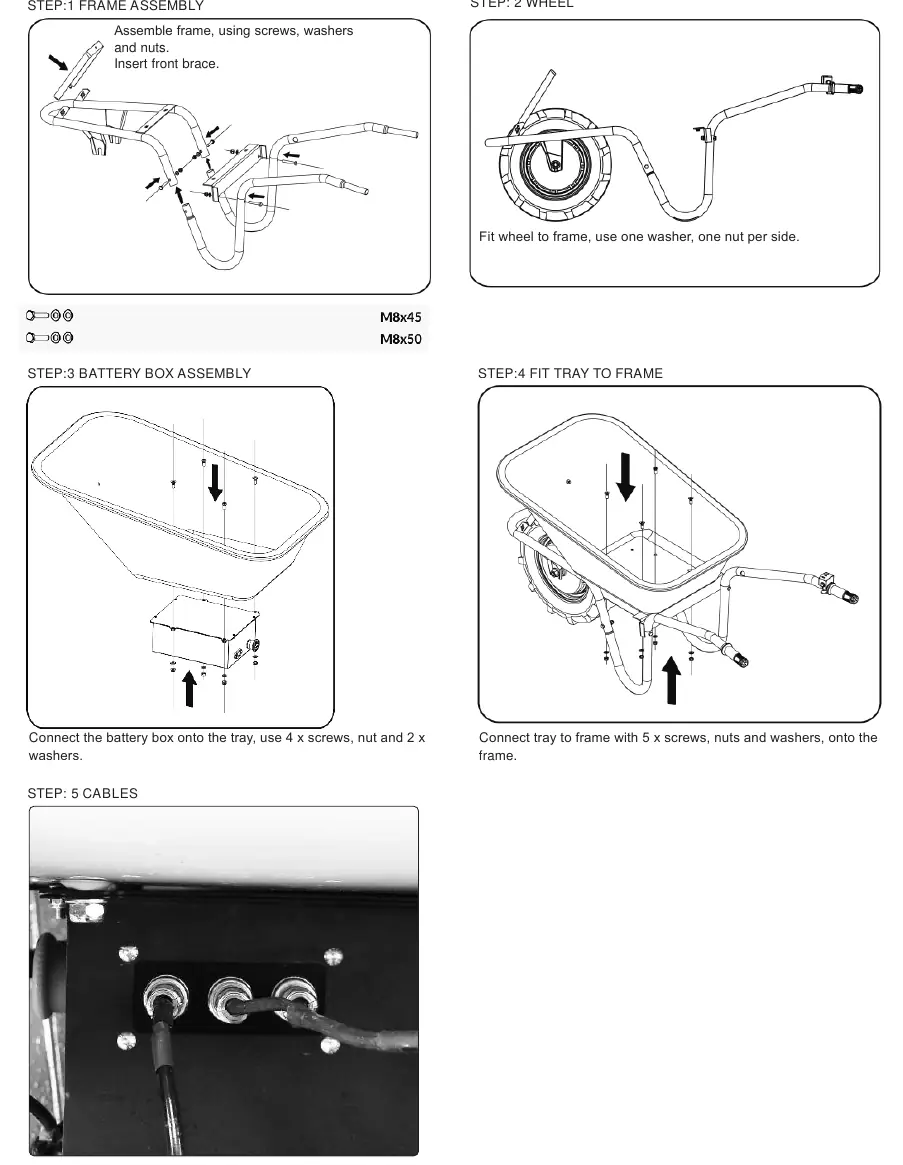
- Frame Assembly: Assemble the frame using screws, washers, and nuts. Insert the front brace.
- Wheel: Fit the wheel to the frame using one washer and one nut per side.
- Battery Box: Connect the battery box onto the tray using 4 screws, nuts, and 2 washers.
- Tray: Connect the tray to the frame using 5 screws, nuts, and washers.
- Cables: Plug in cables from left to right (6 pin, 3 pin, 5 pin). Secure cables to the frame with cable ties to protect wiring.
Operation
Charging: The battery is fixed in the battery box. Connect the charger lead to the plug beside the emergency stop button. Charge status is indicated by lights on the right handle: 3 LEDs (100-51%), Red & Orange (50-10%), Red only (Charge battery).
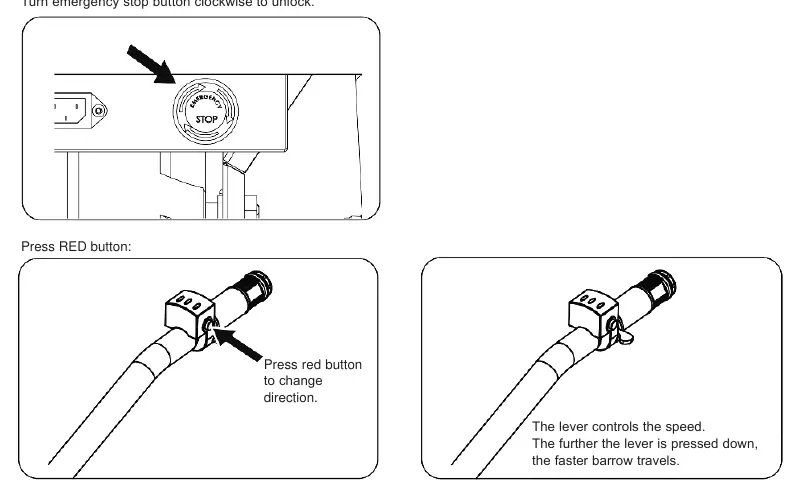
Controls: Turn the emergency stop button clockwise to unlock. Use the red button to change direction. The lever on the handle controls speed; the further it is pressed, the faster the wheelbarrow travels.
Maintenance
- Regularly check the condition of the wheelbarrow and warning stickers.
- Check cables for damage and ensure they are secured.
- Clean the surface with a wet cloth and mild solution. Do not use high-pressure cleaners or running water.
- If storing for more than a month, charge the battery.
Troubleshooting
If there is no electrical assistance, check if the battery is charged, the motor is stuck, the switch is damaged, or if there are broken/loose cables. If the battery will not charge, check the battery cable connection.
Manufacturer information
Sealey Group
Practical help
Common problems
No electrical assistance
Check if the battery is charged, the motor is stuck, the power switch is damaged, or if cables are broken or loose.
Battery will not charge
Check for loose battery cable connections.
Before use
- Inspect safety equipment, electrical controls, and cables for damage.
- Ensure all structural fixings are correctly fastened.
- Verify the battery is sufficiently charged.
- Ensure the emergency stop button is unlocked (turned clockwise).
- Check that the work area is clear and safe.
Specs in practice
- Max Capacity
- 150kg maximum load limit.
- Operating Time
- Up to 8 hours per full charge.
Images and diagrams
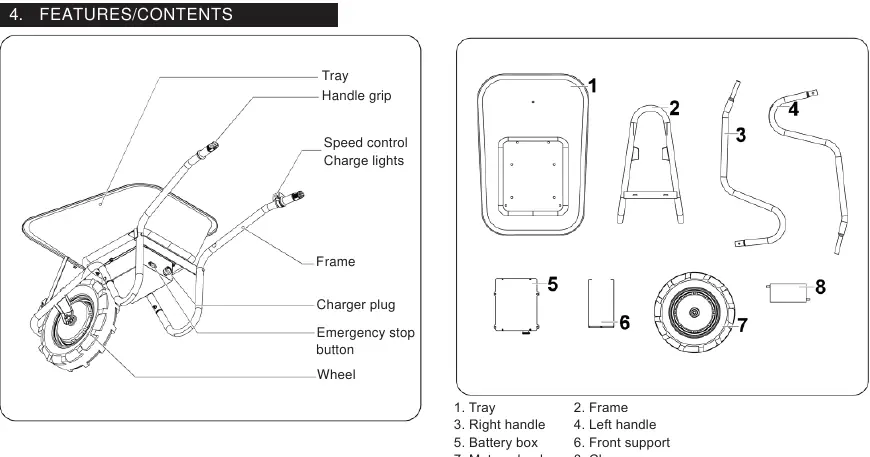
- The parts diagram identifies the tray, frame, handles, battery box, front support, motor wheel, and charger.
- Assembly diagrams illustrate the frame, wheel, battery box, and tray connection points.
- Operation diagrams show the emergency stop button, direction button, and speed control lever.
Model compatibility
- Use only the original charger provided.
- Do not use in rain or damp environments.
- Do not charge batteries near acids or flammable materials.
- Ambient temperature for operation: +5°C to +40°C.

Manual page author
Emily Carter
User documentation editor
Prepares concise manual descriptions and highlights the most useful setup, operation, and maintenance information for readers.