Home Appliances / Garment Steamers
User manual for Sencor SSI 0860GD garment steamer
Quick guide for the Sencor SSI 0860GD garment steamer. Learn how to operate, fill the water tank, use attachments, and maintain your device for optimal performance.
Table of contents
Manual images
Click an image to enlargeImportant information from the manual
The Sencor SSI 0860GD is a hand garment steamer designed for household use to smooth out creases on garments, upholstery, and curtains. It features a 1600W heating element with a 25-second heat-up time and a 320ml removable water tank. The device includes an automatic shut-off function for safety and a drip-stop system to prevent water stains.

Safety Instructions
- Supervision: Never leave the appliance unattended while connected to a power socket.
- Water: Do not submerge the steamer in water. Use only clean tap water (mix with distilled water in hard water areas). Never add additives like vinegar, starch, or descaling agents to the tank.
- Usage: Do not steam garments while wearing them. Always use a coat hanger. Avoid steaming leather, velvet, or heat-sensitive materials.
- Cooling: Always allow the steamer head to cool down completely before cleaning or storing.
Operation
Filling the water tank
- Disconnect the appliance from the power socket.
- Turn the water tank towards the open padlock symbol and slide it out.
- Open the filling cap (C1) and fill with water using the provided container. Do not exceed the MAX mark.
- Close the cap and secure the tank back into the body by turning it towards the locked padlock symbol.
Steaming
- Plug in the device and press button A3. The display symbol B3 will flash while heating (approx. 25 seconds).
- Once the symbol remains lit, the device is ready.
- Select the mode using button A3: Strong/intensive (B2) or Fine/gentle (B3).
- Press and hold button A2 to emit steam. You can lock the button for continuous steaming by pressing it once.
Using Attachments
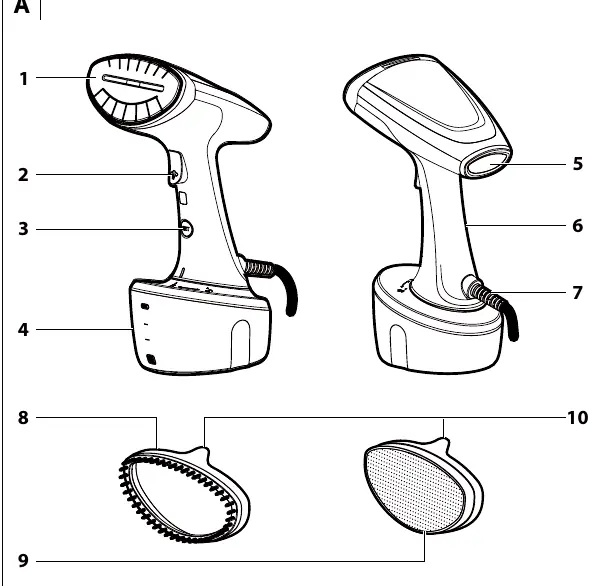
- Brush attachment (A8): Suitable for garments, pillows, and blankets.
- Cleaning attachment (A9): Ideal for removing fibers, hair, and dirt, or for treating delicate fabrics like silk.
- Installation: Ensure the steamer is cool and unplugged. Seat the attachment on the head so the tip (A10) is on the top side and push it on.
Cleaning and Maintenance
- Cleaning: After every use, empty the water tank and wipe the exterior with a soft, damp cloth.
- Descaling: Descale at least once a year or after 50 hours of operation, or if steam output decreases. Use a citric acid-based descaling agent. Fill the tank with the agent and water, heat up, and steam through a cloth until the tank is empty. Rinse with clean water afterwards.
Technical Specifications
- Power Input: 1600 W
- Water Tank Capacity: 320 ml
- Heat-up Time: 25 s
- Steam Output: 17 g/min (gentle) / 25 g/min (strong)
Manufacturer information
Sencor
Practical help
Common problems
Steamer buzzes loudly and stops steaming
Check the water level in the tank; it may be empty or low. Refill the tank.
Water comes out instead of steam
The steamer has not reached the optimal temperature yet. Wait for the indicator light to stop flashing (approx. 25 seconds).
Steam output is reduced
The device may require descaling due to limescale buildup.
Before use
- Check the garment care label to ensure it is suitable for steaming.
- Ensure the water tank is filled with clean water (mix with distilled if water is hard).
- Ensure the device is in a vertical position.
- Check that pockets are empty and cuffs/skirts are turned downwards.
- Ensure the steamer head is pointed away from you.
Images and diagrams
- Diagram A: Shows the main components including the steamer head (A1), steam button (A2), mode button (A3), and attachments (A8, A9).
- Diagram B: Illustrates the display icons for auto-off (B1), strong steam (B2), gentle steam (B3), and steam off (B4).
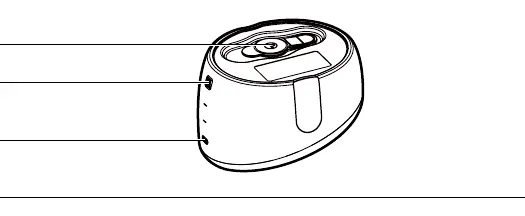
- Diagram C: Details the water tank filling cap (C1) and water level marks (C2, C3).
Model compatibility
- Do not use on leather, velvet, or impregnated furniture.
- Always test on a non-visible part of the garment first.
- Not suitable for industrial or small business use.

Manual page author
Emily Carter
User documentation editor
Prepares concise manual descriptions and highlights the most useful setup, operation, and maintenance information for readers.