Home Appliances / Cleaning Robots
User Manual for Sencor SRD 1000SCL Emergency Radio
Quick guide for the Sencor SRD 1000SCL emergency radio. Learn how to charge the device using solar, hand crank, or USB-C, operate the radio, use the flashlight, SOS alarm, and power bank features.
Table of contents
Quick guide from the manual
Before using the Sencor SRD 1000SCL for the first time, it is recommended to fully charge the internal battery using the USB-C port. If the device has not been used for more than 60 days, use the hand crank for 3 to 5 minutes to activate the battery. Always ensure the rubber covers for the ports are securely closed to maintain the IPX4 water resistance rating.
Device Description
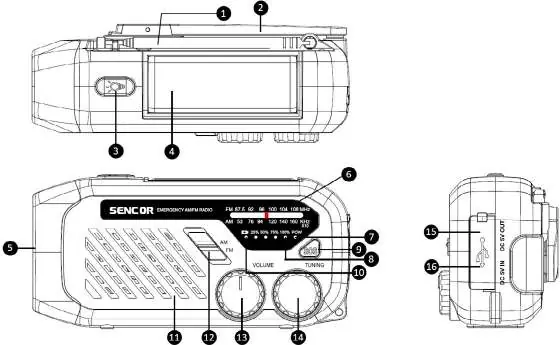
The device features a telescopic antenna, a hand crank for manual charging, a solar panel that doubles as a reading light, a flashlight, and various control knobs for volume and tuning. Ports include a USB-A output for power bank functions and a USB-C input for charging the device.
Charging Methods
The device can be charged in three ways:
- USB-C: The recommended method for fast and reliable charging. Use a 5V/1A adapter. The LED indicator will show charging progress (25%, 50%, 75%, 100%).
- Hand Crank: Rotate the handle clockwise or counter-clockwise. Essential for activating the battery after long periods of inactivity.
- Solar Panel: Place the device in direct sunlight. This is a supplementary charging method and not a primary source.
Warning: Avoid prolonged exposure to direct sunlight to prevent overheating and damage.
Power Bank Function
The device can charge external devices via the USB-A port. Remove the rubber cover, connect your charging cable, and begin charging. Note that this is an auxiliary function and will not fully charge modern smartphones; the USB-A port does not support fast charging protocols.
Flashlight and Reading Light
Flashlight: Press and hold the button to turn on. Short press to cycle through 4 modes: Main LED (spotlight), Side LED, Main + Side LED, and Off.
Reading Light: Locate the notch on the solar panel (near the antenna) to lift it. The reading light turns on automatically when the panel is opened and turns off when closed.
SOS Function
Press and hold the SOS button to trigger an acoustic signal and flashing light. Press again to turn off. This function is for emergency use only.
Radio Operation
Turn the volume knob clockwise to switch on the radio and adjust volume. Use the FM/AM switch to select the band and the tuning knob to find your station. Extend and rotate the antenna for better reception.
Battery Replacement
The battery is replaceable. On the back, unscrew the battery cover, remove the old cell, and replace it with a new one of the same technical parameters. Ensure correct polarity (+/-) and securely fasten the cover. If unsure, contact an authorized service center.
Technical Specifications
- Radio Bands: FM 87.5–108 MHz, AM 530–1600 kHz
- Battery: 2000mAh built-in rechargeable
- Water Resistance: IPX4 (protected against splashing water)
- Output Power: 1W RMS
- Dimensions: 157 x 74 x 53 mm
- Weight: 0.2 kg
Manufacturer information
Sencor
Practical help
Common problems
Radio does not turn on
Charge the internal battery using the USB-C port, hand crank, or solar panel.
Phone not charging fully
The power bank function is auxiliary and will not fully charge modern smartphones; it does not support fast charging.
Poor radio reception
Extend the telescopic antenna fully and rotate it to improve signal strength.
Before use
- Charge the internal battery fully via USB-C before first use.
- If unused for over 60 days, crank the handle for 3-5 minutes to activate the battery.
- Ensure rubber port covers are closed to maintain IPX4 water resistance.
- Use a 5V/1A adapter for optimal USB-C charging.
Specs in practice
- Battery Capacity
- 2000mAh built-in rechargeable battery.
Images and diagrams
- 1: Telescopic antenna
- 2: Hand crank
- 3: Flashlight button
- 4: Solar panel/Reading light
- 15: USB-A port (Power bank)
Model compatibility
- USB-A port does not support fast charging protocols.
- Requires a 5V/1A adapter for USB-C charging.

Manual page author
Michael Turner
Technical manual editor
Reviews PDF manuals for structure, safety notes, and practical product details so readers can find the right information quickly.