Home Appliances / Commercial Kitchen Equipment
User Manual for Server IntelliServ 1/3-Size Pan Warmer Combo Unit
Quick guide for the Server IntelliServ 1/3-Size Pan Warmer Combo Unit (Model IS-1/3). Includes setup, pump assembly, cleaning procedures, troubleshooting, and safety guidelines.
Table of contents
Manual images
Click an image to enlargeQuick Guide
The Server IntelliServ 1/3-Size Pan Warmer is designed for holding toppings and sauces. Important: Always fill the unit basin with 1 liter of water to the fill-line-ridge before use. Never place food directly into the basin; it must always be inside the pans. Clean all parts thoroughly before every use.
Unit Set-up

- Fill the unit basin with 1 liter of water up to the fill-line-ridge.
- Place pans with the pump into the basin.
- Plug the cord into a power source.
- Press the power switch to the ON position.
- Press the power button to turn the unit on.
- Set the thermostat to the recommended serving temperature using the Up or Down buttons.
Pump Assembly
Follow these steps to assemble the pump:
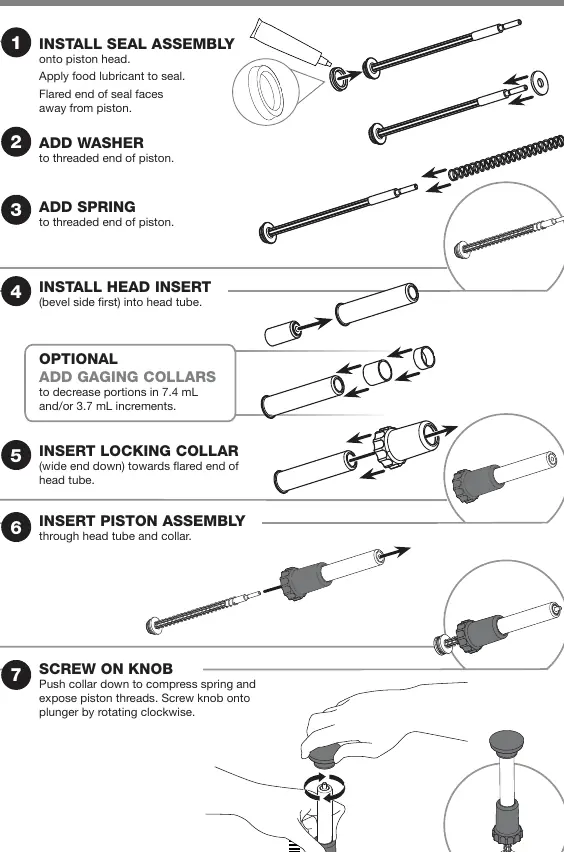
- Install the seal assembly onto the piston head (flared end faces away from the piston). Apply food lubricant.
- Add the washer to the threaded end of the piston.
- Add the spring to the threaded end of the piston.
- Install the head insert (bevel side first) into the head tube.
- Insert the locking collar (wide end down) towards the flared end of the head tube.
- Insert the piston assembly through the head tube and collar.
- Screw the knob onto the plunger by rotating clockwise.
- Install the smaller O-ring onto the discharge tube and the larger O-ring into the valve body (apply lubricant).
- Install the cylinder onto the valve body, pressing down and rotating clockwise to secure.
- Install the discharge tube onto the valve body, pressing down and rotating clockwise to secure.
- Select your lid, slide it over the discharge tube, and insert the plunger into the cylinder.
Operation and Control Functions
The unit features digital temperature control. The temperature range is 37°C (100°F) to 104°C (220°F). The display shows status messages: COL (Cooling down), PRE (Heating up), and ERR (Error). To switch between Celsius and Fahrenheit, turn the unit off, then press and hold the Down button while simultaneously pressing and holding the Power button for 30 seconds.
Cleaning and Maintenance
Daily Cleaning: Disassemble the unit, wash all parts with dishwashing soap and hot water, rinse, and sanitize. Do not use abrasive brushes or pads on the heat plate as this will damage the Teflon coating. Wipe external surfaces daily with a clean damp cloth.
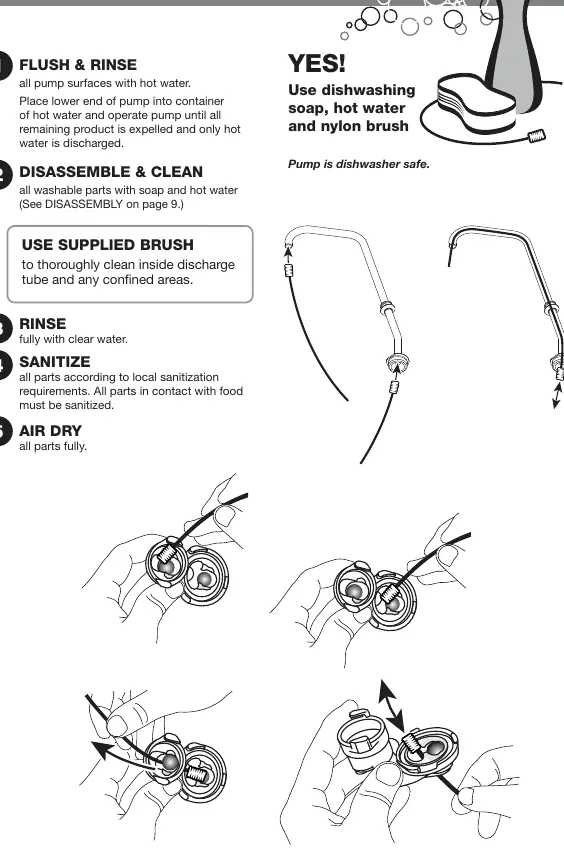
Clean-in-Place Procedure: For pumps, flush with hot water, then pump a mixture of 5 mL dishwashing detergent and 0.95 L hot water. Rinse with hot water, sanitize with a mixture of 30 mL KAY-5 Sanitizer/Cleaner and 9.5 L tap water, and perform a final rinse.
Lime Scale Removal: Use a non-corrosive lime scale remover once a month or as needed to eliminate mineral buildup in the basin.
Troubleshooting
- Unit does not heat: Ensure the cord is plugged in, power is available, the unit is on, the thermostat is set, and the basin has the correct amount of water.
- Unit trips the breaker: Ensure electrical components are dry. If wet, turn off, unplug, and allow to dry completely.
- Pumping inconsistent: Clean the pump thoroughly, especially the discharge tube and stainless steel balls. Check all seals and O-rings.
- Plunger doesn't return: Inspect the spring for damage and ensure the washer is installed on the piston.
- Product oozes: Ensure the seal assembly is firmly installed on the piston head with the flared end facing down.
Practical help
Common problems
Unit does not heat
Check power connection, ensure unit is ON, verify thermostat setting, and confirm water level in basin.
Unit trips the breaker
Check for wet electrical components. Turn off, unplug, and allow to dry completely.
Pumping inconsistent
Clean pump thoroughly, including discharge tube and valve body balls. Check seals and O-rings.
Plunger does not return
Inspect spring for damage and ensure washer is installed on the piston.
Product oozes out around locking collar
Ensure seal assembly is firmly installed on the piston head with the flared end facing down.
Before use
- Wash all parts properly before every use.
- Fill unit basin with 1 liter of water to the fill-line-ridge.
- Ensure unit is on a stable surface.
- Verify power source matches 230V requirements.
- Ensure all seals and O-rings are properly installed.
Specs in practice
- Temperature Range
- 37°C (100°F) to 104°C (220°F).
- Rethermalization
- Elevates food from 4°C (40°F) to 74°C (165°F) within 2 hours.
- Hot Food Holding
- Maintains food at or above 66°C (150°F).
Images and diagrams
- Pump Assembly: Illustrates the correct order of components from the piston to the knob.
- Wiring Diagram: Shows internal electrical connections for the 230V unit.
- Unit Set-up: Shows water filling level and placement of pans.
Model compatibility
- Not acceptable for dispensing potentially hazardous foods (NSF listing).
- Use only approved food equipment lubricant.

Manual page author
Michael Turner
Technical manual editor
Reviews PDF manuals for structure, safety notes, and practical product details so readers can find the right information quickly.