Home Appliances / Commercial Kitchen Equipment
User Manual for Server FS and FSP Fudge Server
Quick guide for the Server FS and FSP Fudge Server. Includes setup, rethermalization, hot food holding, cleaning, and troubleshooting instructions.
Table of contents
Manual images
Click an image to enlargeQuick Guide from the Manual
The Server FS and FSP Fudge Servers are designed for rethermalization and hot food holding. To ensure safe operation, always use the spacer beneath the food container, fill the water basin with exactly 2.5 cups (20 oz/0.59 liter) of water, and never place food directly into the water basin. Ensure the unit is grounded and plugged into a proper power source.
Safety Information
- Electrical Shock Hazard: The unit must be earthed or grounded. Ensure all three prongs on the cord plug are connected to the power source.
- Food Safety: Monitor food temperatures closely. Rethermalization should bring food from 40°F (4°C) to 165°F (74°C) within 2 hours. Maintain hot food at or above 150°F (66°C).
- Caution: The unit gets hot. Allow it to cool before handling or cleaning.
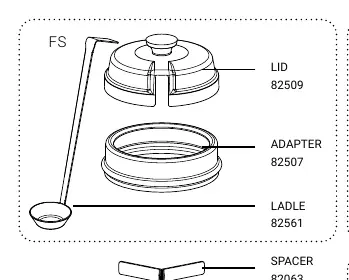
Parts Identification
The FS model includes a lid, adapter, and ladle. The FSP model includes a pump. Both units utilize a water vessel basin, a base, and a spacer. Units 82110 and 84580 include a stainless steel jar (item #94009).
Unit Set-up
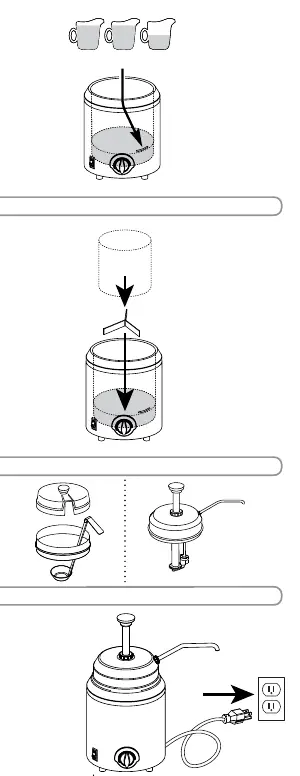
- Fill Water Basin: Add 2.5 cups (20 oz/0.59 liter) of water to the water level line. Do not overfill. Filtered water is recommended to prevent corrosion.
- Insert Spacer: Always place the spacer at the bottom of the basin.
- Insert Food Container: Place the food (in a #10 can or stainless steel jar) into the basin. Never place food directly into the water vessel.
- Install Accessories: Attach the lid or pump.
- Power On: Plug in the cord and press the switch to the ON position.
- Set Thermostat: Pull the knob out to adjust. The range is 75°F–210°F (24°C–99°C). Push the knob in to lock.
Rethermalization and Hot Food Holding
Rethermalization: Preheat the unit for at least 5 minutes with water, lid closed, and thermostat at maximum. Add preheated food (150°F/66°C) and maintain at 165°F (74°C).
Hot Food Holding: Maintain food at or above 150°F (66°C). Do not add cold food to the unit while hot food is being held.
Unit Take-down

- Turn the switch to OFF and unplug the unit.
- Allow the unit to cool.
- Remove the pump/lid, food container, and spacer.
- Empty the water from the basin after each use.
- Dry the unit thoroughly with a soft cloth.
Cleaning and Maintenance
- Daily Cleaning: Wash removable parts with dishwashing soap and hot water. Rinse and sanitize according to local requirements.
- External Surfaces: Wipe daily with a clean damp cloth and dry.
- Stainless Steel Care: Do not use abrasive, caustic, or ammonia-based cleansers. Avoid metal scrapers or pads that can scratch the surface.
Troubleshooting
If the unit does not heat, ensure the cord is securely plugged in, the power source is active, the unit is switched on, the thermostat is set correctly, and the water basin has the correct amount of water. If moisture is suspected in electrical components, discontinue use and allow to air dry.
Practical help
Common problems
Unit does not heat
Check power connection, ensure switch is ON, verify thermostat setting, and ensure correct water level in basin.
Pitting on inside surface of vessel
Empty water from basin daily, dry thoroughly after each use, and use filtered water if possible.
Before use
- Wash all removable parts before first use.
- Fill water basin with 2.5 cups (20 oz/0.59 liter) of water.
- Ensure spacer is placed in the bottom of the basin.
- Place food in a #10 can or stainless steel jar (do not place food directly in basin).
- Ensure unit is plugged into a grounded outlet.
Specs in practice
- Thermostat Range
- 75°F–210°F (24°C–99°C) with 5°F increments.
- Water Capacity
- 2.5 cups (20 oz/0.59 liter) to the water level line.
- Food Capacity
- Maximum 3 quarts (96 oz/12 cups).
Images and diagrams
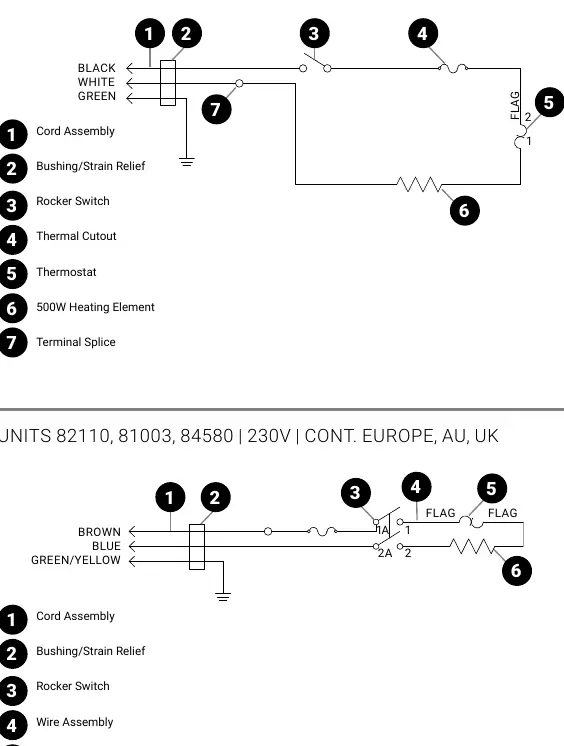
- Wiring diagrams are provided for 120V (USA) and 230V (Europe/AU/UK) models, detailing the cord assembly, switch, thermal cutout, thermostat, and heating element connections.
Model compatibility
- Use #10 can or stainless steel jar (item #94009) for food.
- See separate pump manual for specific pump instructions.

Manual page author
David Miller
Documentation analyst
Organizes user manual content into clear summaries, with attention to model details, product context, and everyday usability.