General / Mounts Stands
Installation Guide for SIIG 04-1418A Heavy Duty Desk Mount Single Monitor Arm
Step-by-step installation and adjustment guide for the SIIG 04-1418A monitor arm. Includes instructions for clamp mounting, VESA plate attachment, cable management, and tension adjustment for monitors up to 49 inches.
Table of contents
Manual images
Jump to the sectionQuick guide from the manual
This document provides instructions for installing and configuring the SIIG 04-1418A monitor arm. The most critical steps involve ensuring the clamp is balanced correctly during installation and adjusting the tension screw to match the weight of your monitor. Failure to balance the clamp or adjust tension correctly may result in instability or improper arm movement.
Parts list
Ensure all parts are present before beginning installation:
- A: VESA Plate
- B: M5x30 Screw
- C: Base component
- D: Hex keys (#3, #4, #6)
- E: Monitor Arm
- F: Clamp assembly
- H: M4x10 Screws
- I: Base cover
- J: Base plate
Clamp installation
The clamp can be adjusted to fit different desk thicknesses. Follow these steps:
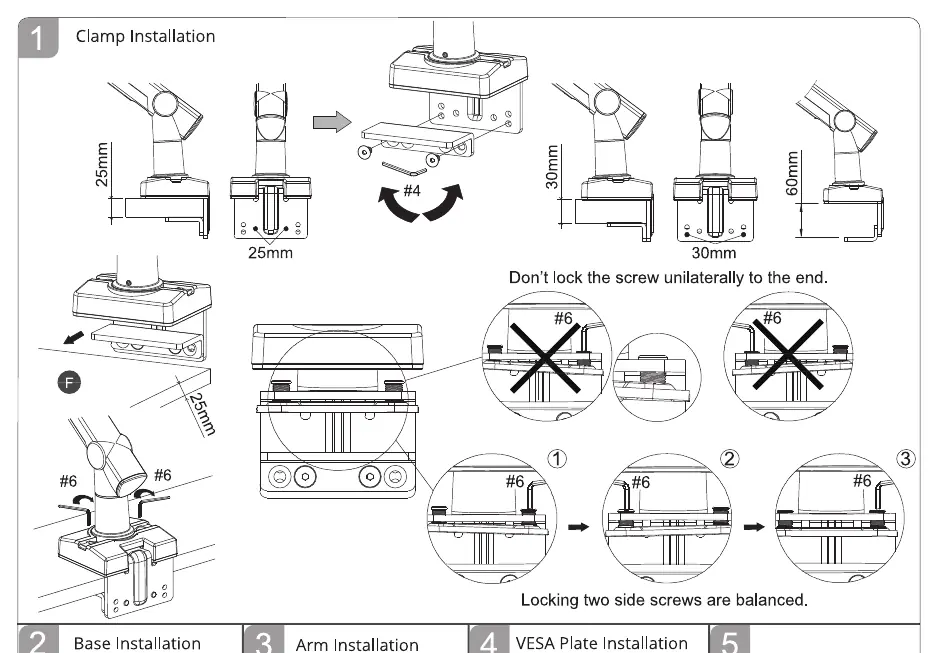
- Attach the clamp assembly (F) to the desk edge.
- Use the #4 hex key to adjust the clamp width to fit your desk thickness.
- Important: Do not lock the screw unilaterally to the end. Ensure the two side screws are balanced and tightened evenly to maintain stability.
Base and arm installation
- Install the base assembly (C, I, J) onto the desk using the clamp.
- Insert the monitor arm (E) into the base.
- Secure the arm using the provided hardware.
VESA plate installation
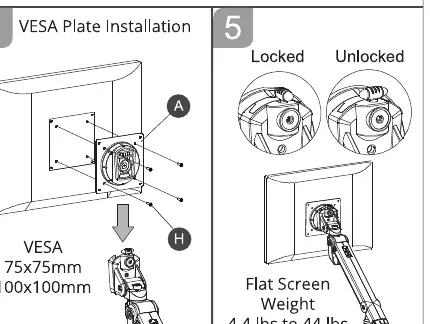
- Attach the VESA plate (A) to the back of your monitor using the M4x10 screws (H).
- Ensure the VESA pattern matches your monitor (75x75mm or 100x100mm).
- Slide the monitor with the attached plate onto the monitor arm.
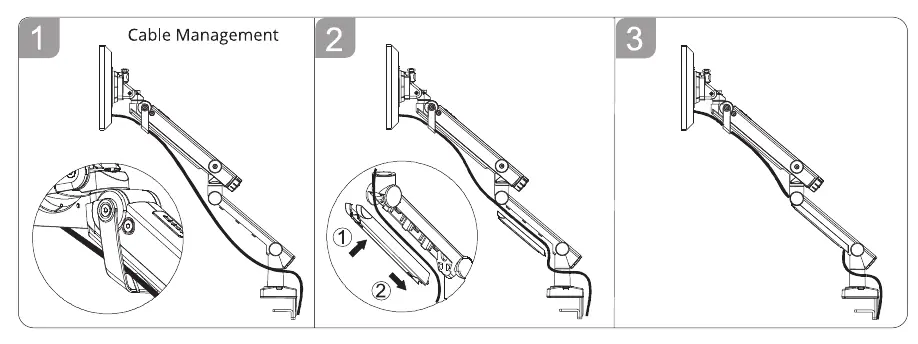
Cable management
Route your cables through the integrated cable management clips on the arm to keep your workspace organized and prevent cable strain during arm movement.
Adjustments
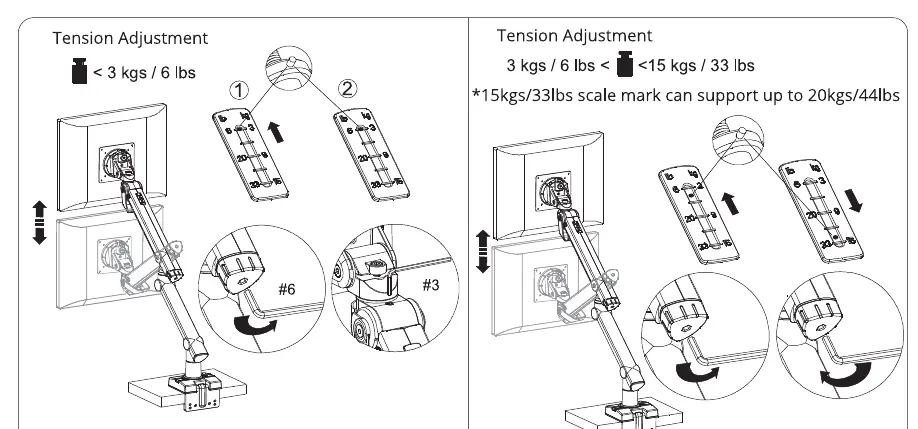
Tension adjustment
Adjust the tension based on your monitor's weight:
- For monitors < 3kg (6 lbs): Use the #6 hex key to adjust tension as indicated.
- For monitors 3kg to 20kg (6 lbs to 44 lbs): Use the #6 hex key to increase or decrease tension until the monitor stays in the desired position.
Tilt and rotate adjustment
Use the #4 hex key to adjust the tilt and rotation tension at the VESA mount head to ensure the monitor stays at your preferred angle.
Manufacturer information
SIIG, Inc.
Practical help
Common problems
Monitor sags or drops after mounting
Increase the tension using the #6 hex key on the arm adjustment screw.
Monitor rises automatically
Decrease the tension using the #6 hex key on the arm adjustment screw.
Clamp feels unstable
Ensure both side screws on the clamp are balanced and tightened evenly.
Before use
- Verify monitor weight is between 2kg and 20kg (4.4 lbs to 44 lbs).
- Check that monitor VESA pattern is 75x75mm or 100x100mm.
- Ensure desk thickness is compatible with the clamp range.
- Have the included hex keys (#3, #4, #6) ready for installation.
Specs in practice
- Weight Capacity
- Supports monitors from 2kg (4.4 lbs) to 20kg (44 lbs).
- VESA Compatibility
- Supports 75x75mm and 100x100mm mounting patterns.
- Monitor Size
- Designed for screens up to 49 inches.
Images and diagrams
- Clamp installation diagrams show how to adjust for different desk thicknesses and emphasize balancing the side screws.
- Tension adjustment diagrams illustrate how to set the arm resistance based on monitor weight.
Model compatibility
- Do not exceed the 20kg weight limit.
- Ensure the desk surface is sturdy enough to support the arm and monitor weight.

Manual page author
David Miller
Documentation analyst
Organizes user manual content into clear summaries, with attention to model details, product context, and everyday usability.