Power / Solar Charge Controllers
User Manual for ECO-WORTHY 30A Solar Charge Controller ECOS 30-U
Quick guide for the ECO-WORTHY 30A Solar Charge Controller (ECOS 30-U). Includes installation steps, wiring diagrams, parameter settings, error codes, and troubleshooting.
Table of contents
Manual images
Click an image to enlargeQuick guide from the manual
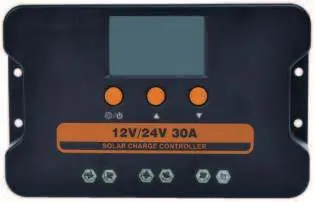
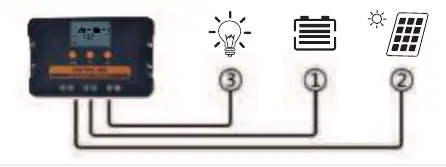
The ECO-WORTHY 30A Solar Charge Controller is designed for 12V/24V systems. Important: Always connect the battery to the controller first, then connect the solar panels. The controller will start automatically. If you experience technical issues, ensure the battery voltage is within the 10-60V range and check all wiring, fuses, and breakers.
Installation
Follow these steps to mount and connect the controller:
- Mounting: Measure and drill 4 holes (6mm diameter) on the wall. Secure the controller using M4 self-drilling screws. Ensure the installation area is dry and well-ventilated.
- Wiring: Connect the battery to the battery terminals (BAT+/BAT-), then connect the solar panels to the PV terminals (PV+/PV-). Connect DC loads to the load terminals (LOAD+/LOAD-).
- Safety: Do not wear jewelry during installation. The controller should be installed by a qualified electrician.
Operation and Settings
The controller features an LCD display and three buttons for navigation and settings:
- Navigation: Long press the button for 3 seconds to enter the Setting Page. Short press to cycle through pages.
- Adjusting Parameters: When a number flashes, use the Up and Down buttons to change the value. Long press the SET button to save changes.
- Inactivity: The controller will return to the Home Page after 5 seconds of inactivity.
- Battery Types: Supports FLD (default), GEL, SLD, LiFePO4, and CUS (custom) battery types.
- Output Modes: Includes various light control and time control modes (0-15), as well as manual control (16-17).
Troubleshooting
If the controller displays an error code, refer to the following list:
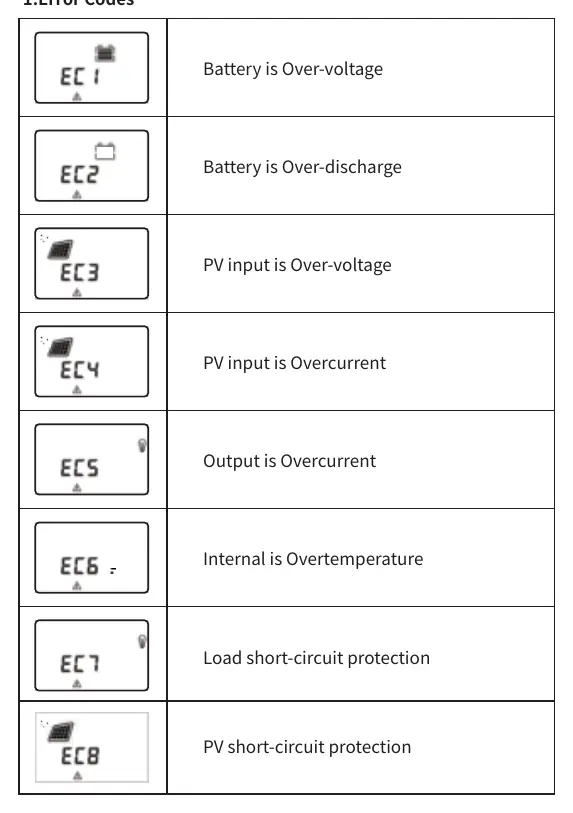
- EC1: Battery is Over-voltage.
- EC2: Battery is Over-discharge.
- EC3: PV input is Over-voltage.
- EC4: PV input is Overcurrent.
- EC5: Output is Overcurrent.
- EC6: Internal is Overtemperature.
- EC7: Load short-circuit protection.
- EC8: PV short-circuit protection.
If the screen does not turn on, test the battery terminal voltage with a multimeter. If the reading is 10-60V but the screen is off, contact support.
Technical Specifications
- Model: ECOS 30-U
- Max Charge/Output Current: 30A
- System Voltage: 12V/24V auto recognition
- USB Port: 5V/2A x 2
- Operating Temperature: -20 to +60°C
- Protection Level: IP32
Practical help
Common problems
Screen and LED indicator won't turn on
Test battery terminal voltage with a multimeter. If 10-60V, contact supplier. Check wiring, fuse, and breaker.
Controller is not charging
Check wiring, fuse, and breaker. Ensure PV input voltage is higher than battery voltage.
Battery SOC is too low
Add more solar panels to the system or increase battery bank capacity.
Before use
- Check battery voltage (12V or 24V)
- Ensure wiring order: Battery first, then Solar Panels
- Verify cable gauge (11AWG/9AWG)
- Install in a dry, well-ventilated area
- Do not wear jewelry during installation
Specs in practice
- System Voltage
- 12V/24V auto recognition
- Max. PV Input Voltage
- 25V for 12V systems; 50V for 24V systems
Images and diagrams
- Wiring order: Battery -> Controller -> Solar Panels
- Mounting: 4 holes, 6mm diameter, M4 screws
Model compatibility
- Compatible with FLD, GEL, SLD, LiFePO4, and CUS battery types
- Values for 12V batteries must be doubled for 24V batteries

Manual page author
Michael Turner
Technical manual editor
Reviews PDF manuals for structure, safety notes, and practical product details so readers can find the right information quickly.