Power / Solar Charge Controllers
User Manual for Falcon MPPT Solar Charge Controller FN-MPPT1050-BT
Quick guide for the Falcon MPPT Solar Charge Controller (FN-MPPT1050-BT). Learn about installation, Bluetooth app setup, load timer modes, LED indicators, and technical specifications.
Table of contents
Manual images
Click an image to enlargeQuick Guide from the Manual
The Falcon MPPT Solar Charge Controller is designed for 12V solar systems. To ensure proper operation, follow the specific connection order: Load first, then Battery, then Solar Panel. The controller features Bluetooth connectivity for monitoring and configuration via the 'solarlife' app.
Installation
The controller must be connected in a specific sequence to prevent damage:
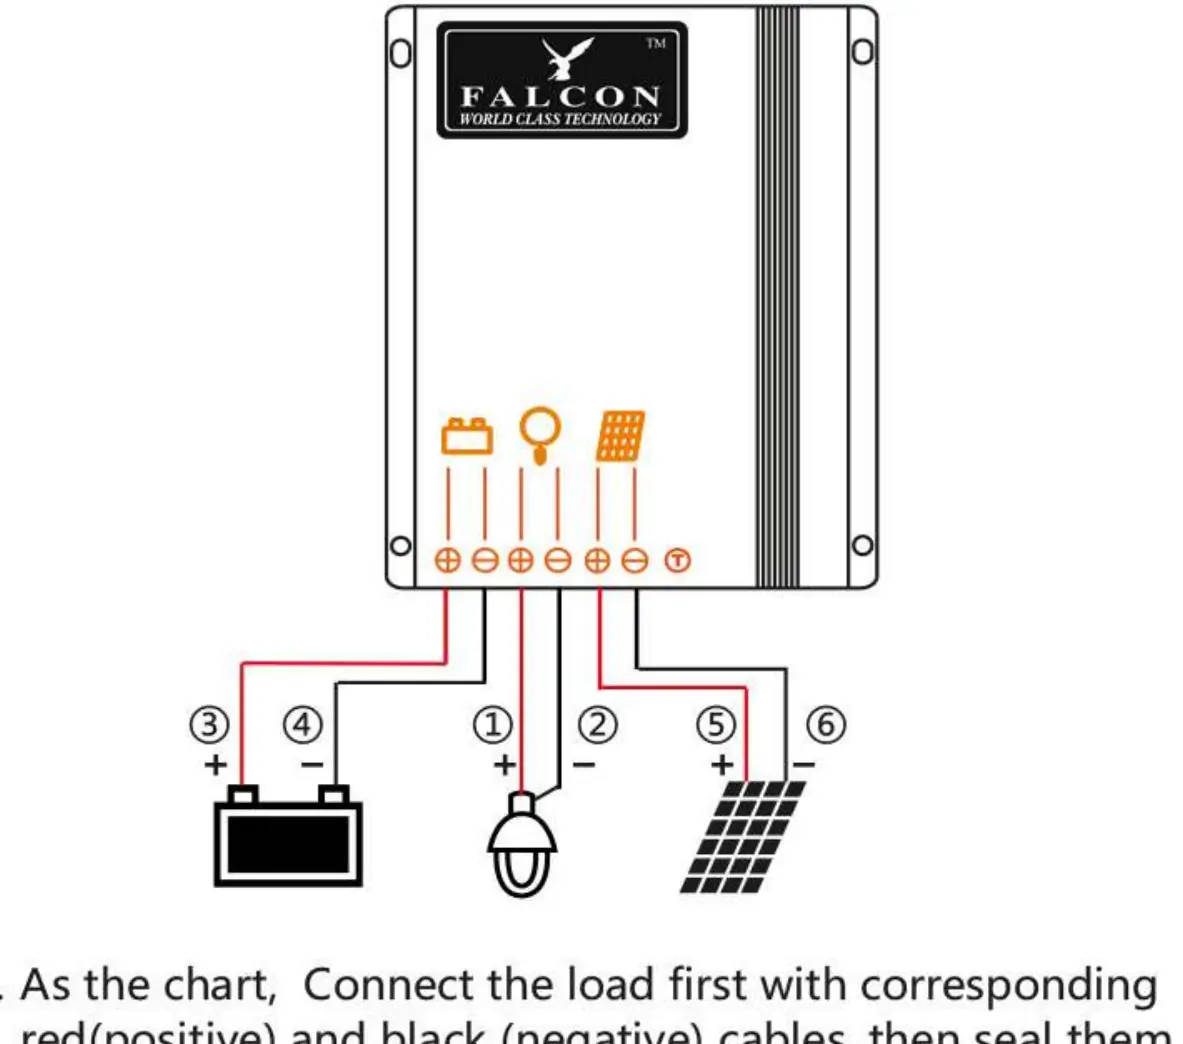
- Connect the load first with corresponding red (positive) and black (negative) cables, then seal with tape.
- Connect the battery with corresponding positive and negative cables; the load will turn on.
- Connect the solar panel with corresponding red (positive) and black (negative) cables; the controller begins charging.
Ensure the wire length between the battery and controller is as short as possible. The recommended wire size is 2.5mm².
Starting Up
Upon power-up, the controller performs a self-test. The factory default setting is for Gel batteries. If using Lithium, AGM, or Liquid batteries, you must verify and amend the settings via the mobile app. If the battery voltage at start-up is not within 10V-15V, refer to the Faults and Alarms section.
Bluetooth and App Installation
Search for 'solarlife' in the Google Play Store or Apple App Store. The app allows you to monitor real-time data, battery status, and adjust charging parameters (Boost, Equalization, Float voltages) for Liquid, Gel, or AGM batteries. For Lithium batteries, you can set overcharge protection and recovery voltages.
Load Output Timer Modes
The controller supports advanced day/night time control functions:
- Standard (24H): Load is always on.
- Dusk to Dawn (D2D): Load turns on at sunset and off at sunrise.
- Five-stage Night Mode: Allows individual timing and dimming settings for different periods throughout the night.
- TOT Mode: Sets the load to turn on for a specific duration before dawn.
LED Indicators and Troubleshooting
The LED display provides status updates:
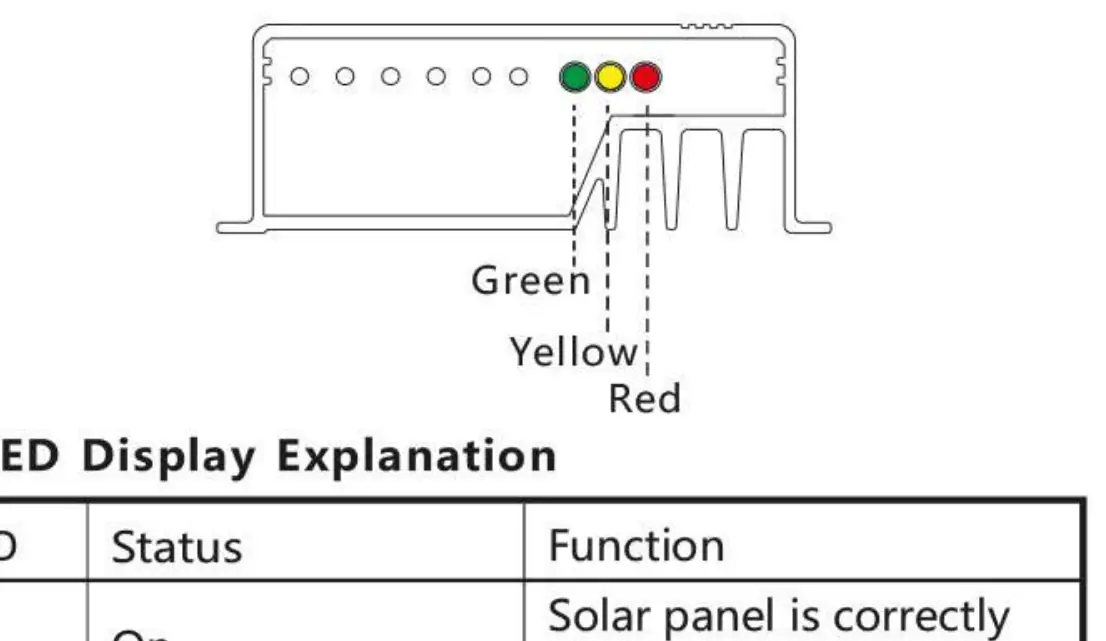
- Green LED: On (Solar connected), Fast flash (MPPT charging), Flash (Equal/Boost charging), Slow flash (Charging).
- Yellow LED: On (Battery normal), Fast flash (Low voltage protection).
- Red LED: On (Output power is 0), Flash (Over temperature), Fast flash (Short circuit or over current).
If loads are not powered, check for low battery capacity, overload, or short circuit. If the battery is not charging, check the PV panel and wiring connections.
Safety and Technical Data
The controller is IP67 waterproof and protected against reverse polarity, short circuits, and over-temperature. Do not exceed the maximum input power of 150W (at 12.8V). The system voltage is 12V, and the maximum charging current is 10A.
Manufacturer information
Falcon Electronics
Practical help
Common problems
Loads are not powered
Check for low battery capacity, overload, or short circuit. Switch off all loads; the controller will reconnect after 1 minute.
Battery not charging
Check PV panel fault or reverse connection.
High voltage at battery terminal
Check if other sources are overcharging the battery. If not, the controller may be damaged.
Before use
- Ensure battery voltage is within 10V-15V at start-up.
- Connect the load first, then the battery, then the solar panel.
- Use 2.5mm² wire for battery and controller connections.
- Download the 'solarlife' app for Bluetooth configuration.
Specs in practice
- Max Charging Current
- 10A
- Max Input Power
- 150W (at 12.8V lithium battery)
- Protection Degree
- IP67 (waterproof)
- System Voltage
- 12V
Images and diagrams
- Installation diagram shows the correct order: Load (3/4), Battery (1/2), Solar Panel (5/6).
- LED indicators show status: Green for charging/MPPT, Yellow for battery status, Red for faults.
Model compatibility
- Compatible with Lithium, Liquid, Gel, and AGM batteries.
- Bluetooth 5.0 and BLE technology supported.

Manual page author
David Miller
Documentation analyst
Organizes user manual content into clear summaries, with attention to model details, product context, and everyday usability.