Lighting / Outdoor Lighting
User Guide for Solar Lighting Direct Post Topper 2-Pack
Quick guide for the Solar Lighting Direct Post Topper 2-Pack. Includes installation steps for 3-inch and 4-inch posts, charging requirements, and troubleshooting tips.
Quick answers from the manual
Quick answer
- The Solar Lighting Direct Post Topper 2-Pack is a solar-powered light for 3-inch or 4-inch posts. It requires 6 hours of direct sunlight to charge and provides 8-10 hours of operation. p. 1
Key actions
- Activate the light by opening the battery cover and removing the plastic tab. p. 1
- Install on 3-inch post by fixing the unit directly to the post. p. 1
- Install on 4-inch post by attaching the mounting base first. p. 1
First start
- Remove the plastic tab from the battery compartment to activate the light. p. 1
Problems and fixes
Light won't turn on
Check if the switch is on. If the battery is flat, charge in direct sunlight for 1-2 days.
p. 1Maintenance and reset
- Clean the solar panel if the light duration is short. p. 1
Technical specifications
| Parameter | Value | Meaning | Pages |
|---|---|---|---|
| Charging Time | 6 hours | Time required to charge the battery. | p. 1 |
| Operation Time | 8-10 hours | Duration of light operation. | p. 1 |
Where to find it in the PDF
- Instruction Guide p. 1
Table of contents
Quick guide from the manual
The Solar Lighting Direct Post Topper 2-Pack is designed for outdoor use. For optimal performance, ensure the unit is placed in a location that receives a minimum of 6 hours of direct sunlight daily. Avoid installing near street or porch lights, as this may interfere with the automatic day/night sensor.
Package Contents
- 2 x Light Fittings
- 2 x Mounting Bases
- 2 x Packets of Fixings
Features
- Automatic Day/Night Operation
- Approximately 8-10 hours of operation
- Charging time: 6 hours
Installation
Installation to suit 3-inch post
- Remove contents from packaging.
- Choose an installation location that receives maximum direct sunlight throughout the day.
- Open the battery cover on the underside of the fitting and remove the plastic tab to activate the unit.
- Fix the Post Top directly on top of your post using the supplied fixing screws.
Installation to suit 4-inch post
- Follow steps 1-3 above.
- Install the mounting base to the top of your post using the supplied screws.
- Place the Post Top onto the mounting base and secure with the screws on either side.
Troubleshooting
If the light does not turn on, ensure the switch is in the 'on' position. If the battery is flat due to cloudy weather, charge the light in direct sunlight for 1-2 days. If the light stays on for only a short time, clean the solar panel and ensure it is not covered by dust or leaves. For battery failure, contact SLD Customer Service.
Practical help
Common problems
Light won't turn on
Check if the switch is turned on. If the battery is flat due to lack of sunlight, charge in direct sunlight for 1-2 days.
Light stays on for a short amount of time
Clean the solar panel of dust or leaves. Ensure the installation site receives enough direct sunlight. Charge for 1-2 days with the switch off.
Battery failure
Contact SLD Customer Service to purchase new batteries.
Before use
- Ensure the installation location receives a minimum of 6 hours of direct sunlight.
- Avoid installing under street or porch lights to prevent interference with the automatic sensor.
- Open the battery cover on the underside of the fitting.
- Remove the plastic tab to activate the fitting.
Specs in practice
- Charging Time
- 6 hours of direct sunlight required for a full charge.
- Operation Time
- Approximately 8-10 hours on a full charge.
Images and diagrams
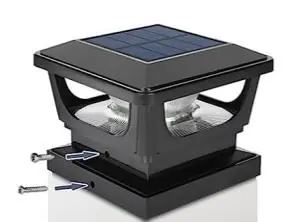
- The manual provides visual instructions for mounting the light directly to a 3-inch post or using the mounting base for a 4-inch post.
Model compatibility
- Designed for 3-inch and 4-inch posts.

Manual page author
Emily Carter
User documentation editor
Prepares concise manual descriptions and highlights the most useful setup, operation, and maintenance information for readers.